How to draw a birch leaf
Let's now look at the stages of drawing a birch leaf . Although it is not so often that you have to draw a birch leaf. But you also need to be able to depict a sheet correctly and beautifully on a sheet of paper. It even seems to me that the birch leaf is the easiest to draw.
After all, the leaf plate is shaped a little like a heart, and even a small child can draw a heart.
Therefore, there will not be much trouble in drawing a birch leaf. The main thing is to draw the sheet step by step ( step by step ).
- We will draw three leaves on one petiole. We draw a branched petiole, and on it leaves, which should resemble a heart in shape. After all, birch leaves are heart-shaped.
- After this, we round off the leaf sections and add cloves to these sections.
- And on the very main vein of the leaf we draw a few more veins.
That's all there was to it. Now you have not only learned to draw a birch leaf, but also learned that a leaf consists of petioles, a leaf blade and veins. And you already know that the birch leaf is heart-shaped. And the shape of the edge of the plate is jagged. Remember one more simple thing: the birch leaf has pinnate-reticulate veining. After you have drawn a leaf and at the same time studied its structure, start coloring. Take watercolors or colored pencils and finish your work.
www.stranainform.ru
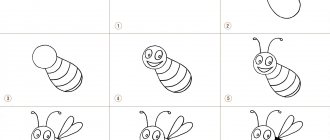
How to draw a birch leaf with a pencil step by step
Drawing lesson on how to draw a birch leaf, a birch leaf with an “earring” with a pencil step by step for beginners.
Here is our original.
First we draw a straight line, which is located in the middle of the sheet, then with very thin lines we draw this shape. Only then do we make the edges uneven and erase the previously drawn contour curves.
Now we draw the veins on the leaf and the outline of the earring in a very light tone.
Next, use very tight circular movements (curl method) to fill the entire space of the earring. Shade the leaf and the birch leaf drawing is ready.
See more lessons:
1. How to draw a maple leaf.
2. How to draw an oak leaf.
3. How to draw an acorn.
www.lesyadraw.ru
How to draw a weeping birch tree in the fall with your child step by step
Content
There is no more useful and enjoyable activity for children than drawing objects they know. In today's drawing lesson we will depict a small beautiful birch tree with autumn leaves. This is the easiest way for children in the older group, first graders or children who have moved to 2nd grade. Our birch tree is somewhat reminiscent of a fairy tale. Shall we draw?
1
Birch trunk
Thicker at the bottom, pointed at the top.
2
Bark
Most often it is white with black strokes.
3
Main branches
The branches growing on the trunk form the lush crown of the birch. One by one we draw a branch.
4
small twigs
Draw thin branches on the main ones that are lowered down.
The main branches grow upward, the small ones hang down.
5
Correcting the contours
We add volume to the main branches.
6
Add black
Use a simple pencil or black pen to shade the spots on the white bark. Draw small branches.
7
Leaves
A birch leaf resembles a small heart. Draw larger leaves on the lower branches and smaller leaves on the top. Leave the topmost branches without leaves, do not forget that we are drawing a tree in the fall. At this time the leaves fall.
8
Coloring
You can color with colored pencils or paints. Now you have learned how to draw another tree that can complement any autumn landscape.
You can do this online.
Choose how you want to paint.
9
Collage
Step by step instructions on how to draw a Russian birch tree.
If you see an error, please select a piece of text and press Ctrl+Enter.
evrikak.ru
How to draw a birch » Prostoykarandash.ru
1. Draw a vertical center line indicating the birch trunk. We mark with a short horizontal stroke the place where the tree trunk branches into three main branches. We outline the main boundaries of the future image in the sheet: we draw inclined lines tending upward, along the movement of the plant’s growth, on the right and left, limiting the main group of branches at the top of the composition and at the bottom - at the extreme points of the hanging branches.
2 . How to draw a birch tree, focusing on the upper inclined lines, from the intended point on the axis of the trunk we draw light dashed lines that determine the directions of the three main branches.
3. On the main center line we mark the places where the birch trunk branches and the branches on the axes of the lateral branches. We easily and airily outline the thickness of the tree trunk and its branches, paying attention to their proportions relative to each other. We mark the location in space of additional, thinner branches with lines corresponding to their shape and movement.
4. How to draw a birch : checking with nature, on the center lines of the branches we mark with horizontal strokes the places where the birch branches branch into thinner branches. We outline the width of additional branches on the side branches of the tree.
5. From the places marked on the axes, draw the initial shape of small branches. We determine their location in space with straight, light strokes in the direction of their rhythmic movement.
6. How to draw a birch : draw the shape of small branches more softly, noting their thickness and emphasizing it in shadow places. Using smooth strokes we show the places of branches on the trunk and main branches of the tree.
7. Consulting with nature, we emphasize the plasticity of the trunk and branches of the birch, the branches in the foreground, with clearer strokes and lines, thereby revealing the original volume of nature.
8. On the trunk and branches, we mark the places of elements (spots) characteristic of birch on the tree bark with light dotted strokes.
9. How to draw a birch : along the trunk and branches of the birch - with light shading in the foreground and shading in the background - we outline our own shadows.
10. We emphasize the three-dimensional shape of the trunk and branches of the tree, enhancing the deeper shadows on the surface of the bark, emphasizing the places of branches.
11. Using light strokes we outline the birch leaves, combining them into a common mass and without specifically drawing each one separately.
12. at the last stage of how to draw a birch , we enhance the contrast of plans: we emphasize the foreground (branches, foliage) and soften the background, slightly shading and generalizing the image. Using chalk strokes we emphasize the whiteness of the surface of the birch bark in the illuminated part and highlight more clearly the characteristic black spots on the surface of the trunk, branches and twigs of the tree.
source: https://www.drulber.ru
Attention! You do not have permission to view hidden text.
prostoykarandash.ru
Drawing a birch from life
I have two lessons on this topic, and I will divide the topic into two articles so as not to overload with pictures. Therefore, read and learn to draw a birch tree using both.
How to draw a birch tree?
The answer suggests itself: from nature!
Moreover, I already drew and told you how to draw a poplar. Then I became very enthusiastic and was ready to move mountains. Or rather, draw forests. Which tree will be the next hero? Birch of course! “What Russian person doesn’t like birch trees?”
Where can I find a suitable beautiful birch tree? Was there a birch tree in the field? It turned out that near our city the fields are flat and there are no trees. You also walk in the forest - you look out... There seem to be white trunks in the distance, you approach - these are alder and aspen. The excursion into the forest was wonderful, but I didn’t find a birch tree. Okay, the city is full of them.
I have always been proud of our green city, but now, when I began to devote walks to finding interesting and beautiful ones, I realized that our city is not just green, but also very dense. Birches grow both together and apart, but not alone, but always in a row of other trees. All the streets are like a park. But to make it clear and beautiful, you need to choose a single tree, and best of all against the sky. Well, two such birch trees were found, thank God.
But keep in mind that you need to draw in the city, there are a lot of people around. And man is an inquisitive creature. It’s not so easy to sit alone on a folding chair and concentrate on drawing a tree (and even periodically photograph the picture), if people come up and are interested. However, my birches did not grow in the park and the people did not walk past idlely, no one asked me to draw their portrait, they just looked at my picture and praised me (thanks to them).
I appeal to all my readers: if you see a person who draws from life, then think, maybe he is shy for the first time and (probably, you shouldn’t bother him - attention is a flattering thing, if you are a seasoned artist and have already developed aplomb. And from unaccustomed the artist is very uncomfortable under the gaze of strangers. Well, you understand what I mean.
But let's move on to the first lesson.
First, we mark the trunk and large branches with a pencil. We outline the shape of the crown and then use large strokes to detail it.
Now who cares, I will continue to draw with a felt-tip pen. Although in the song the birch tree is called “curly”, depicting foliage, as is often customary for children with curls, is of course dishonest.
The birch crown is quite loose and the leaves do not merge into one mass. We will show you in detail.
In the light the foliage is simply green, but in the shade it is almost black. Things like this: in spring the leaves are light and fresh, but now summer is in full swing.
This is how the first birch turned out. And now I invite you to the second lesson “Drawing a birch 2”.
Marina Novikova told you how to draw a birch.
Tags: how to draw trees, drawing a tree, drawing lessons step by step