In this lesson, we have published several step-by-step master classes that clearly show how to make birds from plasticine with your own hands. Let's look at the step-by-step steps of sculpting a crow and a woodpecker. First, tell your children interesting information about these birds, and then proceed to carry out your plans.
Birds are amazing creatures of nature that literally fill our lives with new meaning. They can be colorful, such as parrots, hummingbirds, flamingos or other exotic birds, or seemingly inconspicuous, such as crows, sparrows and others. But they are all amazingly beautiful, graceful and lead a special way of life.
In both the first and second cases, the main color of the plasticine will be black. Only the first craft will be completely dark, and the second will be diluted with white and red.
How to make a crow step by step
To sculpt a bird you need to prepare:
- plasticine set;
- stack.
Step 1 . Prepare a black block of plasticine. You need 1 or more pieces, depending on the size of the craft you plan to make.
Step 2 . Sculpt the body of the bird. Make an elongated part - a pear. If there is not enough plasticine, then inside mask any other shade, damaged plasticine, or a rolled up piece of foil.
Step 3 . Glue a small black ball at the wide part of the pear and smear the plasticine at the joint. Connect the head and torso. The skeleton of the crow will be ready.
Step 4 . Move on to the flat parts: the tail and two wings. Make models of triangles and drops, also leave a little black plasticine for the crow's beak, because it is also black.
Step 5 . Glue 2 wing drops on the sides of the body, and begin to bring out small hangnails in a stack, thereby imitating feathers. If the plasticine is dense, then at this stage you can use small scissors; they can simply cut out such small corners, completely filling the surface of the wings.
Step 6 . Perform identical operations on both wings. After you do this, do not touch the top with your fingers so as not to press down the selected corners (feathers). Attach a tail that flares to the bottom at the back.
Step 7 . All that remains is to design the head. Turn the last small piece of plasticine into a beak. This will be a small cone, glue it in front and carefully bend it down. Glue 2 gray circles as eyes with pupils. Only these lighter spots will stand out against the otherwise dark background.
Step 8 . The bird should also have legs; make these parts from black and gray pieces. Glue small cones in wide parts to the body, and on the bottom - legs.
The crow figurine is ready.
If desired, you can carefully mix blue into black plasticine to make the plumage believable, with a beautiful tint. Everything is simple and clear.
Abstract of GCD in the preparatory group on the topic “Migratory Birds” (modeling)
ABSTRACT
NODE ON ARTISTIC AND AESTHETIC DEVELOPMENT (STYLE)
ON THE TOPIC "MIGRATORY BIRDS"
Program content:
1. Expand and consolidate children’s ideas about migratory birds: cuckoo, nightingale, swallow, rook, starling;
about the body parts of birds. 2. Learn to sculpt a bird from plasticine using a plastic method, pulling out parts from a whole piece and in a constructive way, observing the location and relationship of body parts, connecting the parts, pressing them together. 3. Continue learning how to use the stack. 4. Develop the ability to work with your hands, fine motor skills of the fingers, eye, attention, memory, creative thinking. 5. Instill in children a kind attitude towards migratory birds and all living things in nature. Demonstration material:
illustrations of migratory birds, a swallow made of plasticine.
Handouts:
plasticine, stacks, modeling boards, rags, twigs.
Preliminary work:
bird watching while walking; conversation about migratory birds, reading stories about birds.
Progress of the lesson.
1. The teacher
invites the children to guess riddles: (5 min) 1. Who, without notes and without a pipe, is the best at trilling, more vocal, more tender? Who is this? ... (Nightingale)
2. She sits on a branch in the forest, She repeats one “peek-a-boo”, She counts the years for all of us, She loses her chicks. “Peek-a-boo” here and there, What is this bird’s name? (cuckoo)
3. Faithful guardian and friend of the fields, The first messenger of warm days. Blackens all migratory birds, cleans the arable land of worms. (rook)
4. On a pole is a cheerful house with a small round window. For the children to fall asleep, the house is rocked by the wind. The father is singing on the porch - He is both a pilot and a singer. (starling)
5. Flies to us with warmth, Having traveled a long way. Sculpts a house under the window from grass and clay. (martin)
Children
solve riddles.
Educator
exhibits illustrations depicting guessed birds.
The teacher
asks the children questions:
- What are the names of the birds that you guessed in the riddle? — Why are these birds called migratory? - Name all the migratory birds again?
Children
answer questions.
2. The teacher
makes a generalization and reports that the swallow sent a letter.
(2 min) (teacher shows the envelope).
Educator
offers to open the envelope, read and find out what the swallow writes.
(the teacher reads the letter).
| Hello guys! I hasten to write you a letter! I and my swallow friends were flying from a warm region. I was distracted from the flight, I wanted to see what nature looks like from a bird’s eye view, how I fell behind my friends. And now I’m alone and I don’t know what to do. Please help me find my friends! |
Educator
says that the swallow itself has arrived! It is not simple, but magical. The teacher offers to mold her swallow friends from plasticine so that she will not be bored and lonely, but first she suggests doing finger gymnastics.
3. Finger gymnastics (bend the fingers of both hands) (2 min) Sing, sing along, This bird is a crake, Ten birds are a flock, This bird is a starling, This bird is a sparrow, A gray feather. This bird is an owl, This one is a finch, A sleepy little head. This one is a swift, This bird is a waxwing, This one is a cheerful siskin. Well, this one is an angry eagle, Birds, birds, go home (hands behind your back).
4. Educator
invites the children to first look at the swallow.
(10 min) - What parts does a swallow consist of? (head, beak, eyes, body, wings, tail, paws). - What kind of tail does a swallow have? (forked). -What kind of wings does a swallow have? (wide). Children
look at the illustration of a swallow and note its structure and features.
Educator
informs the children that they are now starting to sculpt a swallow. From a piece of plasticine you need to separate a large one (for the body and tail) and 3 small pieces for the head and wings. From a small piece we roll a ball (the head, the beak should be pulled out with two fingers and made sharp, the eyes will be drawn in a stack. From a large piece we will roll an oval (the body, the tail should be pulled out with two fingers and the tail should be divided into two parts with a stack. This way we get a forked tail. U swallows have a white breast, for this, using a white cake, you need to make a white breast.
5. Exercise “Guess and sit down.” (2min) Teacher
invites children to stand up for a physical education session called “Guess and sit down.” The teacher names migratory and wintering birds; if he names the name of a wintering bird, then you need to sit down; and if the name is migratory, then wave your hands. Crow, nightingale, woodpecker, magpie, dove, swallow, tit, rook, starling, bullfinch, stork, crane, sparrow, heron, etc.
Children
take their seats.
6. Educator
reports that the work continues and wings are made from the remaining two pieces of plasticine.
The swallow has graceful, pointed wings, shaped like a comma. To do this, you need to roll out small ovals and flatten them on one side. The point of the stack will help create the illusion of feathers, you just need to make longitudinal furrows. Then connect all the parts. First attach the head to the body, and then the wings. The swallows are ready. (6 min) 7. The teacher
says that their swallows are ready and invites them to answer: - What did you do today?
(they sculpted swallows). —What were the swallows made of? (from dough) - Please tell us how you sculpted the swallows? Children
remember the work done.
Educator
notes that they made very good and beautiful swallows. The Swallow really liked her new friends. And now they will live, play and enjoy the warm sun together (3 min).
Literature.
Kazakova T. G. Develop creativity in preschoolers. – M.: Education, 1985. – p.181.
Sculpting a woodpecker in stages
The next master class will be on sculpting a woodpecker from plasticine. Remember that the color of these birds is black and white with variegated splashes of red or yellow. Therefore, prepare the appropriate colors of regular plasticine or air plasticine.
Step 1 . As in the previous case, the main block of plasticine will be black. But in this case you need to add white fragments to the plumage. You will also need a small piece of red and brown or orange for the beak and crest.
Step 2 . Divide the black block to form the body, wings, head and tail.
Step 3 . Roll the largest piece in your hands, smooth it out, and turn it into a body.
Step 4 . Attach a small black ball to one side of it. For security, secure a toothpick inside. Glue 2 white cakes on the sides of the small head ball. Glue the chest on the front of the body.
Step 5 . Using additional pieces of black plasticine, fashion wings. Their shape has already been examined using the example of sculpting a crow. Glue the same long tail.
Step 6 . Glue thin white stripes across the wings. Do this on the first and second wing. Also attach a small red plasticine sausage to your head in the form of a tuft. On the reverse side, lift up a kind of comb; the woodpecker should have it.
Step 7 . Attach a long beak in front - a powerful weapon of a woodpecker, with which he heals trees, breaks through wood, and gets worms. Glue 2 small black balls, like eyes, onto white cakes on the head.
Step 8 . Glue the legs in the same shape as in the case of sculpting the crow. Only the paws themselves can be made from orange plasticine.
Step 9 . The bright woodpecker craft is ready.
We looked at a creative lesson in sculpting birds using the example of two individuals familiar to the smallest children of kindergarten age (preschoolers) and older children who have already started school.
Preview:
Summary of a modeling lesson in the preparatory group “Wintering Birds”.
Goal: Creating birds: sparrow, tit and bullfinch from plasticine.
Visual tasks: - Teach children to sculpt birds: sparrow, bullfinch, tit. Convey their structure: body, head, paws, tail; and pose: standing, flying, pecking. — Learn to complement the work with details, by molding wings, eyes and beak. — Continue to learn how to sculpt large birds. Select plasticine according to the color of the birds. Technical tasks: - Reinforce familiar sculpting techniques. Sculpt birds in a constructive way. — Smooth out the bonding points with your fingers. Make a tail by pulling it out. Apply wings. Make eyes and beak by molding. — Continue to learn how to work with plasticine. Divide the plasticine into equal parts. Educational objectives: - To cultivate the desire to achieve the desired result. — Continue to cultivate accuracy when working with plasticine. Independence in conveying movements in sculpting. - Continue to develop the ability to listen and hear the teacher. Interest in sculpting birds. Be happy with the result obtained. Materials: a box of plasticine, a stack, a paper napkin, a board, bird toys and pictures: a bullfinch, a tit and a sparrow, a cassette with bird voices. Preliminary work: Examination of sparrows and tits on the site. Conversation. Carrying out the game "Birds". Drawing fairy birds. Making bird feeders together with parents.
Organizational moment - Guys, guess the riddles: - In a gray feather coat And in the cold he is a hero, Jumps, frolics on the fly, Not an eagle, but still a bird - That's right, it's a sparrow, the bird we watched on the site.
- White cheeks, Blue bird, Sharp beak - Not big. Yellow breast - - Who are these guys? - That's right, titmouse.
- Where are you from, where did you come from to us, Red-breasted? — I flew all over Siberia. - What is your name? - That's right, guys, it's a bullfinch.
- Let's look at our birds. I will explain to you how to sculpt birds using the example of a sparrow. And you blind any bird. - Look at this sparrow. What parts does a sparrow consist of? (Showing the body of the head, tail and paws). — What shape are the torso and head? — The body is round, slightly elongated, the head is round. -What else does a sparrow have? - Beak, eyes and wings. — When do sparrows have wings? - In flight. — What color and size are a sparrow’s eyes? - Small and black. - What beak? - Small, yellowish-brown. - What color is the sparrow itself? - Brown in color, and the wings are gray. - Guys, in what position can you depict a sparrow? - How a sparrow flies, stands or pecks. - Let's remember how to sculpt birds. — We take plasticine and divide it into 2 unequal parts. - From one part we make the body and then draw out the tail, and from the other we make the head and paws into a stand. We glue the head and paws to the body. Smooth out the attachment points with your fingers. We make the wings, beak and eyes with moldings. — Guys, I suggest you make your own birds: sparrows, tits and bullfinches. - Let's make birds in different poses. Some people have a sparrow standing or flying, a bullfinch pecking. To make it more fun for you, I will turn on the music and you will hear the birds singing.
Individual work: I remind children that they need to work with plasticine carefully and wipe their hands on a napkin. I teach how to properly divide plasticine into parts. I remind you how to roll out plasticine. I remind you of sculpting methods. I show individual sculpting techniques individually. I encourage children's independent creativity. Analysis of children's work: - What wonderful and beautiful sparrows, tits and bullfinches we got. - Let's admire our birds. Oh, look at this sparrow in flight, and this tit is pecking, and this bullfinch is standing. - Guys, find me the most beautiful sparrow. The biggest one. A sparrow that pecks. A sparrow that flies. (the same is done with other birds). - Guys, you are all great to me. Everyone tried their best and did a great job. — The lesson is over.
On the topic: methodological developments, presentations and notes
This lesson summary will be of interest to both teachers and speech therapists. During the game, children will better learn the material, and using a mnemonic table will help them quickly remember N. Nishcheva’s poem.
An interesting activity for the older group to consolidate.
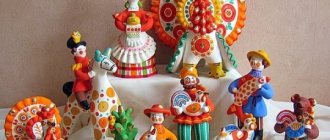
Summary of a modeling lesson aimed at teaching children to convey the characteristic features of the Filimonov toy.
Summary of a modeling lesson in the first junior group.
Goal: To consolidate the idea of wintering birds. Objectives: Educational: to consolidate sculpting skills in different ways: rolling, pulling, smoothing, flattening; develop auditory
Consolidating in children the ability to discuss the topic of future work, take into account each other’s desires, give in, and help each other.
Tasks:1. Teach children to convey in modeling the characteristic features of the “Filimonov toy” (with one long neck and two small heads, a thick body with .
Source