Benefits of classes
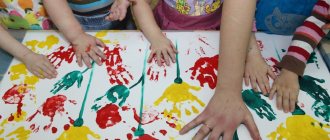
Drawing in an unconventional palm technique will allow the child to develop the muscles of his hands, and parents will be able to establish psychological contact with the baby. Such activities not only entertain, but also bring benefits:
- develop motor skills;
- give new knowledge about the shapes of objects;
- teach color recognition;
- develop taste.
Regular finger painting classes allow you to strengthen your hand muscles and develop motor skills, and this has a beneficial effect on speech and abstract thinking. The child will be able to learn about new objects by depicting them, and will also become familiar with geometric shapes, different colors and shades. Such home lessons will help parents prepare their child for the first grade of school.
Small objects help develop coordination of movements. Children will be able to expand their horizons and gain new tactile and visual sensations. The child will receive many pleasant emotions from creative activities, he will develop a taste and a craving for beauty. Children express their experiences through colors. Each drawing reflects the joys and fears of a child. Parents should pay attention to what exactly he depicts.
You can start classes from 10-11 months, but the baby should draw only with the help of his parents. It is better to make the first lessons short - 5-10 minutes. Over time, they can be extended to 20-30 minutes.
You should not force your child to draw; it is better to observe his mood. Creativity requires a good mood and inspiration.
Materials and tools
All materials can be found in any store that sells office supplies. Children do not need professional expensive paints. It is better to choose those with a safe composition, because the child can taste them.
Required tools and materials:
- paper;
- finger or any other paints;
- dry and wet wipes;
- cotton swabs and disks;
- old toothbrushes;
- oilcloth or mat for creativity.
You can choose any paper for drawing - A4 or A3 sheets, Whatman paper, coloring books, colored cardboard. You don’t have to buy expensive goods; just buy a standard album or sketchbook. But the paper in them should be thick so as not to get wet from water. Suitable paints include watercolor, gouache, and special materials for fingers. They can be purchased at any art stores. The colors should be bright; there are watercolors and gouache with glitter. Such materials will interest children. You can draw figures not only with your hands - the child can use cotton pads or sticks, toothbrushes.
It is advisable to seat the baby at a comfortable table, and lay a blanket or pillow on the chair to make him comfortable. It is better to cover the workplace with oilcloth or a special rug. In any case, the children will cover it with paints. It is also recommended to dress the child in old clothes that you don’t mind getting dirty. And to cleanse the skin you need to use dry or wet wipes.
Kids won't be able to draw serious pictures yet.
Their first attempts will resemble meaningless scribbles: dashes, sticks, crooked lines, blots. But the more often the child practices, the more interesting his images will become. With age, technique will improve, and the most talented children will begin to create real masterpieces.
We draw with palms with children 4–5 years old
In the younger and middle groups, drawing with palms can be supplemented with drawing with fingers. If the theme is winter, then the dotted prints are used to paint snow, while the theme of the sea is to use underwater pebbles. With your fingers you can draw a tree trunk, eyes, mouth. Prints are also good to use for appliques. Example with an autumn tree:
How to draw a caterpillar in the younger group:
- Have the children put green paint on their palm.
- Having placed the landscape sheet horizontally, you should make the first print.
- Then the sheet is turned upside down and 3 more prints are placed next to it.
- The next stage is decorating the caterpillar. You need to turn the drawing back over. On the first print, children draw eyes and a mouth with their fingers, on subsequent prints - bright boots on the legs of a caterpillar.
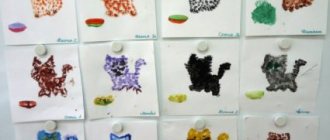
What other pictures can you draw:
Precautionary measures
Small children get tired quickly; for the first time it is enough to practice for no more than 5 minutes . Further, the child’s attention will not concentrate on creativity. The first few lessons are an adaptation period. You should not set difficult-to-achieve goals while you need to conduct lessons in the form of a game. While drawing, children, with the help of their parents, will be able to study geometric shapes, names of colors, various animals and types of transport, even body parts.
It is important to properly prepare the workplace and monitor the baby. First you need to deal with the paints. If it is watercolor, then it is diluted with water to a paste-like state. Thick gouache should also be made more liquid. Finger paints are ready to use. You can add glitter to them to make drawing more interesting.
It is better to pour the material into a flat saucer or plate. It is difficult for kids to get paint out of a small jar with their fingers; it is much easier to scoop it out of a large bowl. It is recommended to place a bowl of warm, clean water nearby. The child will wash his hands in it in order to continue using a different color. You also need to place a towel nearby, which can be stained with paint.
It is not advisable to leave your baby alone during classes. A small child can be so inventive that he will paint more than just paper . The role of parents during creativity is to channel the children's energy. The mother or father must communicate with the baby, prompt or help him. But you need to be allowed to make mistakes. Let a child draw crookedly or ugly - this is how he still expresses his “I”.
If the baby is not yet a year old, then it is better to provide him with a floor instead of a table. It is advisable to remove the carpet from it and lay down oilcloth. It is also recommended to remove all items that a child could damage. Wardrobes and beds can also be covered with oilcloth, otherwise they may be painted. If parents are afraid that the baby will freeze, you can put a warm blanket under him.
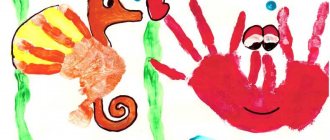
Learn to draw animals using your palms.
Giraffe
We press in the middle finger, move the rest to the sides and circle. All that remains is to decorate and you will get a giraffe with horns and ears.
Hedgehog
To draw a hedgehog with your palms, you need to:
- Spread the brown paint evenly over the surface of your palm in a thick layer.
- Place your hand on the sheet with your fingers pointing up. Leave 4 prints, placing the palm marks as close to each other as possible (hedgehog needles).
- From the left side edge of the print, draw an elongated semicircle, curved to the left (head).
- Draw a small black circle (dot) inside the head.
- At the point of maximum bending of the line, draw a small black oval (nose).
- If desired, add details of the surrounding environment, for example, trees, grass, stumps, and so on.
Paint Recipes
The technology called “Finger Painting” involves the use of paints. But many parents worry that they may be dangerous for the child. After all, many kids taste them, and they contain many harmful chemicals.
Some mothers prepare their own paints. The ingredients are quite simple:
- 2 tbsp. flour;
- 1.5 tbsp. water;
- 7 tbsp. l. salt;
- 1.5 tbsp. l. vegetable oil;
- glycerol;
- food colorings.
First you need to mix the dry products - flour and salt. Add water to them and stir until thick sour cream forms. Then add vegetable oil. The ingredients can be mixed with a whisk, fork, mixer or blender. Glycerin is added as desired, it gives the paint shine.
The finished mass is poured into different jars; you can use empty containers from gouache or baby puree. Then you need to add dyes. They can be natural - juice of carrots, beets, celery, turmeric. You can also use food colorings that are added to baked goods.
At home, you can prepare three-dimensional paints for finger painting. You will need few ingredients:
- 1 tbsp. flour;
- 1 tbsp. salt;
- 2 tbsp. water.
The products must be thoroughly mixed and placed in different containers. Then dyes are added to them. For additional shine, glitter or glycerin is added to the mixture. Next, the jars are placed in the microwave for 1.5 minutes at 180 degrees. The result will be a voluminous material. While drawing, the paints will lie on the paper so that any image will acquire a 3D effect.
You can also use porridge for cooking:
- 0.5 tbsp. fine-grained cereals;
- water;
- dyes.
Semolina is suitable for creating paints; it is quite small. It is cooked according to the usual recipe; the consistency of the porridge should resemble sour cream. For greater viscosity, you can add PVA glue to the mixture. The mass is also laid out in small jars and mixed with dyes. This material will also allow you to create three-dimensional drawings. But after applying it to paper, you need to handle the painting more carefully - it must dry. You can fix the cereal with regular hairspray.
Tips for parents
Parents should show the little ones exactly how to draw a picture with their fingers. The unusual technique of fine art should interest the child. Use your fingertip to scoop up some paint and make a dot or draw a line on the paper. The baby can repeat this. But you can draw not only with your fingers, but with your entire palm.
Older children enjoy using ready-made templates. You can find them on the Internet and print them or draw them yourself. These are images of fruits, vegetables, animals, transport. They are usually already painted, but have white areas. The child must paint them so that the colors match, or trace the outlines of the drawings .
There are popular pictures that kindergarten teachers use. The finger painting technique is also suitable for depicting natural phenomena. A child can draw the sun, rain, snowfall, and starry night with his hands.
The background is painted over with your fingers, evenly distributing the material over the paper. But you can use colored cardboard. Large images - sun rays, clouds, fish, flowers - are drawn with palms. And small details can be depicted with little fingers, cotton swabs and even toothpicks.
Finger painting will allow you to prepare greeting cards and themed posters for kindergarten. The child will be able to take part in decorating the house for any holiday. And parents will help kids master more complex painting techniques with each new lesson.
We draw with palms with children 2–3 years old
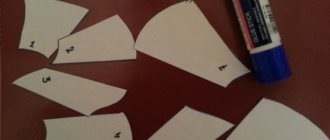
For children in the nursery group, simple tasks and drawings should be used. Depending on age, there will be a group drawing of the sun, butterfly, and octopuses. In addition to the standard set of materials, you will need blanks.
How to draw the sun (collectively):
- Draw the eyes and smile yourself. Trace them in a circle and color them with yellow gouache.
- Ask the children to smear their favorite paint (not necessarily yellow) on their palms.
- Explain that they will now draw rays. You need to place your palm on the paper next to the sun - in a circle.
- Sign each print.
How to draw a butterfly:
- Prepare blanks - a landscape sheet for each child with a ready-made butterfly body (from colored paper or drawn).
- Show how to place your hands on the paper to create wings. You need to spread your fingers and connect your palms with the bases.
- Then the children independently apply paint to their palms and make prints.