On the topic: methodological developments, presentations and notes
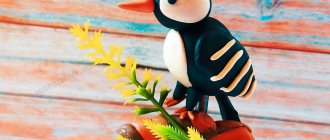
Goal: To make children want to do the work (the image of a fairy-tale bird); encourage them to create a variety of images, using different means of expression (color of plumage, different shapes of beak, tail.
Program tasks: Strengthen the skills of adding and subtracting numbers within 10. Teach children to solve arithmetic problems, put the solution on cards and pronounce notes. Strengthen comparison skills.
Summary of a drawing lesson in the senior group On the topic: “fairy-tale bird” Purpose: To teach children to conceive a fairy-tale image, come up with unusual details for a real image, develop imagination Tasks: ·.
Summary of a lesson on speech development in the senior group.
Learn to sculpt a bird from plasticine using a plastic method, pulling out parts from a whole piece and in a constructive way, observing the location and relationship of body parts, connecting parts, when.
Summary of a drawing lesson in the preparatory group “Migratory Birds”.
Topic: "Chickens". Goal: To introduce children to the technique of palm typing. Learn to add details to an image using a brush. Develop the ability to empathize. Handout
Source
Progress of the lesson.
I read to the children a poem by the Japanese poet K. Hakushu “ Bird , red bird .”
- What do you guys think, can this really happen?
-What is the character of this poem? (Comic, cheerful)
Imagine that you and I were asked to draw pictures for a book with this poem. For you to portray?
- Let's draw two birds with you: a red one and a blue one.
Let's remember the diagram for drawing a bird . I demonstrate step-by-step drawing of a bird on an easel .
Independent work of children.
Results of the lesson .
- Why did you and I draw such interesting birds ? (This is an illustration for a comic poem.)
— Whose work do you think is the most successful? Why?
- You all did great, you coped with the task.
Summary of the integrated lesson “Wintering Birds” in the senior group Synopsis of the integrated lesson on the topic: “Wintering Birds”, in the senior group Goals: to cultivate a caring attitude towards birds. Objectives: Developmental:.
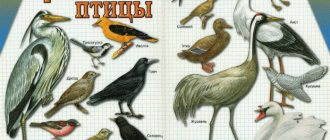
How to draw a bird with a pencil: step by step for children
Drawing a bird is a task that often faces children and their parents. Sparrows, crows, jackdaws, nightingales, bullfinches, eagles, tits and other birds are common objects in children's albums. There is also room for unusual characters - firebirds and Angry Birds. However, everything is not as difficult as it sometimes seems for beginning artists. Using visual lessons and acting step by step, step by step, you can make a high-quality and clear drawing. After several trainings in drawing birds, the child will get better and better.
Step by step bird drawing lessons
Bird drawing lessons with step-by-step photos for beginners will help artists master the art of creating birds on paper.
Wintering bird: drawing a sparrow
Among wintering birds, the most popular are sparrows. Creating a drawing of such a bird is quite simple if you proceed in stages.
- You need to draw an elongated oval. This is the base of the bird's body.
- At the top of the workpiece you need to draw a figure with rounded contours. This will be the head. Several straight lines are drawn below. This is the tail of a wintering bird.
- Next, the beak is clearly drawn.
- Then you need to use smooth contours to create the outline of the breast, wings and make the eye.
- You need to draw the sparrow's legs with a pencil.
- All that remains is to color the drawing using colored pencils or felt-tip pens. If desired, you can use paints.
Bird in flight: drawing a seagull
- The process of drawing a bird in flight is much simpler than it seems. Even a child can cope with the task. First you need to draw a circle, which in the future will become the head, and the body of the bird. The bottom and top of the body should be a little sharp. There is no need for roundness here. Then the eye and beak are drawn, after which the contours of the circle must be erased with an eraser.
- Now we need to draw the span of the flying wings and the tail. The wing, which is located closer to the right edge of the paper sheet, should be much larger and longer than the second and the body. No need to grind!
- Next you need to finish drawing the paws and wings. The first ones need to be depicted folded tightly to each other.
- Then you need to draw lines that will make the thigh. To do this, the contour is drawn from the seagull's foot down. Next, the feathers on the tail and wings of the bird are depicted.
- It is necessary to remove all unnecessary contours.
- All that remains is to draw the shadows. The wings of the bird in flight should be made almost black and the underside of the seagull should be greatly darkened. Plus, a shadow also falls from the wing on the body. On the second wing, located closer to the left edge of the sheet, you should slightly outline the outlines of the feathers along the entire length. Similar contours need to be made on the body and around the head.