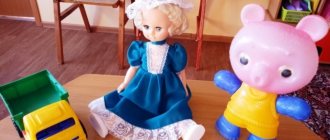
Topic: Make whatever toy you want as a gift for a friend.
Yulia Zhdanova
Topic: Make whatever toy you want as a gift to a friend.
Program objectives: Continue to develop figurative ideas and aesthetic perception. Cultivate attention to other children , a desire to take care of them.
Reinforce previously learned modeling techniques. Progress of the lesson. At the beginning of the lesson, ask the children about toys toys they have , which ones they like to play with. And how happy everyone is when they are given toys . You can pay attention to the toys standing in the group .
Remind children that they need to think about the shape and color of your toy . We discuss with the children who wants to make what kind of toy .
Physical education minute. We're tired, we've been sitting too long. We wanted to warm up. We put aside all our business and started charging. Then they looked at the wall. Then they looked out the window. Right, left, turn, and then turn. Let's start squatting. Don't rush to squat. And we sat down for the last time. And now they sat down.
If necessary, help children choose the right modeling techniques. During the sculpting process, clarify the techniques and the name of the sculpting form.
At the end of the lesson, consider with the children what they have sculpted and talk about the sculpted images.
Summary of educational activities “New Year's gift” Purpose: Creating conditions for the cognitive and speech development of children through a gaming situation. Objectives: Correctional - educational:.
“Cut out and paste whatever toy you want” (In the world of fairy tales and cartoons) Summary of an open lesson on appliqué on the topic: “Cut out and paste whatever toy you want” (In the world of fairy tales and cartoons) in the middle group. Didactic game “Make Tin the Snowman” Author’s didactic game for senior preschool age “Make Tin”, presented by teacher O. N. Skvortsova, MBDOU No. 21, Novopokrovsky village.
What kind of music should my child listen to? What kind of music should a child listen to? Today, parents pay less and less attention to what kind of music their child listens to when remembering.
Abstract of a collective creative activity using ICT “Gift to a friend” for children of the older group (5–6 years old) Integration of educational areas: • “Cognitive development”, • “Artistic and aesthetic development”, • “Social and communicative.
GCD summary for junior group 2. Artistic creativity (drawing). Topic: "Let's smile at each other." GCD summary for junior group 2. Artistic creativity (drawing) “We will smile at each other.” Goal: Expanding children's active vocabulary.
Summary of GCD in the preparatory group “If you want to be healthy. A visit to an otolaryngologist" Summary of educational activities in preparatory group No. 1. Topic: If you want to be healthy (visit an otolaryngologist). Goal: clarify and expand ideas.
OOD abstract for application Topic: Creating a collage “Gift for Moms” MUNICIPAL AUTONOMOUS PRE-SCHOOL EDUCATIONAL INSTITUTION BOLSHEALEKSEEVSKY COMBINED KINDERGARTEN “KALINKA” STUPINSKY.
Summary of the circle lesson “Give each other kindness” for children of senior preschool age Topic: “Wonderful old man” Summary script of the circle lesson Direction: cognitive. Age of pupils: Children of the preparatory school group 6-7 years old, in number.
GCD in the middle group “Gift for a friend” SYNOPSIS of GCD in the middle group on the topic “Gift for a friend”. Educational field “Artistic and aesthetic development” (non-traditional techniques.
Source
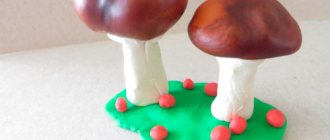
Equipment and materials for modeling classes in kindergarten
Typically, kindergarten groups use plasticine, but the possibilities of working with it are limited. The most effective way to use clay in creative work. Fat clay is best. You can sculpt several large objects from it, create objects with subsequent heat treatment for immortalization and paint them. The plasticity of clay can be adjusted with water, which makes the work easier for children.
In education, it is more practical to use clay, since plasticine is intended for small products, and small forms are not able to convey the fullness and clarity of the lines of the details of the figure. Using plasticine complicates activities with young children, since it is quite hard and needs to be constantly kneaded to make it soft, and small children are not always able to do this. Plasticine modeling is more suitable for children with developed finger muscles, at an older age of 5-7 years, but its use should be limited to only a small number of activities.
If the kindergarten has enough budgetary funds, then clay can be purchased at the store, but in rural areas it is easier to dig it up. The clay layer is located directly under the fertile soil layer, so this will not be particularly difficult. Preparing the mixture for modeling is also not difficult. You just need to add water to the clay and knead it, and then put it in a thick cellophane bag, and then the working material can be stored for a whole year. To fire clay, you only need to spend money on a muffle furnace. You will also need paint. Thus, after processing, children's crafts will turn into real ceramic products and souvenirs. Clay itself in its raw form is not a load-bearing material and to make products you will need to stock up on frames.
Ordinary sticks or pieces of wire can serve as frames. The frame must be made in such a way that it can be removed from the product after the clay dries, otherwise the clay on the frame may crack when drying. To draw out individual elements and recesses, you can use plastic knives like in plasticine, spatulas and nails. The better and more conveniently the place for a child’s creative activity is organized, the better the quality of his work. Usually boards are used for the working surface, but it is better to have a rotary machine for ease of working on the product from any side.
In the end, I would like to add that modeling in kindergarten is important for preschoolers for the development of sensory perception. Children must not only see, but also touch objects.
Summary of GCD for modeling “Our Favorite Toys” in the middle group
Purpose of the lesson: to teach children to work with plasticine; sculpt various
objects, conveying their shapes, proportions, poses.
Teach children to sculpt familiar objects - toys , convey their characteristic features, consolidate knowledge about the properties of plasticine;
develop skills in organizing the workplace;
develop cognitive interest in creativity, imagination;
friendly attitude towards each other;
develop fine motor skills;
Cultivate accuracy and attentiveness;
Instill love for the world around us.
Preliminary work: reading poems about toys , riddles about toys , drawing toys .
Equipment and materials: pyramid toy , plasticine, plasticine board.
How to make a frog from plasticine
Plasticine is an amazing material that allows you to develop not only creativity and imagination, but also fine motor skills. You can make a frog from plasticine using a master class, where everything is described step by step and is understandable even for children. Follow the instructions exactly or apply your own ideas - everyone decides for themselves.
A simple do-it-yourself plasticine frog
Any child can make a frog from plasticine with their own hands in the simplest way. Just 8 main parts, 5 additional ones and the little toad will be ready. The child can complete large parts independently, and one of the adults will help him with small ones.
Sculpting process:
- Roll 2 balls from the green material - one larger than the other. Connect them together - this will be the torso and head.
- Make two identical small balls and attach them to the top of the head. Thin white plasticine circles are glued on top of them. Pupils of blue or another color are sculpted on them.
- The mouth and nose are cut using stacks or toothpicks. Attach a tongue made of red plasticine.
- Roll out two green bars. Flatten on one side, giving the shape of fins. The legs are bent and fixed on the frog's body.
- For the front legs, the blanks are made thinner and shorter. The lower part is made flattened. Cut out 3 toes on each foot, making membranes using a toothpick. Attach the legs to the body.
Frog princess made of plasticine
To get your child interested in modeling, you can make a frog princess from plasticine. To do this, first make the frog itself and add just a couple of additional details - a crown and an arrow:
- Roll the green mass into a roll and cut it into 3 pieces - 1 small and 2 larger.
- Prepare a blank for the head. One of the large pieces is rolled and flattened, giving it an oval shape.
- Roll the second large piece into a ball. Stick a toothpick or match into it and connect it to the head blank.
- From the last piece, four sausage-shaped legs are created. Bend them in half and connect them to the base.
- 2 small flat cakes are connected to the paws. 2 slightly larger cakes are attached to the body in the abdominal area.
- Make 2 balls from the remaining piece and attach them to the top of the head.
- On the base for the eyes, fix 2 white circles and stick black pupils on them.
- A stack is used to cut through the frog's mouth. Roll small balls from pale green plasticine. Slightly flattening them, place them on the head and body. The same details indicate the nostrils of a frog.
- The abdomen is made from light green material and attached to the body.
- Using the stacks, cut fingers at the edges of the foot cakes. White mini-highlights are placed on the pupils.
- To make a crown for the princess, you will need yellow or light orange plasticine. Make a sausage and roll it into thin strips. Sharp teeth cut along the edge of the stack.
- Cut a part from the jagged strip so that it has 5 teeth. They fold it into a crown, which is placed on the frog's head. The sharp ends are slightly twisted in different directions.
- A small tongue is created from a piece of red plasticine and glued to the line of the mouth.
- The arrow is molded from plasticine in brown, yellow and white colors.
Frog made of light plasticine
Making a frog from light plasticine is easy step by step. For example, you can create the heroine of the cartoon “Frog Traveler”. Parts made of this material hold their shape well, and the mass does not stick to your hands.
Important! This material is afraid of moisture, both during the work process and in finished crafts.
- Take a small piece of green mass. They give it the shape of a head with chubby cheeks. Particular attention is paid to the mouth - making it slightly pointed. Designate slightly raised areas for the eyes.
- Roll out yellow plasticine and frame the lower part of the head. A thin strip marks the opening of the mouth.
- The eyes are made from the white mass. To make them look funny and cheerful, the pupils are sculpted in different shapes, blue with black splashes.
- To save material, you can use foil for the frog’s body, which is crumpled into a pear-shaped shape and covered with a thin layer of green mass. To highlight the frog's abdomen, the front part is covered with a yellow mass.
- The bases for the frog's legs are made in the form of rounded blocks of the required size.
- The fingers and toes of the frog are squeezed out with a stack. Give them the necessary bends. Add a yellow mass to the middle of the palms.
- Connect all the parts together. For a strong attachment, the head is “set” on a match or toothpick.
- Smooth out roughness and unevenness. Add dark green splashes to the arms and legs of the frog.
Craft with a frog made of plasticine
To captivate your child, you can make together with him not only one frog from plasticine, but an entire craft. A step-by-step analysis will help you understand how to sculpt reeds using toothpicks. How to make a pond and a water lily leaf on it:
- To create a reed, you will need toothpicks, brown and green plasticine. The bottom is wrapped in green plasticine, the top in brown. Leaves are sculpted separately. Everything is connected and fixed to the surface.
- To make a water lily leaf, roll out the green mass and flatten it into an oval with your fingers. Using a stack or a knife, draw veins and make a cut in the bottom of the sheet.
- Cut out a circle or any shape large enough from cardboard to accommodate the wah and additional accessories.
- The cardboard is coated with a thin green layer.
- On top of the green layer, pieces of blue and light blue material are laid out and smeared in a chaotic manner.
- Reeds are placed at the edges.
- A water lily leaf is placed a little away from the center, on which the main character is planted.
How to make a caterpillar and a bee step by step
How to make a ladybug
Snail step by step for children (spiral modeling)
How to make a teddy bear
An interesting idea for sculpting: a bird in a nest
We sculpt flowers and compositions step by step
How to make a car from plasticine
Bicycle step by step
Modeling should be interesting for a child. Therefore, choose the most interesting ideas for modeling. Let the child choose what he will sculpt. When the baby is engaged, discomfort, excitement and anxiety go away. When a child creates a favorite cartoon animal, be it a bunny or a kitten, a giraffe or a unicorn, he feels good and proud of his achievements. Therefore, mommies, do not forget to praise your baby for any achievement!