Making a paper pumpkin
It’s not at all difficult to make; even a kindergartener can handle the task. This is how they make a pumpkin.
- Take orange, yellow or green colored paper.
- We line it into strips. The width of each strip is 1-2 centimeters (depending on the expected size of the future pumpkin).
- The length of the stripes should be different. The first two stripes are the same length, the next two are 1 centimeter shorter, the next two are another 1 centimeter shorter, and so on.
- We begin to fasten two strips at a time. To do this, they need to be intertwined in the center and secured with glue or a stapler. Add to them the next two strips, fastened in the same way. Then two more, and so on, until the entire craft is assembled.
- On top of the finished pumpkin you can add a leaf cut out of green paper.
The result is a beautiful three-dimensional paper pumpkin.
Making an autumn tree
If you wish, you can even make a whole paper autumn grove.
- First you need to prepare the tree trunk. The best option for this is a toilet paper roll. Or - a tube rolled up from cardboard and glued around the edges.
- We cover the trunk with colored or white paper. If desired, add the missing strokes to it. For example, we paint it like a birch tree.
- Cut out a crown from cardboard.
- The first option is to paint it in different colors with paints. If it is an autumn tree, then it is yellow, red and brown, if it is a summer tree, then it is green.
- The second option is to take paper of different colors and tear it into small particles. Next, apply glue to the crown and glue pieces of paper onto it in random order. These will be the leaves.
- We make a cut on the sleeve (on the trunk) and insert the crown into it. If necessary, fix it with glue or adhesive tape.
That's it, the tree is ready. And if you make several trees, place them on some hill (a cardboard box is best for this purpose), place animals or birds made from cones, nuts or acorns between the trees, you will get a real, wonderful grove.
Another autumn tree
It is done a little differently, but the end result is a craft of amazing beauty.
- Cut out a trunk and branches from brown paper.
- Glue them onto a sheet of colored cardboard. The color can be any, the main thing is that the trunk does not get lost against its background.
- Take yellow, brown, orange, red and green paper and cut it into strips.
- Using glue, we make circles from the strips. These are the leaves of a paper tree.
- We make a tree crown from circles (leaves), gluing them on top of the trunk and branches.
- Cut out two green or yellow strips and glue them to the bottom of the tree. This is autumn grass. For a more autumnal mood, glue several circles to the grass. These are leaves that have fallen from a tree.
In addition, the video will tell you how to make autumn trees from paper. Here it is.
Making paper leaves
Well, it's quite simple.
- Draw a tree leaf on colored paper. Any: maple, oak, apple - whatever you like. Then we cut it out with scissors.
- Is it difficult or don’t you want to draw? It doesn’t matter: with the help of adults or on our own, we find the sheet on the Internet and print it on a color printer as many times as we like.
This video will tell you more about how to make maple leaves from paper.
Paper leaves are beautiful in themselves, and they can also be used to make a wonderful autumn garland. For it, the leaves need to be made colored on both sides, otherwise the garland will not turn out to be any beautiful.
This is how a garland is made. The leaves are attached in random order to a strong thread. They can be strung on a thread, glued, sewn - in general, whatever is more convenient. The more colorful leaves there are on the garland, the more beautiful the garland will be. It can decorate any room. Paper leaves, unlike real ones, are stored for a very long time.
Paper leaf templates
Autumn print
This activity is especially fascinating for children; they make crafts with pleasure, so you should definitely do it. Moreover, there is no difficulty here. On the contrary, everything is simple, bright, fun.
- We cover the table with paper or oilcloth, because we will have to deal with paints.
- We prepare real, large and durable autumn leaves. It’s better to use different trees, it will be more interesting.
- Apply a thick layer of gouache to any color you like on the sheet. We experiment with paints - this develops creativity in the child.
- Press the painted sheet onto colored or white paper. An imprint of the sheet will appear on the paper. It can be cut out (when the paint dries), or you can make several prints on one sheet. The end result is a beautiful autumn picture.
- The missing details on it are completed with felt-tip pens or paints.
Making an autumn rainbow
To make such a craft, you need to stock up on:
- cardboard of various colors;
- scissors;
- glue stick;
- cotton wool;
- stapler.
Let's start making a rainbow.
- We cut seven strips from colored cardboard. Moreover, in a strictly defined order: red stripe, orange, yellow, green, blue, indigo, violet. If the child does not understand the essence, he should be explained that this is the order in which the colors on a real rainbow are arranged.
- When cutting out strips, you should also take this point into account. The red stripe should be the largest, the orange one should be slightly smaller, the yellow one should be even smaller, and so on. The smallest should be the last, purple stripe.
- We arrange the stripes in the appropriate order, starting with red (top), continuing with orange, yellow, green, blue, indigo and ending with purple (lowest). The stripes should not be even, but in the form of an arc.
- We fasten the strips together with a stapler.
- We make clouds from cotton wool and glue them to the sides of the rainbow.
A beautiful autumn rainbow is ready!
This is just a small part of autumn crafts made from colored paper. And there are an infinite number of them. Create!
Craft ideas made from colored paper
Preview:
Summary of the educational situation “Farm estate”
Teacher of the first qualification category Efimova Alla Petrovna
— enrich children’s design and construction experience when using different building materials
— consolidate the lexical topic “domestic animals and their young”
- train mental operations - analysis, comparison, generalization, develop attention, speech.
Preliminary work: talking about domestic animals, asking riddles, looking at pictures, building farms for animals.
Didactic objectives: To evoke the internal need of children to be included in activities.
The teacher gathers the children around her and holds a box of pet toys in her hands. Children look at the animals and call them babies.
-Guys, how can all these animals be called one concept?
- why are they called that?
- Because they live next to a person.
— Guys, this morning I received an email asking for help, listen: “Help, help!” Winter is coming soon, and my pets have nowhere to live. Help build a farm estate » And that’s it, there’s not even a signature. Who do you think it could be?
Listens to all answer options, the teacher repeats the correct answer - farmer.
— Do you want to help the farmer? (Yes). Can you help?
Children and their teacher approach the interactive board.
Educator: Guys, I’ll now show you the pictures that came with the letter, and you look carefully and answer my questions. (children look at pictures depicting farms, haylofts, stables, sheds, paddocks...)
The teacher concludes: for each animal there is a certain type of building.
The teacher and the children approach the table on which there are diagrams of buildings.
A difficulty arises because the children are not familiar with the concept of a farm estate.
Educator: Were we able to help the farmer? Why couldn't they? (because we don’t know what a farm estate is). Do you want to know? What do we need to know? (what is a farm estate)
What should you do if you don’t know something? (ask someone who knows)
Ask! (Children ask the teacher).
Educator: a farm estate is a piece of land for permanent residence on which a family can build their house, plant a garden, a vegetable garden, build outbuildings for their animals, can fence their estate or plant trees around it.
Can we help now? (Yes).
Didactic objectives: to enrich children’s design and construction experience: building a farm estate according to plan.
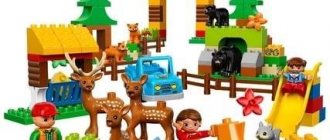
Choose your own material for construction: Kostya chooses gray-haired assistants to build on the carpet with a large wooden construction set; Danil chooses his assistants to build on the carpet with a Lego constructor;
Lisa chooses her helpers for construction at the table with a small wooden construction set (children are divided into mini-groups, choose their own building material and pet toys).
In case of difficulty, the teacher asks questions: “Where will your cows live? And the horses. )
The teacher praises the children for their excellent work. Takes photos of the final result to send the photo to the farmer to select a farm estate.
Didactic tasks: to reflect on activities in class, to create a situation of success.
The teacher invites the children to sit on chairs and invites one representative from each group.
Children talk about their construction, show what is where and what it is intended for.
- why were you able to help? (Because we know what a farm estate is)
Technological map of the educational situation "Farm estate"
Source
Summary of GCD in the preparatory group 6–7 years old “Design from natural materials”
Oksana Shubenkina
Summary of GCD in the preparatory group 6–7 years old “Design from natural materials”
Construction from natural materials
How we created 3D compositions together
Continue to introduce children to ecoplastics - the art of creating sculptures and arrangements from natural materials . Arouse interest in the design of collective 3D compositions for the interior of a kindergarten. Promote experiences of collaboration and co-creation. Remind how to connect parts. Expand the experience of examining natural forms . Develop creative imagination, feel forms and compositions.
Material
Demonstration material : illustrations, photographs, children's drawings and collages depicting the sea, space, forest clearing.
For practical work: cardboard boxes, various natural materials - cones (spruce, pine, pine, various nuts (whole and shells, acorns, chestnuts, rose hips, rowan berries, pebbles, shells, branches, autumn leaves. For stands - foam sponges , stones; for fastening parts - brown plasticine, strong threads, soft safety wire.
The teacher draws the children's attention to the natural material prepared on the tables and advises them to create beautiful three-dimensional compositions for the interior of the kindergarten. Shows demonstration material . After general orientation, the teacher helps the children plan activities:
1. Divide into groups of 5-7 people , give your team a name (for example, “Dwarfs”
) and choose a motto - a proverb or saying about friendship, for example:
“One for all and all for one”
2. Each group will find its own theme (sea, space, meadow, forest, zoo or another)
and select the appropriate box to
prepare for your chosen topic .
3. The group agree among themselves what or whom each of them will design for the overall composition; everyone chooses a suitable natural material .
4. Work is underway, each participant constructs his own character , but at the same time manages to observe what and how others are doing in order to create a beautiful composition together.
5. All characters are placed in a common box, group members examine , discuss, share impressions, and help each other.
Children are convinced that together they managed to create large and beautiful 3D compositions to decorate their kindergarten.
Summary of a lesson on designing a “Winter Tree” from natural material. Summary of educational activities on the artistic and creative development of children in the preparatory group “Winter Tree” design. Photo report on GCD for designing from natural materials in the preparatory group “Circus Dogs” Goal: Continue to consolidate skills in working with natural materials, improve the ability to independently determine the sequence. Collective design from natural materials with children in the senior group “Zoo” Design from natural materials is a creative and useful activity, during which children create original products, improving them.
Abstract of OOD on artistic and aesthetic development. Construction from natural material “Boat” MBDOU kindergarten No. 16 of the general developmental type “Pearl” Summary of organized educational activities in artistic and aesthetic.
Summary of the lesson “Construction from natural materials” The natural world is incredibly beautiful, mysterious and wonderful. Each blade of grass, leaf, and twig is unique, fraught with extraordinary secrets and...
Construction from natural materials. Comprehensive development of children in the process of working with natural materials Comprehensive development of children in the process of working with natural materials. Kindergarten, being the initial stage of the general education system.
Construction from natural materials in the preparatory group “Travyanchiki” The main task of environmental education is the cultivation of kindness, careful treatment of nature, people, and oneself. On a modern one.
Project “Construction from natural materials” Municipal budgetary preschool educational institution “Romodanovsky kindergarten of a combined type” Project “Design.
Source