How to draw a picture on the topic of fire safety with a preschooler and schoolchild? What to show in the picture?
According to statistics, 80 percent of fires occur due to careless handling of fire and electrical appliances. You need to learn fire safety rules from early childhood. In order for the child to remember them better, he is often asked to illustrate them with pictures. Also, schools and kindergartens often hold competitions for children's drawings and crafts on the topic of fire safety. So what can you draw?
Subject Features
Every educational institution pays great attention to fire topics, and the task of parents is to promote such upbringing of the child at home. When making crafts, children gain certain labor skills and develop fine motor skills; they become familiar with fire safety rules and the difficulties of working in the Ministry of Emergency Situations.
Crafts can be taken to kindergarten or school, submitted to a competition, or simply used as a toy.
In the works on the topic under consideration, the following main plots stand out:
- What causes a fire and how dangerous it is. You can reflect the following directions: “Matches are not a toy”, “Be careful with fire”, “Do not light a fire in nature”, “From a spark begins a flame”, etc.
- Actions in case of fire. Of particular interest are fire extinguishing means and equipment. A bright fire truck is a popular craft. By making a fire shield, the child gets acquainted with the basic methods of fighting a fire.
Children's crafts can be created from different materials depending on the age and skills of the child. It is important to start with simple things, gradually moving on to more complex products.
Poster “Matches are not toys!”
Fire-fighting crafts are aimed at strengthening safe life skills. Very often, parents and children follow the path of least resistance and use matches in crafts.
Inspectors from the Ministry of Emergency Situations and the All-Russian Fire Department categorically do not recommend doing this! Because now the child has glued a match to give “vitality” to the drawing, and then he decides to set fire to the piece of paper in order to stick it, burnt, also for vitality. Therefore, no matter how much you want to save time and effort in this way, it is better not to take risks.
The correct handling of matches is taught in posters, which can be done in groups at school and in kindergarten.
Take a sheet of whatman paper in format A 1 or A 3. Create a “match”. It can be cut out of paper. You can draw with a felt-tip pen, gouache or watercolor.
We paint the flame with paints or create an applique using a stencil from colored paper. If the flame is not glued completely, but only at the beginning or end, you will get a three-dimensional applique. We supplement the poster with the inscription “Matches are not toys!” You need to try to correctly calculate the place for the letters. To do this, we measure the distance that we have for the inscription.
We count all letters, punctuation marks and spaces in a word. Divide the distance in centimeters by the number of characters. We get the distance that we can allocate to one letter. Divide the segment into equal rectangular parts. Now we can draw the letters using a ruler. Since the letters are all straight, we will only have to draw the central and middle details with a ruler.
Paper crafts
The simplest paper fire truck can be made using matchboxes:
- Its base is made up of 4 boxes, stacked in 2 rows in height.
- The fifth box is installed on top in the middle and imitates the cabin.
- All elements are glued together to form a rigid frame.
- Next, the workpiece is carefully covered with red paper on all sides.
- The windows are made of white paper, and yellow paper circles are glued as headlights.
- The fire escape is assembled from 2 parallel wooden branches (skewers) and transversely assembled matches. The ladder can be secured with plasticine.
- Wheels are taken from broken toy cars or cut out of cardboard.
With the help of adults, it is easy to make paper crafts using the papercraft technique. To do this you will need a thick sheet of paper. The turn of the car is drawn and painted on it. The photo shows a diagram of the headquarters fire truck. The workpiece is carefully cut out with scissors, and the parts are bent in the right places, glued together along the flaps, and the craft is ready.
You can also glue simple compositions from paper. A green background is created on a solid base (cardboard, plywood). A village house is made of paper. Windows and doors made of colored paper are drawn or glued on it, as well as flames escaping from the window. The craft is fixed to the base. A small fire truck is made in the same way.
Fire hose
You will need: 6 toilet paper rolls, tape, scissors, white paint, brush, blue colored paper.
Master Class
- Fasten the bushings together using tape.
- Paint the bushings with white paint and leave to dry.
- Cut out “water” from blue paper.
- Attach the “water” to the hose using tape.
The fire hose is ready!
Plasticine models
One of the first craft materials that a child gets acquainted with in early childhood is plasticine. You can make a beautiful fire truck out of it.
Master Class:
- Two large parts are formed from red plasticine - the base and the cabin, which are connected to each other.
- Windows made of thinly rolled white plates, yellow circles of headlights, a small blue signal light and a black bumper (a strip of black plasticine at the front bottom of the cab) are fixed to the cab.
- Thin strips and a number (01) made of white plasticine, as well as a fire hose coil in the form of a spiral made of gray plasticine flagellum, are installed on the base.
- The wheels are made of 2 parts: first, a disk is formed from black plasticine, a notch (tread) is applied to it along the perimeter, and a yellow circle is attached in the center.
- The ladder is made of gray material: cylinders with a diameter of 5-7 mm are formed and installed in parallel. Steps of the same color are attached to them.
Plasticine is a very malleable material. In addition to the car, you can make figures of firefighters out of it. A firefighting helicopter or airplane looks modern.
Oxygen balloon
You will need: 2 liter plastic bottle, black tape, yellow spray paint, plastic tube, thick cardboard, backpack straps, drill, Velcro, scissors, hole punch, 0.25 liter plastic round bottle.
Master Class
- Paint a 2 liter bottle with yellow paint and wait until it dries.
- Make the inscription “AIR” with black tape.
- Make 4 holes on the cardboard for the backpack straps.
- Attach and adjust the straps.
- Drill a hole in the bottom of the small bottle and secure the tube.
- Attach a large bottle in the center of the cardboard using tape.
- Make 2 Velcro loops to secure the tube and attach the round bottle.
The oxygen cylinder is ready!
Applications
One of the most common trends in fire themes is applications. A simple craft in the shape of a fire truck is made from colored paper. The photo shows a cutting diagram. The outline of the parts is drawn on paper and cut out. On a thick sheet of paper on which the desired color background is created, the largest parts are first glued, and then the small ones are attached to them.
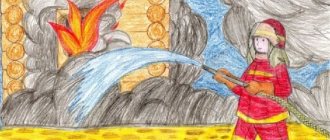
It is more difficult to make a composition. The photo shows a firefighter fighting a fire. His figurine can be cut out from a magazine or printed on a color printer, assembled from a certain number of parts cut out of colored paper. Lines and very small details are drawn with a felt-tip pen.
To the competition
Children try to make beautiful and original crafts that will be presented at the competition.
First you need to decide on the topic:
At the second stage, kids make crafts. For example: a model of a helicopter for extinguishing fires, a fire truck made of buttons, or an original volumetric exhibition.
For kindergarten
For the middle group
For the older group
For schoolchildren
Pupils in grades 3–4 make complex applications. Children can already sew a figurine of a rescuer and dress him up in firefighter clothes. Boys build large fire trucks, helicopters and other equipment from matches.
Drawings
Crafts in the form of drawings require certain skills, but in kindergarten one should not strive for artistic performance, the main thing is that children feel the importance of their work.
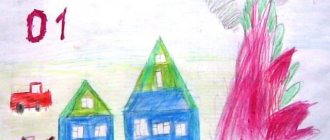
The photo shows an example of how a child sees the process of extinguishing a fire in a house using fire equipment. Of course, parents should help as much as possible in choosing a plot, then the best drawings can be submitted to the competition.
Children's creativity uses colored pencils, felt-tip pens, and wax crayons. Gradually mastering watercolor and gouache.
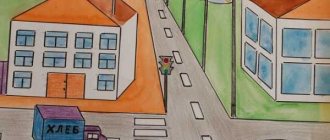
Another direction is drawings by adults for children. They must reflect basic fire safety rules. The photo shows how you can attract children's attention to the phone number to call in case of a fire.
“From one small spark the forest lights up, my friend!”
Much attention in fire safety training is paid to open fire as a source of danger. Bonfires, curtains on fire, a saucepan on the stove and, finally, the ill-fated poplar fluff.
All this requires attention and thorough study.
There is just not enough attention. Children are not interested in lectures at all. Watch a movie or cartoon - yes! Although, if you interest children in non-standard work and invite them to take part in a competition, then they will attract attention and perseverance. As an option, the All-Russian competition “Burning Bush”. So, we conclude: “You need to arouse the child’s interest in any activity!”
Crafts from cereals
Quite simple crafts can be created from semolina. To do this, colored semolina is prepared: the cereal is mixed in a container with gouache of the desired color until a rich shade is obtained and dried. For a fire truck you will need red, black and gray semolina, as well as undyed (white) semolina.
The outline of the machine is drawn on a sheet of thick paper or cardboard. Glue is applied inside the lines and red material is poured in a thin, even layer, and excess grain is shaken off. Then other colors are carefully formed into small details. When the picture is ready, glue is applied to the paper outside the outline, creating a general background of unpainted semolina.
Quilling
This is a method that is very simple to implement, but gives enormous scope for creativity. His original blanks allow you to convey flames in a variety of ways. Using paper of different colors, you can achieve unique combinations.
Torn applique technique.
Fire can also be made using this interesting method.
Conducting a master class on this technique couldn’t be easier.
- Take blue thick paper of size A 4. The base-substrate (background color paper) should be thick. Otherwise, strong impregnation with glue will occur, and the sheet may not withstand.
- A drawing is applied with a pencil to the background template sheet.
- Pieces of paper are being prepared to represent the flame. Carefully tear the paper, creating pieces of different colors and sizes.
- We take the largest pieces and begin to fill the space with them (flame, fire, bonfire). Then the average ones. We finish small. Each piece is glued separately. Otherwise, the work will look sloppy.
You need to carefully ensure that the pieces do not protrude beyond the edges of the picture. Otherwise you will end up with sloppy work.
At the same time, we are talking about how fires are put out. What materials do we extinguish with what? Thus, by unobtrusively influencing the child, we try to convey to him the necessary information.
All that remains is to arrange the exhibition and photograph it. So that the children, in the future, can see what beauty they can make with their own hands!
More complex crafts
As you gain certain skills, you can move on to more complex crafts. Already at school age, interest in other technologies appears. Attention is paid to quality of execution, volume and layout.
Volume projects
Volumetric crafts are created in different ways:
- Volumetric figure. An example would be a campfire, a common cause of fire. Logs (cylinders of thick paper) are laid out on a sheet of cardboard; a bunch of “flames” cut out from colored paper in red, yellow and orange are collected in the center.
- Three-dimensional pictures are made in the form of a double-leaf postcard made of thick paper. On the inside of one of the halves, various figures are glued to the bent edge: an image of a fire, trees, which are pressed by the second flap, but when it is turned away, they take a vertical position. On the second half, a drawing or appliqué is made. When positioned vertically, it creates the main background of the picture.
Complex crafts are available for older children. The photo shows the three-dimensional composition “Fire Extinguishing”. In it, each element is made in different ways. For example, in the photo the fire truck is made of Lego, the firefighters are made of plasticine, and the burning house is made of wood rods laid in the form of a log house.
Dough crafts
Salt dough successfully replaces plasticine. It is also malleable, but when hardened it becomes hard and can retain its shape for a long time. This blank can be painted and varnished. Dough recipe:
- For 200 mg of flour add 150 mg of table salt and 5 tbsp. vegetable oil.
- The components are diluted with water to the desired consistency.
From the prepared plastic mass you can easily fashion a fire truck and a helicopter, houses engulfed in flames, emergency workers, etc. The workpiece is placed in the oven and dried at a temperature of +70...+80 0C for 1 hour. Accelerated drying is provided at a temperature of +110...+120 0C for 25-30 minutes. After cooling, the hardened workpiece can be painted in any color using acrylic paints.
Trimming
Unusual crafts are obtained using the trimming technique. Essentially, this is a mosaic laid out from paper elements that will have a cone shape. To do this, small squares are cut from corrugated (crepe) paper and rolled into a cone. Using trimming you can make spectacular volumetric applications and entire panels. Glue is applied to a dense base and the conical elements are carefully installed one by one. They are pressed using wooden sticks, toothpicks or knitting needles.
Bonfire
You will need: 7 branches, white lace ribbons, a stationery knife, foil, pva glue, water, brush, stones, garland.
Master Class
- Wrap the branches in foil.
- Wrap the branches with lace.
- Dilute pva glue with water in a 1:1 ratio and apply this mixture to the entire lace in several layers using a brush.
- Leave to dry overnight.
- When the branches are dry, you need to cut the lace along the stick, remove it and remove the foil.
- Place the stones in a circle and place a garland in the center.
- Form a fire from lacy branches and turn on the garland.
The fire is ready!
Fabric crafts
Applications using colored patches look very impressive. Such paintings have an important advantage: they can be made soft using thick fabric as a base. The photo shows a warning picture that will remind you of the dangers of matches. The necessary details are sewn onto the woven base. To add volume, cotton wool is placed under some flaps. Human figures or his face can be embroidered or drawn.
Another direction is voluminous woven crafts. In the photo there is a “Fun Fire Extinguisher”. You can use foam rubber or polystyrene as a base. The base is covered with red fabric. Characteristic small details are sewn on. They can be made from ribbons, braid, felt. This craft is absolutely safe for kids.
Crafts from napkins
Paper napkins make magnificent crafts. One popular option is to roll napkins into small balls and soak them in gouache of different colors. From such elements you can put together a three-dimensional picture. The technology is the same as when working with beads.
Even a small master can make voluminous figures from such lumps. The photo shows a small composition on a fire theme. The frame of a machine or structure is assembled from matchboxes or cardboard boxes. On top it is tightly covered with balls of napkins, painted in the desired color.
Crafts reflecting fire-fighting themes, made by a child together with an adult, help to learn the basic rules of fighting fire. They can be made from different materials and in different ways. It is important to inspire the little master to be creative, and he will receive the necessary information during the process of work.
Dough as a material
Crafts about fire safety can be made from dough. Modeling from salt dough is similar to modeling from plasticine. Preparing the dough is not at all difficult: mix 220 grams of fine salt with 220 grams of flour, add two tablespoons of water, 130 milliliters of vegetable oil and a little gouache or vegetable juice to color the dough.
Mix everything thoroughly, the dough should be stiff. Children will enjoy sculpting with dough.
- To sculpt from dough, you will need available materials: modeling knives, boards and water to wet the pieces of dough during the process of creating figures.
- After all the figures are ready, you need to paint them. For this you will need paints or gouache.
- To dry the craft, you can use the oven, setting it to the lowest temperature.
The dough craft cannot be placed on the battery, because it will crack.