Consultation for parents. Games with children “Cut-out pictures of the house and in the garden”
MUNICIPAL AUTONOMOUS EDUCATIONAL INSTITUTION
"Kindergarten No. 396", Perm
Consultation for parents of children of the second junior group
topic: “Cut pictures - at home and kindergarten”
Developed by teacher Yulia Vitalievna Fedeneva
Dear parents! An interesting option for didactic games are cut-out pictures, we’ll talk about this today. But first I want to ask you, do you use this game with your children and grandchildren? Where do you get the pictures? How do children behave in the game?
Cut picture
is a picture
cut
along straight lines into a different number of parts. The child does not have to think about the shape of the parts and can focus only on the image.
The purpose of cut pictures:
Teach your child to make a whole from several parts. In the process of playing with pictures, the child gets acquainted with the world around him, expands his vocabulary, activates speech, develops logical thinking and fine motor skills.
When a child collects a drawing, he must imagine what he is collecting, what image he will get. In this case, he must correlate the pieces with the image so that the correct place is allocated to it. Otherwise the illustration will not work. This requires concentration, seriousness, and attentiveness from children.
When folding cut images, the baby begins to realize the objective integrity and compose an illustration from parts. He trains his memory, develops thinking, and spatial orientation. Drawings are great for improving fine motor skills. By consolidating knowledge about objects and phenomena, assembling a whole from pieces, the goal of the cut-out pictures game is formed.
From simple to complex
At first it is better to use the simplest designs with a small number of individual pieces. The image should be familiar to the baby. A good option is two similar pictures, one of which is divided into 2 parts. In this case, one can be a sample.
After the child masters this fun, he will not need an example picture. For this game, drawings from coloring books or old books will be useful. It will be much more interesting if you draw them yourself. Use bright, but not irritating colors.
First, cut the images into two, then into three parts. Then increase the number of pieces gradually when the child folds the previous drawing on his own. You should know that the number of elements collected increases, and their size decreases. There are times when a baby puts together pictures with large pieces easier.
Very often in kindergarten I involve older children in making such games for younger children, and preschoolers are happy to help me. But at the same time, I am pursuing my goals, my task is not only to attract a child to artistic work, but also to teach how to cut paper, while developing children’s hands and fingers. The game of cut pictures is widely used in speech therapy activities with preschool children of the middle and senior groups. A speech therapist works with them and uses these games in his work. At every age, starting from 1.5 - 3 and continuing up to 7 years, the child is very interested in this fun, because with the help of it he learns the alphabet, toys, professions, transport, etc.
Methodology “Cut pictures”
Author: Belopolskaya N.L.
Goal: to identify the level of development of children’s holistic perception of an object picture.
Conducting an examination: an adult shows the child parts of a cut picture and asks him to put together the whole picture: Look carefully at these cards. What do you think it is? What object is shown on them? Now fold these cards so that you get the item you named.
Training: an adult shows how to connect the parts into a whole. After this, he again invites the child to complete the task independently.
Stimulus material: object pictures, cut into several parts (2-6).
Processing instructions: Children with normal mental development from the age of 3 put together a picture from two parts using the trial method. After 4 years they move on to visual correlation. Pictures cut into 4 parts are offered from the age of 4; by the age of 5, the task is completed using the method of visual correlation. When working with pictures cut straight into three parts, children often “lose” the middle part, shifting the beginning and end of the image, but when surprised and asking, “Where should we put this piece?” fix the error themselves.
Children with mental retardation can assemble a picture of two parts by the age of 4; a picture of 4 parts can cause difficulties for them even at the age of 5. After showing the method of action (the adult collects, shows the child, and then destroys the picture), the child completes the task. Children are distracted, may not complete the task, and require organizational help and support.
Children with mental retardation do not understand the meaning of the task and randomly rearrange parts of the picture. By the age of 5–6 years, these children are able to assemble a picture cut into 2–4 parts, but to do this they need to be shown an already folded image. If the parts are upside down, folding becomes very difficult. Only after being shown and done together with an adult do they begin to assemble the picture on their own. However, for some of them, composing pictures from four parts remains inaccessible at this age.
1 point – does not understand the purpose of the task, acts inadequately in the learning environment. 2 points – accepts the task, but does not understand the terms of the task, acts chaotically, and after training does not move on to an independent method of execution. 3 points – accepts and understands the purpose of the task, performs it using the method of enumerating options, after training moves on to the method of targeted trials. 4 points – accepts and understands the purpose of the task, acts independently by trial or practical testing.
Sample stimulus material.
Methodology “Construction according to a model” (author T.V. Lavrentyeva) The methodology “Design according to a model” is aimed at determining the level of development of spatial perception based on an analysis of the relative position of objects in space.
The material used is three pieces of building material of different shapes (for example, figures with a base - a semicircle, a triangle, a rectangle). The experimenter and the child have their own sets of parts.
The experimenter behind a screen (or a sheet of paper - a screen) creates a structure from building parts. Then he opens the structure and asks the child: “Build it the same way with your cubes.”
1. High level of task completion - construction of a structure based on visual comparison with the model.
2. In case of difficulties, the experimenter builds a structure without a screen (screen), in front of the child. Correct completion of the task in this case corresponds to the average level.
3. A low level is considered as a lack of independent completion of the task, even when the experimenter built the structure in front of the child.
“Free drawing” technique (“Drawing on a free topic”, “Beautiful drawing”)
The level of formation of ideas about the environment is revealed. Level of proficiency in drawing techniques and development of motor skills. The child is provided with paper (not glossy), pencils and colored pencils, and markers. Pencils are selected that are more contrasting in relation to the paper (red, blue, green, black, brown) Blind people use N.VKlushina’s device
This technique is a drawing - a message. Instructions: “Draw whatever you want” or “Draw a beautiful color drawing.” Materials: paper, large selection of pencils and pastels. Interpretation:
· General impression;
· Detailed interpretation begins with the most unusual elements of the drawing; clarifying questions on these elements;
· Formal features:
- the format of the drawing and its adequacy to the size of the sheet of paper; - pressure in general (strong may indicate excessive control, sometimes - aggressive tendencies, weak - about uncertainty, an asthenic state, variable - about instability, mobility of the nervous system); Content features: - absence of important elements of the picture; - pressure when drawing details. Location of the drawing on the sheet:
- the location in the center of the sheet is typical and is not interpreted;
- upward shift - high level of aspirations, “soaring in the clouds”, lack of support, instability of family / social ties; - downward displacement - lack of self-confidence, desire to remain in the shadows, low self-esteem; - an upside-down drawing - in children under 4 years old can be considered the norm, in older ones - it can indicate a violation of the concepts of “top-bottom”. Other elements and their possible meaning:
- sharp corners - a tendency to aggressive manifestations; - clear geometry - intellectualism, sometimes combined with insufficient development of the emotional sphere; - an abundance of geometric (including rectangular) shapes - the need to fit into boundaries, standards, the desire to comply with generally accepted norms; - chess coloring - rationality; - shading - anxiety; - darkening of an element or its excessive drawing in a specific area - a problem area, rigidity, for example, darkening of the mouth, may indicate difficulties in the communication sphere; - sketchiness - poor understanding of oneself or reluctance to reveal oneself in drawings and words; - oddities in the drawing, for example, the use of plant elements in a drawing of a person or animal and other elements that are inadequate to the context are alarming, painful signs, except in cases of strong creativity.
.
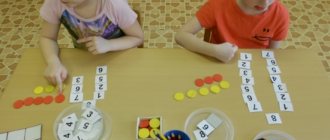
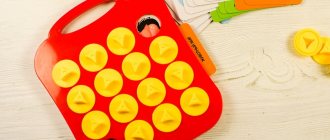
Game 5. “Cut pictures”
Goal: to teach the perception of a holistic graphic image; develop attention.
Materials: two sets of cut pictures (10x10) with different numbers of parts (2-5) and cut configurations.
How to play: Before starting the game, prepare cut-out pictures. To do this, you can use suitable illustrations from books or postcards that depict objects familiar to children (the pictures should be simple and clear). Give each child a whole subject picture (later a story picture) and the same picture cut into parts. Ask the kids to assemble the picture according to the model. In the future, you can invite children to collect pictures without a sample.
Game 6. “Assemble a picture from cubes”
Goal: to consolidate the ability to perceive a holistic image of an object, to compose a complete image of an object from individual parts; develop attention.
Materials: sets of cubes from which you can make simple and narrative pictures (4-6 cubes per set).
Progress of the game: the game is played individually.
Offer your child a set of cubes consisting of 4 pieces. Show a sample picture and ask to assemble the same picture from cubes. If the child cannot complete the task on his own, help him.
Didactic games for the development of auditory perception
Game 1. “Recognize by sound”
Goal: develop auditory attention; auditory perception of sounds made by various sounding toys.
Materials: sounding toys (rattles, whistles, bells, rattles, screen.
Progress of the game: Show the children the toys and invite them to play with them. Let the kids make sounds from them. Until they learn to clearly differentiate them by ear. Then hide the toys behind the screen. Invite the children to listen to the sounds and guess what objects make them (you can play the sounds behind the child's back or ask them to close their eyes). Depending on the level of speech development and abilities, children can show the toy or name it.
In the future, the role of presenter can be offered to one of the children.
Game 2. “Bear and Bunny”
Goal: to develop auditory attention, perception and differentiation by ear of different tempos of sound of musical instruments.
Materials: drum or tambourine.
Progress of the game: explain to the children the rules of the game: “Let's play! The bear walks slowly - like this, and the bunny jumps quickly - like this! When I hit the drum slowly, walk like a bear, when I hit the drum quickly, jump quickly like a bunny.”
Repeat the game several times. You can invite the children to try beating the drum at different tempos, and then choose one of the children to be the leader.
Game 3. “Who’s there? »
Goal: to develop speech hearing.
Materials: toys: cat, dog, bird, horse, mouse, and other animals; pictures with their images.
Progress of the game: two adults participate in this game: one is behind the door, holds a toy and gives a signal, the other conducts the game.
Outside the door you can hear the cry of an animal (meow, woof-woof, pee-pee, qua-qua, etc.). Invite the children to listen and guess who is screaming like that: “Listen, someone is screaming outside the door. Listen carefully. Who's there? » Children can show a picture of the corresponding animal or name it in words.
Open the door and take the toy: “Well done, you guessed right. Listen. Who else is screaming outside the door?
The game continues with other toys.
If there is no second leader, then you can play the game by hiding the toy behind a screen.
Game 4.”Who called? »
Goal: develop speech hearing; learn to distinguish the voices of familiar people by ear; develop auditory attention.
Progress of the game: invite the child to the center of the room and ask him to turn his back to the other participants in the game (you can ask him to close his eyes).
Children take turns calling the child's name in a normal voice. The baby should listen carefully and try to guess who is calling him (point to the child and say his name).
If the child guessed who called him, he changes roles with this player. If he doesn't guess correctly, he continues to drive.
You can complicate the task by changing the strength of your voice, timbre, and intonation when pronouncing the name.
Game 5. “Find the picture! »
Goal: to develop speech hearing.
Materials: paired pictures from lotto depicting various toys and objects.
Progress of the game: First, the game is played individually.
Place several pictures on the table in front of your child. Take the paired pictures for yourself. Take one picture from your set, place it face down on the table and name it. Ask your child to find the same picture in his own place, show it and, if possible, repeat the name. Then invite your child to turn the picture over and compare the images. That's right, this is a house. Well done - you guessed it right!
The number of pictures can be gradually increased. In this case, you can say 2-3 words.
The game can also be played with a group of children. Give them 1-3 pictures. Then take one picture from your set and, without showing it, name it. If someone finds the same one among his pictures, he raises his hand and receives a second card. Unrecognized cards are put aside and solved at the end of the game. The first player to collect pairs of pictures wins.
Didactic games to develop the sense of touch
Game 1. “Round Square”
Goal: develop sense of touch; learn to feel objects.
Materials: box with holes or bag; cubes and balls.
How to play: At the beginning of the game, invite the children to feel the cubes and balls. In order to focus on sensations, you can invite kids to feel objects with their eyes closed.
Then put the items in a box or bag and invite the children to play. Ask one of the children to take a ball out of the box by sticking their hand into the slot. Offer the next child to get the cube, etc.
Subsequently, you can put cubes and balls of different sizes, made from different materials, into the box.