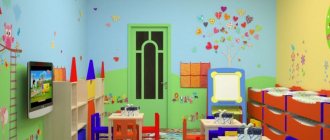
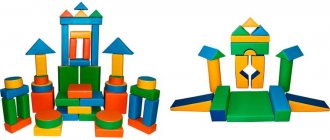
A beautifully designed group in a kindergarten will allow children to feel comfortable, show greater interest in the world around them, and look forward to visiting kindergarten. Correct and beautiful seasonal decoration of a group in kindergarten or decorating a group for the holidays brings children a lot of joy, especially if they take part in making decorations. Today there are many ways to do it yourself, for example, decorating a group based on its name. If the name of the group is “Stars” or “Rainbow”, you can draw posters with images of stars, come up with emblems, pictures for cabinets or beds, make stickers for towels, etc. In a word, design the group in a single style based on the theme of the name.
Autumn group decoration in kindergarten
In the fall, many children come to kindergarten for the first time, so that their adaptation is faster and easier, you can decorate the group in the kindergarten in the fall with bright crafts and drawings.
- For example, you can hang dried tree leaves from the ceiling, or cut them out of multi-colored paper; you can also cut out mushrooms, apples, and viburnum. Involve the children in this or ask them to draw pictures about autumn, how they walk with their mother in the park, they will be interested in helping you and such joint design of a group in kindergarten with their own hands will bring even more benefits.
- Hang autumn garlands of leaves, pumpkin-shaped lanterns or fly agarics on cabinets or cornices.
- Make little men out of acorns, matches and plasticine and build a real “City of Acorns”.
- On the walls you can hang frames made in orange tones with birthdays of September, October and November.
- In the corner of the room you can put a large basket with “gifts of autumn”; place pumpkin, viburnum, rowan, sunflower, apples, grapes, nuts, chestnuts, acorns there.
But don’t forget - the design of a group in a kindergarten should be done in the same style, clearly reflect the purpose of the design, so that the child does not develop an aesthetic imbalance. To solve this problem, among other things, you can use templates for decorating a group in a kindergarten.
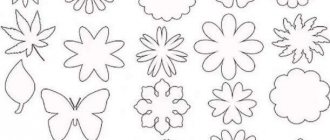
Beautiful paper flowers for March 8th - how to make them yourself step by step, photo
With the onset of spring, nature wakes up, primroses appear in the thawed areas - crystal snowdrops, delicate crocuses, majestic daffodils. In addition, already at the beginning of March you can admire the bright yellow fluffy branches of mimosa, which has become a symbol of the main women's holiday. In honor of March 8, I really want to please my beloved mother and grandmother with paper flowers - made by the hands of children, they look especially touching. Beautiful DIY paper flowers in our master class are quite within the capabilities of children 5-6 years old, but older children will also be happy to take part in making the craft. A little patience, step-by-step following the instructions - and you will get the best gift for Women's Day.
List of materials for creating paper flowers for March 8th:
- colored paper, corrugated
- yellow threads, yarn
- wire
- scissors
- long sticks (skewers) made of wood
Master class on creating flowers from paper and thread, step by step with photos:
- We start by making mimosa “balls” - we will need wire and yellow yarn. Open the blades of the scissors slightly and place a wire between them (as in the photo). We wind the thread tightly, in several layers, and then bend both ends of the wire upward. The coils of yarn end up inside.
- We connect the sides of the wire together and scroll several times, tightly encircling the skein. Then, on the other side, we cut the threads and get a fluffy pompom - a mimosa ball.
- We wrap the wire stalk with a strip of green paper, the tip of which is fixed with glue. We begin winding the stem.
- After making a couple of turns, we attach the second ball.
- Then, as you go, add another 5 - 6 pom-pom balls, placing them on both sides of the stem. The result should be a mimosa sprig with yellow “flowers”.
- Now we cut a strip of green corrugated paper 4 cm wide. On one side along the entire length of the strip we make cuts in the form of a thin fringe (about 2/3). We coat the other side with glue.
- We begin to wrap the prepared strip around a wooden stick, gradually moving towards the bottom - do not forget to straighten the fringe.
- We collect ready-made flower balls and green mimosa branches into a bouquet - a great gift for March 8th! As you can see, it is quite possible to make beautiful flowers with your own hands, almost as good as real ones. Happy holiday!
Winter group decoration in kindergarten
Winter decoration of preschool institutions is always the most festive and elegant, because in winter there are so many favorite children's holidays. To decorate a group in winter, you can choose a specific theme, for example, decorate the group in the style of the fairy tale “The Snow Queen”, “Snow Maiden”, “Twelve Months” or “Frost”. To do this, you need to cut out fairy-tale characters from white paper and stick them on the windows, hang them from the ceiling or hang pictures on the walls. Garlands of snowflakes, lanterns, angels, snowmen, and bells, hung above windows, on cabinets or walls, look great.
When decorating a group in a kindergarten for the New Year, add bright rain, Christmas tree decorations, figures of Father Frost and the Snow Maiden. You can paint the windows with special white paints, which are then easily washed off, and instead of Christmas tree figures, a Christmas tree made of green helium balloons decorated with garlands is perfect. Make a large Christmas tree out of paper or from cut-out children's palms and write down each child's wishes for the New Year on it.
Craft “Bouquet of Paper Flowers” - do it yourself for school using a master class with photos
To create flowers from ordinary corrugated paper, it is important to be patient so that the product turns out neat and beautiful. Among the many step-by-step paper flower master classes, we have selected one of the simplest, accessible to schoolchildren of all ages. Today we will make our own paper flowers - such a bouquet will please your mother or grandmother for its extraordinary touchingness and freshness. Follow the step-by-step photos, and soon your table will be decorated with an original craft, a real work of art.
What materials and tools will be needed for the paper flower master class:
- colored paper
- ruler
- pencil
- scissors
- glue
The procedure for making paper flowers for school with your own hands, photo step by step:
- Take a sheet of paper and measure out a strip (width 5 cm, length 10 cm). Then we retreat 1 cm from the edge, draw a line and make small cuts in the form of a fringe.
- Using a pencil, twist the strips upward.
- A green paper strip (size 4 x 10 cm) needs to be rolled into a tube, the middle and edges carefully sealed.
- We begin to glue the fringed strip onto the green tube - with the curls facing up.
- We cut out the leaves and also glue them to the stem of the flower.
- That's it, we have a hyacinth - a beautiful spring flower. To create a bouquet, you can use paper of different colors to create an original composition. A mother or grandmother will be pleased to receive such a touching bouquet of flowers from the hands of her daughter or son, grandson or granddaughter.
Spring group decoration in kindergarten
Bring as many bright colors as possible into the spring decoration of the group in kindergarten , so that the children feel how nature awakens, how buds appear on the trees, and from them leaves, how the bright sun warms, and blue clouds float across the sky.
- Cut out the word “Hello, spring!” in large letters and hang it on the wall, immediately attach a bright rainbow.
- Make pictures of the spring months (you can find and download pictures for group design on our website), where you will record the spring holidays or children’s birthdays. Draw the month of March in blue tones, draw a tree covered with snow, April in green and a tree with flowers, May in yellow and a tree with leaves.
- You can hang carved figures of the sun, clouds, bees, birds, and flowers under the ceiling.
- Let the kids make crafts of tulips and snowdrops from colored paper and you arrange them in vases.
- You can attach butterflies and ladybugs from colored paper to the curtains.
The decoration of a group in a kindergarten in the spring should be carried out in such a way that there are as many bright details as possible; alternatively, you can decorate glass bottles or jars and make flowerpots out of them, replacing plain flowerpots for indoor flowers with multi-colored bright flowerpots.
DIY paper flowers for children - easy step-by-step master class with photos
Children's crafts made from scrap materials are a great gift for mom or grandma on March 8, Mother's Day. As a rule, most often for their hand-made masterpieces, children choose colored or corrugated paper, from which they make beautiful appliqués, postcards using the origami and quilling techniques. We suggest making paper flowers with your own hands by studying an easy step-by-step master class with photos - and you will get cute daisies.
Materials and tools for the paper flower master class:
- corrugated paper – white, yellow
- wooden stick (skewer)
- sticky tape - green
- scissors
- thread
- glue
Step-by-step instructions with photos for a master class on a children's craft - a paper flower:
- First, cut a strip of white corrugated paper and bend it 2 - 3 times.
- On one side you need to cut out the flower petals.
- Take yellow paper, cut a strip and fold it several times. We make small cuts as in the photo.
- We roll up the yellow cut paper and attach it to a skewer.
- Now we twist the white petals slightly to one side, imitating a natural bend.
- We coat the lower part of the white strip with glue. Then we apply a skewer with “stamens” at one end and begin to roll, heading towards the other end.
- We wrap the finished flower at the base with thread.
- We wind green adhesive tape over the thread and towards the bottom - the stem turns out just like a real one.
- For a gift to your mother or grandmother, it is better to make a bouquet of several flowers (unpaired number). Alternatively, such a flower can be used to create a tabletop composition or a beautiful greeting card.
Summer group design in kindergarten
The decoration of a group in a kindergarten in the summer should be even brighter and more colorful than in the spring.
- You can make garlands of butterflies, flowers, fish and hang them from the ceiling, on the cornices.
- Make a train out of several carriages and write down the name of the birthday boy in each carriage in order of turn. Children will look forward to the next birthday when one carriage has already rushed ahead.
- The design of a group in a kindergarten in the summer will look original in the form of a city waking up after a long winter. You can place a large city made of bright colored paper on the wall, making houses (police station, hospital, school), trees, clearings, river. Ask each child and their parents to make one part of the city (for example, cut out a store or a zoo from colored paper).
The design of a street area in summer is no less important.
- In summer you can draw daisies, butterflies, birds on the asphalt, make animal figures from car tires, mushrooms from old bowls, bees from plastic bottles.
- Each stump on the territory of the kindergarten can be decorated and made into a cute face of a bear, pig or cat.
Ideas for decorating a kindergarten group can be very different. With a little imagination, each group can be made a source of pride for teachers and parents, and children will go to such a group with great pleasure.
DIY paper flowers - master class for beginners, photo
With the approach of March 8, Mother's Day, the demand for fresh flowers increases - many people buy lush bouquets of tulips, roses, daisies for their beloved mothers and grandmothers. However, along with a touching congratulation, you can present your family and friends with a bouquet of flowers made from the simplest materials available. How to make paper flowers with your own hands? Our step-by-step master class with photos for beginners is designed for children over 6 years old, but preschoolers will need adult help.
Necessary materials and tools for creating paper flowers:
- thick two-color paper
- ruler
- pencil
- scissors
- narrow tape
- glue
- wooden stick
- green tape
A simple master class with photos on creating flowers from paper:
- Take a sheet of paper, measure 6 cm from the edge, draw a line and cut it. Then we retreat 1.5 cm on the strip and draw a segment.
- On the other side of the strip we cut out the cloves.
- Now the “toothed” side needs to be cut into a thin fringe, without going beyond the line.
- We apply a wooden stick to the strip and wind it, and at the end we drip a little glue to hold the bud together.
- In order for our bud to “bloom”, we need to bend the petals in different directions.
- We wrap green tape on a stick or skewer.
- We attach the head of the flower to the stem, and make the core from a piece of plasticine, a bead, a button or a strip of paper rolled into a “roll”. These wonderful paper asters can be placed in a vase or made into a panel on the wall.