Creating a paper applique is a fairly popular task in kindergarten. Often, a task is given to parents so that they can implement it together with their child. One of the popular themes is the theme of birds.
- What paper is suitable for appliques?
- Application options for children
- Junior group
- Middle group
- Senior group
- Ready-made templates
- Origami parrot: how to fold it from paper
- Pigeon
- Crow
- Step-by-step instruction
- Cutting
- Glue
- Tips and tricks
- Gallery of ready-made examples of making birds – 14 photos
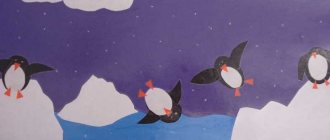
Very often, such crafts are proposed to be done in the spring, when nature begins to bloom.
Making a bird out of paper is not that difficult. However, despite this, you can vary the degree of difficulty depending on which group the child is in. Using ready-made templates, you can make an interesting and original craft about birds, which will not only decorate the interior of your home, but will also surprise your kindergarten teacher.
Paper plate craft
How to make such a bird craft? Disposable plates are taken. They are painted with the necessary paints and eyes are drawn on their surface, and a paper beak is also placed. The bird's wings and tail are best cut out of paper or made from real bird feathers.
You can also stretch a thread near the bird’s eyes, by which you can hang it, for example, on a chandelier, to then take wonderful photos of the bird’s crafts.
What paper is suitable for appliques?
Of course, first of all, to create a paper applique you will need the paper itself. Absolutely any paper is suitable for creating an applique, since everything depends on the work itself.
It will be best if the paper is not too thick and two-color in its characteristics.
The paper may be thick, but it is worth taking into account the characteristics of a particular craft.
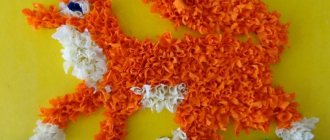
Application "Firebird"
To create such a craft, you will need pre-dried leaves of trees (linden, rose hips, birch, oak, etc.) of various colors, as well as large seeds, for example, pumpkins. Linden and birch leaves are glued onto a sheet of cardboard, which will serve as the body and head, respectively.
A fluffy tail is made from rosehip leaves; you can also add a small tree branch for a strong base. The seeds form the eyes and small details of the craft.
A tuft from some branch will help to completely decorate the “Firebird”. You can safely send this bird craft to an exhibition in a kindergarten.
How to make notes for a lesson on application
The lesson on the applicative type of art creation includes three stages:
- introductory to familiarize yourself with the topic, appeal to the experience of children - up to 3 minutes;
- the main one for carrying out preparatory work, preparing materials and tools, completing tasks and physical education for 10–15 minutes;
- the final one for assessing children’s work and reflection - up to 3 minutes.
Table: Kasatkina M.V. lesson notes on appliqué (work in pairs) on the topic “Birds on a branch” (fragments)
| Stage | The essence |
| Introductory | The teacher holds a book in his hands and invites the children to come up (the children stand in a semicircle around the teacher). - Guys, there is a riddle about a bird hidden in this book, listen carefully, I’ll read about it to you now, try to guess who we are talking about? … > |
| <… The teacher puts a picture of a titmouse on the easel. — Guys, is the tit a migratory or wintering bird? Children give the answer and prove it. - Look at what a wonderful tit flew in and sat on a branch (shows a sample). | |
| Educator: - Guys, it’s easier for both animals and birds to overwinter when they are together, so let’s not leave our tit alone and place a whole flock with her. - Tell me what the bird has? Children name the components of the bird's body. | |
| Basic | The teacher displays a mnemonic table on the easel depicting the sequence of carving a bird. - Guys, there are geometric shapes of different colors and sizes on the tray, let's tell you what parts we will cut out the tit from (from a black square - the head, from a yellow rectangle - the body, from a black rectangle - the wing, small parts - the tail, the eye and beak are already ready, you will finish drawing the bird’s legs with a pencil). If necessary, the teacher shows ways of working. |
| - Before we start work, we will rest. Children stand in a circle. Finger gymnastics “Flock of Birds” is carried out. When naming birds, bend your fingers. Sing, sing along, ten birds are a flock. - This bird is a nightingale, this bird is a sparrow. This bird is an owl, a sleepy little head. This bird is a waxwing, this bird is a corncrake. This bird is a little gray feather. This one is a chaffinch, this one is a swift, this one is a cheerful siskin. Well, this is an evil eagle. Birds, birds, go home! (Clench your fingers into fists.) | |
| The teacher removes the sample. — Guys, you will again do the work in pairs, so help each other, consult. Don't forget that before gluing, you should first place the birds on a branch. And please be careful with scissors, and our magic helper table will remind you how to work with them. The teacher sets up a mnemonic table “Working with scissors.” | |
| - Now get to work. Children perform the appliqué in pairs, the teacher helps, controls the children, helps. | |
| Final | At the end of the work, the teacher offers to clean his workplace and places a sample on the easel. “Our titmouse won’t be sad now, bring your work and we’ll have a whole flock of titmice.” Children exhibit their works and admire them. |
| Quote via: https://nsportal.ru/detskiy-sad/applikatsiya-lepka/2017/02/17/moi-zanyatiya | |
At the end of the lesson, the teacher should thank the children for their work and praise the results of their creativity
Video: lesson on collective application on the topic “Migratory Birds” in the senior group
Origami birds
It is very easy to make this craft using the well-known origami technique. The essence is this: strips are cut out of colored paper, which need to be folded into a knot so that their ends are different in length.
Using scissors, the head of the bird is cut out on one side, and the tail part on the other. These origami will perfectly decorate your home at any time of the year, and in winter they will remind you of warm days.
Ready-made templates
You can find a huge number of bird templates on the Internet. Here are examples of ready-made templates that can be used for paper crafts:
Origami parrot: how to fold it from paper
An interesting bird-themed craft will be a parrot using the simple origami technique, which is popular among children. This craft is suitable for any age and it is not complicated. All actions must be implemented in accordance with the diagram presented below.
You should choose paper that is not too thick, preferably one-sided.
In total, the scheme contains 12 steps, all of them are simple and understandable.
1. The basis for the parrot will be a square, which must be folded in half diagonally.
2. The far edges are folded towards the center of the sheet as shown in the diagram.
3. The free corner is bent.
4-11. After which all the parts are folded and turned out as shown in the diagram.
12. The end result is an interesting two-color parrot. In order to make the parrot more bird-like, you should glue a homemade eye. It’s even better to do it on both sides. To create an eye you will need white and black paper. Circles are cut out of paper. The black circle will be 2 times smaller than the white one. Next, the circles are glued to the place of the eyes.
The origami parrot is ready! This craft will look most advantageous in the junior and middle groups of kindergarten.
Pigeon
If you want to make a dove, then this is also quite possible. Such a craft will not require large-scale expenses, and ready-made crafts can be used as decorations.
This dove is made in 5 minutes; for this you will need: white paper, scissors, cardboard, glue stick and napkins. A silhouette of a dove of the required size is drawn on cardboard, then the template is cut out.
The resulting template is applied to the cardboard and the required number of birds is created.
Next, take napkins and fold them like an accordion.
Having connected the templates, we make cuts into which the wings will be inserted (for example, from napkins).
The accordion is threaded through the slit and the wings are straightened.
This craft is no different from the first craft presented in the list. However, in this case the craft is considered as a specific pigeon.
Crow
To make a paper crow using the origami technique you will need a few materials. Making an origami crow is quite simple. A special advantage of this model is that a notebook sheet can be used as a basis. It is precisely for this reason that crows are quite popular among schoolchildren, but this does not mean at all that such crafts are made exclusively by schoolchildren.
As mentioned earlier, a sheet of paper with a proportion of 4 to 5 is taken as a basis. It is best to choose paper of a suitable color, not too thick so that it is easy to bend.
It is noteworthy that if you take thicker paper, the output will be a crow, which can not only open and close its mouth, but also click quite loudly.
This origami must be assembled in accordance with the diagram presented below.
The sheet that acts as the main one must be folded in half, and then in half again.
Next, the edges are bent as shown in the diagram and the workpiece is partially unfolded. After which the part is reattached, as shown in the sixth step. In the same step, a small incision is made.
The two halves of the opposite ends are connected and at the end we get the head of a crow.
In order for the part to look more like a crow, you need to glue its eyes. Eyes can be made from plain white and black paper.
Birdhouses made from milk bottles
Don’t rush to throw away milk bottles and Kinder surprise containers, because you can make an attractive craft out of them. Round holes are cut in milk bottles, clothespins are glued to the bottom of the bottles, and the birds themselves are on them in the form of kinder boxes. Just decorate the birds' bodies with down or feathers, colored paper, and also draw eyes on them with a felt-tip pen, then the craft will be completely ready.
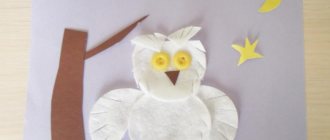
Chickens
In order to make a craft with the image of funny chickens or other poultry, take a sheet of colored cardboard, cotton pads, a brush with paints, as well as glue and plasticine.
- The entire cotton pad will play the role of the head, as well as the body of the bird; if you separate half of the disc, you will get wings or a tail. Pre-paint them with paints and then glue them to the cardboard.
- All other elements (paws, eyes, beak) can be made from plasticine.
- To create a goose or chicken, you need to make a printout with a picture of a bird, and also stock up on a piece of cotton wool and PVA glue.
- Roll cotton balls to fill the image.
- You can also add colors to your work - paint some elements if necessary, add details.
- This way you will get a bird with plumage, the effect of which is created by cotton wool.
Peacock from bottles
You will need multi-colored plastic bottles, foil, thin plastic, a log, a metal rod, foam, a stapler and glue. The body of the peacock along with the head is formed from polystyrene foam. Small indentations are made in the intended places for the eyes.
The log will be used as a base; you need to attach the peacock's body to it using a metal rod.
Feathers are sold from cut plastic bottles of different sizes: the longest for the tail, the shortest for the neck and normal size for the rest of the body.
One part of the future feather is rounded, and notches are made on the other to give a more realistic look to the feather. The tail feathers can be decorated with cutouts made of thin plastic and foil.
Decorations can be attached with a stapler or superglue. A beak is cut out of a piece of red plastic. The “feathers” are glued with a slight overlap onto each other to the body with superglue. You can make the crest the way your heart desires, but it is better to use colored plastic to create it.
The recesses for the eyes are painted over with felt-tip pens of any color. It is convenient to use some kind of mesh to form the tail. Its collection begins from the bottom edge. The made tail is attached to the body.
Tips and tricks
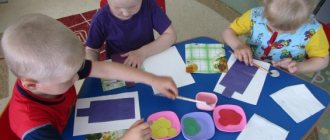
As tips in the recommendations, we can remind you that children need to be instructed on the use of scissors and glue, if this has not been done previously by parents or one of the adults. It is also worth remembering that even with the help of paper, a child can get hurt if he accidentally runs the edge of the paper across the skin. It is for this reason that parents must monitor every action of the child so that in the future he does not cause any injury to himself.
Any of the instructions can be applied to any type of bird; in this step everything depends only on the imagination of the parents and the child.
If you follow all the rules described above and do everything in accordance with the instructions, then the end result will be wonderful bird-themed crafts.
You can be 100% sure that such crafts will surprise others and allow the child to show all his capabilities. At the stage of creating crafts, you can invite the child to fantasize on a given topic, or discuss with him on the topic of finalizing the figures. The child will certainly be interested in the process of creating such birds.
Gallery of ready-made examples of making birds – 14 photos
You can make the bird colorful by decorating it in your favorite shade.
Flamingo from bottles
To make this product you need large plastic bottles (5 and 10 liters), a polymer pipe about two meters long, a corrugated pipe about sixty centimeters long, acrylic, wire, foam.
The base body is made from the largest bottle. In its bottom you need to cut 2 holes according to the diameter of the polymer tubes (future legs). Feathers are cut from smaller five-liter bottles and attached to slits in the body.
A neck is made from a corrugated pipe, which is inserted into the neck of a ten-liter bottle. The head is cut out of foam plastic. Eyes are drawn with a felt-tip pen and a black plastic beak is attached. It is better to start attaching the feathers from the very bottom to the mesh.
Chickens and geese
These poultry have abundant plumage, which also needs to be indicated on the applique. Depending on the age of the child, applique with these birds can be of different types.
For the little ones, the same approach is used as when making chicken. As a final step, the child will need to place cotton wool on it, which will imitate plumage.
For older children, for example, for the second or third year of being in kindergarten, pre-prepared bird templates are used. They are printed on paper and given to children. And they, in turn, must correctly fill the template with cotton wool where it is needed.
The remaining parts should be colored with felt-tip pens, pencils or colored pens, whichever is more convenient for you.
For this craft you will need:
- Glue stick
- Outline drawings of birds
- Paints, pencils, pens
- cotton wool
- Scissors