Lesson notes on the application “Birds on branches”
(middle group)
Goals: - to teach children to make an application in the form of a bird; - consolidate the idea of their name, structural features, body shape, wings, tail, distinctive features of different types of birds; - to cultivate love and caring attitude towards birds; - strengthen the ability to carefully use glue; -develop fine motor skills of the fingers, the ability to listen and hear birds singing; -develop observation and attention; - practice correct sound pronunciation; develop a response to a verbal signal.
Equipment: template made of colored paper: body, wing, tail, beak; half of an album sheet; oilcloths, brushes, glue, napkins. Image of birds: tit, sparrow, woodpecker, swallow; image of a tree. Audio recording of birds singing. Toy steering wheel.
Progress of the lesson: -We go on a trip to a forest clearing. We'll go by car. How does he signal? (Children enter the group room, in which images of birds are pre-attached) -Listen, guys, who sings so beautifully? (Birds) -Where did they hide? Let's find them and see what kind of birds flew to us. This is a magpie. It is also called the white-sided magpie because its sides are white. This is a little sparrow. Nimble jumper. How does he tweet? Chick-chirp! -What kind of bird is this? In a red riding hood, he knocks and knocks on wood with his sharp beak. Woodpecker. -And this is a titmouse - she has a yellow belly. All these birds live next to us both in winter and summer. - But this bird flew to us from the south. This is a swallow. It flies very quickly, catches midges, mosquitoes and other harmful insects. -Look, guys, what is this unusual bird? Where did she come from here? I think I know: this bird was made by children from another kindergarten and sent to see the world. Is it really beautiful? -Yes! - Do you want me to teach you how to make such beautiful birds? And when you do them, we will let them fly to other kindergartens to visit the children. -Let's first figure out what the bird will consist of. I will show, and you name the parts. - Head. -Which smoothly passes into the body. - Wing. (why do you need a wing?) -Tail. (why do you need a ponytail?) -Eye. (why do you need an eye?) -Beak. (why do you need a beak?) - Now show me quietly how birds fly (you studied the movements in music classes). The birds flew, flew and sat quietly at the tables so as not to make noise in the forest clearing. -Look at what lies on the table in front of you. 1. A twig depicted on a leaf. 2. The body of your future bird. 3. Wing. 4. Tail. 5. Round little eye. 6. Small triangle eye. - The first thing we do is put a twig in front of us. Then we smear the body with glue and “plant” the bird on a branch. The bird's head is at the top, and the tail will be at the bottom. Glue the wing and glue the tail. Then glue the eye and beak. -Our birds are ready, let's put them on a common tree, and they will sing clear songs for us. -Oh, how loudly the birds sang, what do they want? I think I know. They invite us to play the game “Sparrows and the Car.” (game) - What did you learn to do in the forest clearing? — Did you like our trip? -It’s time for us to return home: wave goodbye to the birds and get into the little car.
Master class on creating a postcard on the theme “Autumn Birds” with children of the middle group of a preschool educational institution
Author of the work:
Polina Bolotnikova, a student of the middle group at the MBDOU “Kindergarten of general developmental type No. 452” of the Samara city district.
Head:
Maria Aleksandrovna Lisova, teacher at MBDOU “General Developmental Kindergarten No. 452” of the Samara City District.
Description of work.
This master class includes photographs and text material, aimed at the development of children in a preschool educational institution.
It includes a combination of drawing and appliqué at the same time. Can be used in the educational process of both schools and kindergartens. Purpose.
The work can be used in drawing classes, you can decorate an exhibition of works on an autumn theme, or use it as a gift.
Target:
familiarizing pupils with the technology of creating postcards for the Autumn holiday.
Objectives of the GCD: Educational:
- to familiarize children with the technology of creating postcards for the Autumn holiday;
- be able to depict on a plane; - learn to distinguish colors; - be able to use brushes, paints, felt-tip pens. Developmental:
- develop observation skills, the ability to reason, discuss, analyze, perform work based on drawings, diagrams and instruction cards;
- learn to use your knowledge and skills in new situations, draw analogies; - develop artistic abilities. Educational:
- cultivate interest in the subject; - cultivate accuracy and independence;
Cultivate a love of work. Resources:
white A4 sheet, paints, brushes, black felt-tip pen, pencil, orange paper, scissors, glue.
Templates
The teacher asks the children to guess what the topic of the GCD lesson will be.
To do this, he includes the musical piece “Hello, Autumn!” (Music - Y. Slonov, words - V. Maslov). Educator:
Guys, what do you think this song is about?
Pupils:
This song is about autumn.
Educator:
Correct.
Let's remember how weather conditions change in the fall? The teacher invites the children to look out the window: at the trees, at the sky. Pupils:
In autumn it becomes colder, in autumn it drizzles.
Educator:
But now it’s not so cold yet: the sun is shining, but it’s already getting chilly.
And in the fall, birds fly south, but not all of them. For example, the following birds do not fly south in autumn and winter: bullfinch, crossbill, goldfinch, siskin, pigeon. We will draw with you birds like pigeons. What do you know about pigeons? Pupils:
Pigeons can be wild and domestic.
They come in different colors: white, black, motley. Pigeons used to deliver mail to people. Educator:
Do you know that pigeons love their chicks very much, they feed them, look after them and keep them warm in such cold weather.
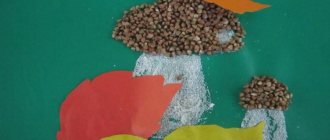
Let's draw a mother pigeon and a chick, which she warms with her warmth. The teacher creates all the conditions aimed at the children actively making postcards, explains the step-by-step actions in the work, which the students repeat.
1. Take a white sheet of paper and fold it in half.
2. Lay the sheet horizontally so that the card can open. 3. Place the large mother bird template close to the right side of the card half and trace with a pencil. 4. Now place the chick template so that it is located next to the mother. So that the outline of the chick template matches the outlined outline. And outline the missing outline with a simple pencil. 5. In the background (behind the birds) draw a clearing. To do this, simply draw a straight line above the middle of the sheet. In the upper left corner we will have the sun. To do this, simply trace the template along the contour and draw rays of the sun. 6. First, let's color the background. Let's start painting the clearing green. To prevent the clearing from being too dark, we will use more water on the brush. Take a medium size brush. 7. Now that the clearing is dry. A little short of the horizon line, we begin to paint the sky. It will be bright blue, for this we take more water on the brush. 8. Now that our background has dried, we begin to paint the big mother bird orange. 9. Now let's color the sun yellow, and then the chick yellow. 10.Now let’s outline the sun, separate the clearing from the sky, draw the paws, draw the eyes and beak of the birds with a black felt-tip pen: the circles are the eyes, and the triangle is the beak. Trace around the template and cut out the wings. Glue the wings: a smaller wing on the left side, a larger wing on the right side. Glue it on, spreading a little glue on the edges of the wings. First we glue the large wing, then the small one. 12.The postcard is almost ready. All that remains is to glue a wish that will warm you with warmth in such cold weather. Autumn, autumn, wait!
And don’t rush with the rains, Give us more summer, Sunshine and light (A. Teslenko) Summary of the lesson on the application “Birds on the branches” (middle group) Objectives: - to teach children to make an application in the form of a bird; - consolidate the idea of their name, structural features, body shape, wings, tail, distinctive features of different types of birds; - to cultivate love and caring attitude towards birds; - strengthen the ability to carefully use glue; -develop fine motor skills of the fingers, the ability to listen and hear birds singing; -develop observation and attention; - practice correct sound pronunciation; develop a response to a verbal signal. Equipment: template made of colored paper: body, wing, tail, beak; half of an album sheet; oilcloths, brushes, glue, napkins. Image of birds: tit, sparrow, woodpecker, swallow; image of a tree. Audio recording of birds singing. Toy steering wheel. Progress of the lesson: -We go on a trip to a forest clearing. We'll go by car. How does he signal? (Children enter the group room, in which images of birds are pre-attached) -Listen, guys, who sings so beautifully? (Birds) -Where did they hide? Let's find them and see what kind of birds flew to us. This is a magpie. It is also called the white-sided magpie because its sides are white. This is a little sparrow. Nimble jumper. How does he tweet? Chick-chirp! -What kind of bird is this? In a red riding hood, he knocks and knocks on wood with his sharp beak. Woodpecker. -And this is a titmouse - she has a yellow belly. All these birds live next to us both in winter and summer. - But this bird flew to us from the south. This is a swallow. It flies very quickly, catches midges, mosquitoes and other harmful insects. -Look, guys, what is this unusual bird? Where did she come from here? I think I know: this bird was made by children from another kindergarten and sent to see the world. Is it really beautiful? -Yes! - Do you want me to teach you how to make such beautiful birds? And when you do them, we will let them fly to other kindergartens to visit the children. -Let's first figure out what the bird will consist of. I will show, and you name the parts. - Head. -Which smoothly passes into the body. - Wing. (why do you need a wing?) -Tail. (why do you need a ponytail?) -Eye. (why do you need an eye?) -Beak. (why do you need a beak?) - Now show me quietly how birds fly (you studied the movements in music classes). The birds flew, flew and sat quietly at the tables so as not to make noise in the forest clearing. -Look at what lies on the table in front of you. 1. A twig depicted on a leaf. 2. The body of your future bird. 3. Wing. 4. Tail. 5. Round little eye. 6. Small triangle eye. - The first thing we do is put a twig in front of us. Then we smear the body with glue and “plant” the bird on a branch. The bird's head is at the top, and the tail will be at the bottom. Glue the wing and glue the tail. Then glue the eye and beak. -Our birds are ready, let's put them on a common tree, and they will sing clear songs for us. -Oh, how loudly the birds sang, what do they want? I think I know. They invite us to play the game “Sparrows and the Car.” (game) - What did you learn to do in the forest clearing? — Did you like our trip? -It’s time for us to return home: wave goodbye to the birds and get into the little car. -How does he signal? -Bi-bi, let's go!!
Hi all. Today we will make applications on the theme of Birds
.
I will show you all the most interesting techniques
and explain exactly how to convey each technique to the understanding of young children.
I will also give recommendations on organizing appliqué classes in kindergarten. Applications with birds - imply a variety of birds. Here you will find an applique of Swans, Peacocks, Tits, Penguins, Crows and other winged animals. I divided all the works according to methods of creation,
that is, according to artistic techniques. You will learn a lot today and discover new ways to make your own paper birds.
Well? Did you fly? There are a lot of delicious things ahead.
Package of ideas No. 1
appliques with birds
IN LAYER TECHNIQUE.
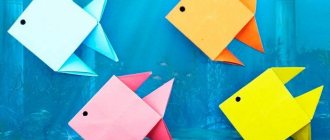
Usually we make simple appliqués - where there is a bird's body, tail and wing. Children assemble the bird by connecting these three parts. Classics of the genre. But I want something interesting. I want new technicians.
Why not make a TWO-COLOR WING for the bird. That is, it eats a wing that consists of TWO LAYERS OF PAPER of different colors (as in the photo below).
Here's how it happens:
for the wing we cut out 2 parts - one part is the whole wing (pointed oval), and the second part is half of the wing (half of the pointed oval). And it turns out that the wing consists of a lower part (whole) and an upper half of a DIFFERENT COLOR.
And we add another important detail
appliques - a ROUND SPOT on the head, and on this spot we glue a blank eye made of paper and a pupil drawn with a black marker.
Using the same technique you can make a TRIPLE WING
- where there are already three layers of the wing - whole, half and half from half - we glue all three layers into one wing. It turns out to be an elegant bird. There’s an immediate different feeling from the craft. A noble, beautiful bird – and you can’t tell that this is a children’s applique. And how it develops the mind - after all, the layers of the wing need to be glued in the correct position - so that the pieces fit in the desired corner of the wing.
Here is another application where a TAIL is made using the LAYER TECHNIQUE
. By preparing such an application you can proceed faster.
First, cut semicircles for the tail, then fold each semicircle like a snowflake (in half, in half again, in half again) and trim the edge with a SEMI-CIRCLE PETAL - then we will get a uniform wavy pattern along the edge.
Package of ideas No. 2
Bird appliques
With paper strips.
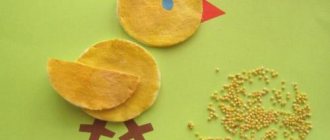
Take a sheet of colored paper and cut it into strips. Now we look and decide for which part of our bird such stripes might be useful. If we make chicken, then of course it’s wings. Here we wrap each strip in a loop (that is, first let the children make loops and then stick them on the bird.
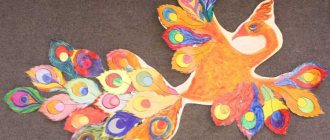
The same paper loops can become the fluffy tail of a peacock or turkey, or a firebird.
The stripes can be the same color or different colors. And pay attention, we can make 2 or three rows of strip loops - and then each row can be of its own size. First we glue the back row, then the middle one, then the front row. And then we glue the bird (body, head).
To make it clear for children and to avoid chaos from the loops, draw ARC (semicircles) on a sheet of paper - so that the child glues the strips as rays from this arc line.
How to make such a peacock applique IN ONE LESSON in kindergarten.
- On a sheet of paper we draw arcs (two arcs). The child smears glue on the UPPER ARC all at once.
And very quickly, before the glue has dried, he puts strips there (not loops, but stripes) like rays in all directions from the arc. We wait for the glue to set (a few seconds). - Next, we apply glue to the SAME SOUL directly to the edges of the strips that lie on the arc.
And very quickly, before the glue dries, we apply the second ends of these strips to the already glued ends (that is, we wrap the loops). The first row is READY. - the same
with the second arc - to create the second tier, a feather. We glue the third tier faster, using the same method (there are few stripes in this row). And then we smear glue in the middle and put the silhouette of a bird.
SEE HOW QUICKLY all the children managed to make such an applique with a bird with their own hands.
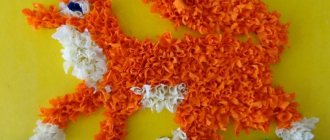
And here is an applique with a turkey
, which a small child can handle. We give the baby paper strips of the same length. Draw a circle on a piece of paper (circle the glass). The child coats the circle with glue and quickly places strips on it. Then he looks for dry, un-glued pieces, spreads glue under them and presses them.
On top are the eyes and beak. The tail part does not have to be made from feathers; you can cut out imitation feathers from colored paper (long ovals, cut on both sides into fringe-feathers - here you have a feather).
And for the older group you can make this bright braided applique with the OWL bird.
Detailed master class
will show you how easy it is to prepare such an application. All that is needed is to teach children to slip strips of paper alternately through the top and bottom of the cut strips.
Package of ideas No. 3
VOLUMETRIC bird appliques
Here in the photo below we see applications with a volumetric effect. The blade technique is created very simply. To create six blades, you need to cut out six round disks from paper.
Fold each circle in half. And then glue them in halves to each other (like we glue pages in a notebook). You will get a three-dimensional unfolded ball.
Such a paddle ball can become the chicken's belly, or its head. Or the belly of a bullfinch bird. Or the white breast of a penguin.
Volumetric appliqués may have some folded details. Simply part of the cut out silhouette is bent to the side. So a circle of paper cut along the radius turns the paper round into the silhouette of a hen or chick.
Also, the bird's wings can bend forward. And it will be great if these wings hug a nest with eggs or an already grown chick, as in the photo below.
Package of ideas No. 3
Bird appliques
from scrap materials.
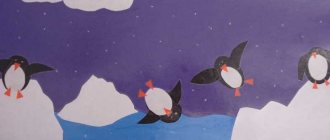
Cotton pads can also be a source of inspiration. White cotton wool can become the body and head of a stork. Or, with your help, a white cotton pad will turn into a penguin breast.
And by the way, cotton pads are easily painted with gouache or watercolor.
Cupcake tins - paper rosettes can also be painted well with gouache. And you can make interesting applications from them. In the store, such sockets are sold in packs of 100 pieces. This means there will be enough for the entire kindergarten group.
The sockets painted in multi-colored paint stains look very nice. Below we see a paper bird. We glue a colored paper napkin to the back of the bird's body. Then we glue it all onto a sheet of cardboard (on the background of the applique). Next, we glue a paper spring onto the tummy (which we fold from two strips of paper - crosswise, like an accordion). And on this paper accordion spring we glue the bird’s head. Easy and quick to do with your own hands.
Paper napkins
can be a source of fluffy elements for your bird applique. Take a napkin folded in several layers. Cut out a round piece from it. We click a stapler in the middle of the roundel (we fasten all layers of the roundel with a staple). We cut the round fringe in a circle and fluff it with our hands. We get a fluffy circle.
Lace Paper Napkins for Pastry
also turn into delicate appliqués with birds. Simple and elegant crafts for kindergarten, which are easy and quick to make with children's hands.
Plastic plates,
also turn into appliqués with birds.
Package of ideas No. 5
Bird appliques
Using the PAPER STAINED GLASS technique.
Here is the technique for creating appliqués that I like best - paper stained glass. Here we fill the cardboard frame with pieces of colored napkins. And we get a craft that glows beautifully when hung on a window. Now I will show you exactly how such a stained glass applique with birds is created.
But I’ll show you with an example with butterflies. 2 methods can be used here
METHOD No. 1 –
cut out a stained glass stencil (the frame of which we will fill with colored pieces of paper). Place the frame on a sheet of white thin paper and trace it with a pencil. Now we cover the entire pencil silhouette with pieces of paper (a colored napkin or pieces of crepe crumpled paper will do).
After the entire pencil silhouette is hidden under the paper kaleidoscope, glue the frame on top. We wait for the glue to dry and cut out the frames. The application is ready.
METHOD No. 2
. Place a stencil on a transparent document file. Spread glue on the film file and stick in colored pieces of paper. PVA glue is then easily detached from the plastic of the file. And everything is ready.
Package of ideas No. 6
Bird appliques
Painted with paints.
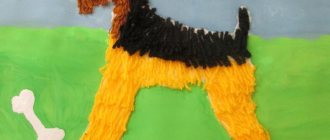
The appliqués, in which the details of the birds are HAND PAINTED, look very elegant and bright. Every detail becomes unique. The author's colors of such birds make the applique soulful and elegant.
Children really, really like this kind of work. It's not just cutting out a part and sticking it on. This is to give the bird its individual image. Feel like a creator, and not a craftsman with brushes and glue.
Package of ideas No. 7
Bird appliques
From PAPER DISCS.
Circles of paper can become a constructor for creating any shapes on children's appliques. With paper discs you can create silhouettes of any birds.
Leave the discs round or fold them in half. You can bend the edges of the disks and fold them into triangles (like on the beak of the bird in the photo below).
The parrot bird applique looks very bright and attractive. Children love the rainbow colors of these birds' plumage.
Package of ideas No. 8
Bird appliques
Pictures in frames.
You can create silhouette artistic crafts with appliqués with birds. We glue such silhouette work inside the frame onto the frame lining - so that the silhouette hangs above the background and does not stick to it. Look at the photo.
Framed silhouette appliques do not have to be black. You can add any colored elements. Just be careful with the combination of colors and shades. Think like an artist, which colors go well together, which ones work in contrast, which ones create a soft fusion.
That is, understand what your task is and select those shades that work to solve this artistic task.
Ideas for applique with birds CAN BE VERY DIFFERENT. It's not necessarily a bird on a branch.
It could be a bird on the palm of your hand. A bird in the mouth of a crocodile, A bird on the bald head of a happy hippopotamus. Any plot can be decorated with a bird - making it the center of the entire composition.
Your applique painting with birds can have SYMMETRIE - as in the photo below, where the right side of the painting is a reflection of the left.
Symmetry can be framed as the reflection of a bird in water. Like a bird looking into a puddle. Also a beautiful idea. Try to give this idea real life.
You can make an assorted collage from scattered elements of birds, leaves, flowers, butterflies.
We place everything on the sheet in any order, but SO THAT all elements do not go beyond the edges of a given shape - in the photo below it is a square
.
The given shape can be round, oval, whatever you like.
Appliqués look beautiful in frames that go beyond these same frames (as in the photo below).
A twig, a bird's tail, or any other appliqué detail can extend beyond the frame. For example, foamy waves can overflow through the frame if we are making a seagull flying to the sea.
Fantasize. Look for topics that you haven’t seen anywhere or from anyone before. Try making a penguin in the north, and let the snow frost crawl out onto the picture frame and make it freeze (this effect can be created from paper and salt crystals).
These are the works with applications on the theme “Birds” that you saw today in our article. Olga Klishevskaya will continue to try and look for NEW SOLUTIONS to make your dreams come true, to realize your creative thoughts.
Strive for the best. Don't be afraid of more. Dare and believe in work as the engine of your life.
Olga Klishevskaya, especially for the site
If you like our site,
you can support the enthusiasm of those who work for you.
Every year we see birds gather in flocks and fly south. Traditionally, the application “Migratory Birds” is included in a set of creative activities for kindergarten. At such lessons, children not only learn more about migratory birds, but also get acquainted with new appliqué techniques, for example, making crafts from leaves, from bird feathers, and so on.
The various possibilities of applications on this topic will allow you to use it for classes with children of different ages: younger children will be interested in gluing the prepared elements. Children in the senior group will enthusiastically cut out different shaped wings and tails of bird figures on their own, and in elementary school I can easily come up with compositions for appliqués on my own, without using templates.
This article presents a master class on creating applications with children on the theme of migratory birds using different techniques.
Types of applications
Before you start learning how to make beautiful appliqués with your own hands, you should understand what types of this technique exist.
- Mosaic applique - first the contours of the image are drawn, then parts of geometric shapes and different sizes are glued inside it.
- If you twist colored paper into a spiral, the technique is called quilling.
- For symmetrical applique, before cutting out the part, the paper blank is folded in half.
- A multi-layer applique is one that is created from parts of different sizes, small ones are glued onto large ones.
- If you trace the palm and use this figure as a base, you will get a palm applique.
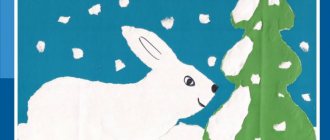
Owl creation technique
- Take cardboard - it will be the base.
- Glue a twig cut from colored paper.
- Now paint the background with paints, you can paint with your fingers.
- Glue clouds, moon and other background elements as you wish.
- Using the templates, trace the outline of the owl on the branch with a pencil.
- Tear off pieces of paper and glue them inside the outline.
- Make a second layer on top of the first.
- You can draw the eyes and beak with felt-tip pens or make them out of colored paper and glue them on.
Lesson notes for the senior group. Collective application on the topic “Wintering birds”
Summary of a lesson in visual arts (collective application) in a senior speech therapy group on the topic “Wintering Birds”
Author of the lesson: Margarita Vladimirovna Ivakhnenko, teacher at MBDOU MO “Kindergarten No. 75”, Krasnodar. Goal: to clarify children’s knowledge about the body structure of birds through application. Objectives: 1. Development of children's interest in visual arts. 2. Learn to convey characteristic details in an image, the ratio of their parts, their location relative to each other. 3. Generalization of figurative ideas and development of aesthetic perception and imagination. 4. Mastering cutting techniques using various methods of attaching material to the background. 5. Develop accuracy, perseverance, and patience in children. Materials for the lesson: colored and white paper, whatman paper, glue, scissors, oilcloth, napkins. Preliminary work: 1. observation of wintering birds on the street;
2. examining images in pictures, photographs; 3. viewing a presentation on the topic “Wintering birds”; 4. conversation about the external structure of birds; 5. preparing the basis for a collective composition - a sheet of large format paper, cutting out trees from colored paper, clouds and pre-gluing it onto whatman paper. Progress of the lesson:
Educator: Guys, when I came to the group today, I saw that there was a beautiful envelope on the table. This letter was sent to us by a sparrow and his friends, the wintering birds. Let's open it and see what's written in it! (The teacher opens the envelope and reads aloud)
.
Oh, this message says that April 1st is International Bird Day around the world. Let's remember that back in the fall we hung several feeders on our site so that the birds would not starve, because it is very difficult for them to feed themselves in winter frosts. What kind of birds are these? Listen to the riddles and try to guess: Guess what kind of bird Jumps along the path, As if it’s not afraid of a cat – Collects crumbs, And then jumps onto a branch And chirps: “Chick-chirp!” ( Sparrow
) Like forests among animals This bird is the most cunning.
Hiding in the green crowns, And her name is... (Crow)
Who sat down on a thick branch and knocked: “Knock-knock, knock-knock!”?
( Woodpecker
) Guess what kind of bird, lively, perky, dexterous, agile, shading loudly: “Shadow, shadow!
What a beautiful spring day!” (Tit)
Who flies, who chirps - Does he want to tell us the news?
(Magpie)
Breast brighter than the dawn, Who has it?
(at the bullfinch)
Like a fox among animals, This bird is the most cunning of all.
Hiding in the green crowns, And her name is...? (crow) Educator: Well done, guys, you guessed the riddles correctly! I suggest we now make a collective application about wintering birds! Educator: Pictures of wintering birds hang in front of you. Now I will give you blanks where the contours of the body, wings, and tails of the birds are drawn. According to your wishes, choose what kind of bird you want to make. Children take scissors and cut out patterns along the outline. Educator: Well done, guys, now we’ll rest a little and do some physical exercise!
Physical exercise: “Grey feathers”
Sparrows - sparrows,
(patting hands on sides)
Little gray feathers!
(wave your arms up and down)
Peck, peck the crumbs
(knock your fists in front of you)
From the palm of my hand!
(we blow on our open palms)
No, they don’t peck from the palm
(we spread our arms to the sides, shrugged our shoulders)
And they don’t let you pet us.
(hands on the waist, body tilts left - right)
How can we get along so that we can pet them?
(claps hands).
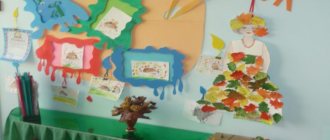
The teacher shows a large sheet of paper with trees in the background and a feeder drawn.
Educator: Look what a beautiful winter landscape! But of course there are not enough birds. Next, the guys take turns coming up and sticking on the cut-out wintering bird. Result of the collective application: Children, what did we do in our lesson? (Children's answers). Educator: what a great fellow you are! We remembered that April 1 is International Bird Day and made such a beautiful applique!
Analysis of children's collective work.
We recommend watching:
Application in the senior group on the topic “Bullfinches on the branches” Summary of a winter walk in the senior group Summary of educational activities for the formation of a healthy lifestyle in the senior group Summary of a lesson on speech development with children of the senior group
Similar articles:
Summary of a comprehensive lesson on familiarization with the outside world and development of speech “Wintering Birds” in the senior group of a preschool educational institution
Lesson notes for the GPD. Cuttings of indoor plants
A story about a sparrow, grades 1-2
A story about a crow, grades 1-2. The world
Walk “Wind Watching” in the senior group
Firebird
The process of creating such a craft perfectly develops the imagination, because the character is magical and very bright.
- To make the head and body, cut out a ten-centimeter square piece from colored paper.
- Form a square into a triangle and bend along the larger side.
- Now expand the square - it is divided into four sectors.
- To get the body of the bird, glue both edges overlapping.
- The belly is the larger side, and the smaller side is the back.
- To create a chic ponytail, cut nine nine-centimeter strips - curl them or leave them straight.
- Glue three stripes to the back, six will serve as material for making wings also on the back.
- You can also make both the tail and wings using the palm technique.
- You can cut out eyes and other small details from colored paper or draw them.
- Attach the bird to the background on a branch of colored paper, decorate the background by painting it and gluing parts from colored paper.
Crafts made from dry leaves
To create a firebird from dry leaves, prepare dry leaves, a glue gun, paint, and a sheet of cardboard.
- For the background, paint cardboard or use colored cardboard.
- Spread the paper and carefully arrange the leaves, and then color them.
- Now dry the leaves. Apply hot glue to the cardboard and glue colorful leaves.
- To do this, there must be an adhesive layer on the cardboard sheet, as well as spot-applied glue on the leaves.
- First, form the shape of a tail, then a larger leaf that stands out in shade - this will be the body of the firebird.
- Paws and eyes can be made from colored paper or cardboard.
- The magic bird is ready!
Leaf craft
Making a firebird from leaves is not at all difficult, just take:
- Dry leaves;
- Glue;
- Paints;
- Glue gun;
- Cardboard for the base.
The first step is to prepare the cardboard for the base. You can paint it the color you want or choose a pre-colored one.
When the paint on the leaves has dried, glue them to the base. Apply a thick layer of hot glue to the cardboard, and also put dots on each leaf so that it sticks well. We lay the leaves on the cardboard as intended and press well. You can use a napkin to remove excess glue.
It's important to remember that hot glue hardens very quickly, so if there are visible marks left, you can paint them with the same paint as the leaves to help the colors blend together.
The next step is to create the body of the bird. For it you will need a dry leaf, different in color from the ones we chose for the tail. We glue it on top of the tail, and also press it tightly with a napkin so that the body sticks well to the leaves.
Cut out the legs and eyes from a dark piece of paper or cardboard and glue them to the body of the firebird.
Migratory birds
Materials you will need:
- Sheet of cardboard,
- colored paper,
- And also scissors
- Paints and glue.
Operating procedure:
- A piece of cardboard is the sky.
- Color it or get a colored one.
- Cut out clouds from white cardboard and glue them to form a background.
- Draw and cut out the birds and then glue them to the cardboard.
- Draw the details - eyes, feathers, beak, and also add trees and other elements as desired.
Paper birds
You can make an applique of migratory birds from paper using:
- Colored paper;
- Scissors;
- Glue;
- Paint;
- Cardboard for the base.
First, let's prepare the background. It will be blue skies with some clouds. To do this, take blue and white cardboard. We cut out small clouds from white cardboard and glue them to the blue background.
When the birds are cut out of colored paper, glue them to the cardboard. The finished picture can be supplemented with trees below, cut out of paper or drawn by hand.
You can also make an applique “Birds on Branches” from paper.
You need to take colored paper, scissors, glue and cardboard for the base.
From paper we cut out the details of the bird: body, tummy, wings, eyes, legs and beak. We also cut out a branch on which the bird will sit. When the parts are ready, glue them in order.
First, glue the branch to the cardboard, then the torso and tummy. Then paws so that the bird is sitting on a branch. Next we glue the head to the body, wings, place the eyes and beak. You can decorate the space of the painting at will with the sun, berries on a branch, clouds, and so on.
Chickens
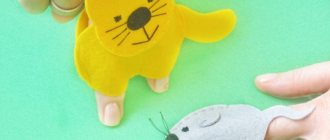
In order to make a craft with the image of funny chickens or other poultry, take a sheet of colored cardboard, cotton pads, a brush with paints, as well as glue and plasticine.
- The entire cotton pad will play the role of the head, as well as the body of the bird; if you separate half of the disc, you will get wings or a tail. Pre-paint them with paints and then glue them to the cardboard.
- All other elements (paws, eyes, beak) can be made from plasticine.
- To create a goose or chicken, you need to make a printout with a picture of a bird, and also stock up on a piece of cotton wool and PVA glue.
- Roll cotton balls to fill the image.
- You can also add colors to your work - paint some elements if necessary, add details.
- This way you will get a bird with plumage, the effect of which is created by cotton wool.
Cockerel and hen
- Take a white sheet of paper, a brush with paints, images with a pre-printed chicken and cockerel, colored paper, napkins of different colors, and you can’t do without a hole punch, glue and scissors.
- Prepare your future background: for this you need to paint a white sheet of paper and draw on it the background elements that you come up with.
- Illustrate the earth as well as the sky in your work.
- You can use colored paper to create images of a house, fence and other details.
Now cut out the birds.
- You can move on to decorating the characters of the craft - cut out feathers from colored paper, twist lumps from a napkin, a hole punch will be useful for making confetti.
- Glue the resulting plumage, now you can glue the birds to the background.
- If you wish, you can create a large work in a group, which will include an entire poultry yard.
There are many techniques for creating applications with images of birds. Using those presented in this article, you will create unique paintings that will decorate your child’s room, and the process of creating this masterpiece will give him a lot of positive emotions.
Also, all these techniques can be safely used for classes in kindergarten, all of them will develop the imagination of children and teach them to be neat, and will give them experience in running their own small project.
Application “Birds on the branches” outline of a lesson on applique, modeling (middle group)
GCD applique “Birds on branches”.Teamwork (middle group)
Goal: - to teach children to make an application in the form of a bird; - consolidate the idea of their name, structural features, body shape, wings, tail, distinctive features of different types of birds; - to cultivate love and caring attitude towards birds; - strengthen the ability to carefully use glue; -develop fine motor skills of the fingers, the ability to listen and hear birds singing; -develop observation and attention; - practice correct sound pronunciation; develop a response to a verbal signal.
Equipment: template made of colored paper: body, wing, tail, beak; oilcloth, brushes, glue, napkins. Image of birds: tit, sparrow, woodpecker, swallow; image of a tree. Audio recording of birds singing. Toy steering wheel.
Progress of the lesson: -We go on a trip to a forest clearing. We'll go by car. How does he signal? (Children enter the group in which images of birds are pre-attached) -Listen, guys, who sings so beautifully? (Birds) -Where did they hide? Let's find them and see what kind of birds flew to us. This is a magpie. It is also called the white-sided magpie because its sides are white. This is a little sparrow. Nimble jumper. How does he tweet? Chick-chirp! -What kind of bird is this? In a red riding hood, he knocks and knocks on wood with his sharp beak. (Woodpecker). -And this is a titmouse - she has a yellow belly. All these birds live next to us both in winter and summer. - But this bird flew to us from the south. This is a swallow. It flies very quickly, catches midges, mosquitoes and other harmful insects. -Look, guys, what is this unusual bird? Where did she come from here? I think I know: this bird was made by children from another kindergarten and sent to see the world. Is it really beautiful? -Yes! - Do you want me to teach you how to make such beautiful birds? And when you do them, we will let them fly to other kindergartens to visit the children. -Let's first figure out what the bird will consist of. I will show, and you name the parts. - Head. -Which smoothly passes into the body. - Wing. (why do you need a wing?) -Tail. (why do you need a ponytail?) -Eye. (why do you need an eye?) -Beak. (why do you need a beak?) - Now show me quietly how birds fly? The birds flew, flew around and sat down quietly at the tables so as not to make noise in the forest clearing. -Look at what lies on the table in front of you. 1. A twig depicted on a leaf. 2. The body of your future bird. 3. Wing. 4. Tail. 5. Round little eye. - The first thing we do is put a twig in front of us. Then we smear the body with glue and “plant” the bird on a branch. The bird's head is at the top, and the tail will be at the bottom. Glue the wing and glue the tail. Then glue the eye and beak. -Our birds are ready, let's put them on a common tree, and they will sing clear songs for us. -Oh, how loudly the birds sang, what do they want? I think I know. They invite us to play the game “Sparrows and the Car.” (game) - What did you learn to do in the forest clearing? — Did you like our trip?
-It's time for us to return home: wave goodbye to the birds and
we get into the little car.