Appliquéing a person is a very exciting and creative job. Its advantage is the variety of techniques used and varying complexity. Such work is suitable for very young children, preschoolers and elementary school students. Using the application, you can study geometric shapes, colors, parts of a person’s face, and his emotions.
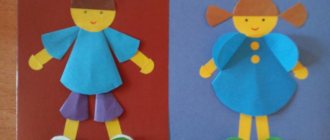
Application of a man from geometric shapes
Different techniques allow you to captivate children of any age with applique. For the first experiment, an applique of a person made from geometric shapes is good.
This method of execution will help develop the child’s associative thinking, help him understand the shapes of body parts and identify similar shapes.
In the photo of the applique, a full-length person is shown using simple shapes made of colored paper. You can also use blanks made of fabric or thick cardboard.
To ensure that classes with your baby are as educational as possible, adults should use the following techniques:
- Say out loud the names of body parts, show them on the child’s body;
- Say the names of the figures and demonstrate their similarity to parts of the body;
- Help the child understand where this or that part of the body should be in space and place it correctly on paper.
As for practice, for younger aunts you need to prepare templates of geometric shapes, which all you have to do is glue them correctly onto a sheet of paper.
The places for gluing the figures can be marked on paper with an outline to make it easier for the baby to determine how to position the parts of the body relative to each other, or you can leave the baby a chance to determine for himself where the legs and arms of his person will look best.
Older children can be trusted to cut out geometric shapes themselves and place them on paper. As you acquire skills, the task can be complicated by asking your child to make a composition with the image of several people.
Movable little man
Patterns of human body parts can make applique more interesting for children. With their help, it is possible to achieve a realistic, bright picture or give it dynamics. Surely older children will enjoy the dynamic applique.
To work you will need:
- templates of body parts (arms, legs, torso, head);
- screws and nuts from a metal constructor;
- cardboard;
- glue;
- scissors.
The work is carried out in several stages:
- Templates printed on paper are cut out and glued onto thick cardboard. This makes them stronger. Then the parts are cut out of cardboard.
- Place your hands on the body and use sharp scissors to make a through hole. A screw is inserted into it and a nut is tightened. I repeat the operation with my legs.
- The head is attached to the body in a similar way.
The little man gains mobility and is ready to play. To complicate the work, you can create additional connections at the elbows and knees.
Applications are a fascinating creativity that develops imaginative thinking, perseverance, and fine motor skills. Working with paper is suitable for children of all ages. Having mastered the skills of appliqué on paper, you can move on to more interesting and complex activities - for example, creating a reusable game with felt Velcro.
Application of a person's face made of paper
Having seriously studied body parts and geometric shapes, you can distract yourself a little and do more creative things - applique of the human face.
Here the child gets more space for imagination and enjoys studying not only the parts of the face and their names, but also practices using facial expressions to distinguish and show different emotions.
As with other applique techniques, parents need to talk about the face, sensory organs and their functions, show them to the baby on the body and discuss their position relative to each other.
On a sheet of paper, you should mark the outline of the face with a pencil, or prepare a circle or oval from paper, which will become the basis of the face and the rest of the elements will be placed on it.
You should try to prepare several variations of facial elements in advance:
- Different eye colors and sizes;
- Eyebrows of different shapes
- Several nose options;
- Several smiles expressing different emotions;
- Ears of different sizes and shapes;
- Hair: hairstyles for boys and girls;
- Additional accessories (bow, hat, etc.).
In the process of making the applique, it is better to help the child stick the base face onto a sheet of paper and place the eyes correctly on the face - they will become a reference point for the baby, relative to which all other elements of the face need to be positioned.
By gluing eyebrows above the eyes, a nose in the center of the face, ears parallel to the eyes, the child learns the basics of symmetry and proportions. Several stencil options will add an element of play and fun to this process.
A beautiful applique will not only delight your baby, but will also immerse him deeper into the world of creativity.
We teach to lay out and identify sense organs
You can also make a model of a human head out of paper with your own hands. The design of a human head consists of several paper figures:
- the head itself;
- eye;
- lips;
- hairstyles
They are prepared in advance, and then step-by-step instructions are explained to the children in detail:
- First, the head itself is glued on, on which you need to mark the places for the eyes, lips, eyebrows and draw the nose.
- Then the eyes and eyebrows are glued on.
- After - lips.
- And the last step is for the hairstyle. By the way, it is better to trim the edges of the hair to create stripes - then the craft will take on a real live look, as shown in the photo.
For younger children, you can suggest arranging the senses like a puzzle and laying out a person’s face.
You can use a stencil, or you can draw parts of the face and cut them out yourself.
You can attach parts of the face using Velcro:
Application of a man in motion
The next level of complexity is considered to be the appliqué of a person in motion. This application for children will seem more painstaking and will require their concentration.
But, in addition to basic skills, it will allow children to study the structure of the body, the names of poses and directions of movements. The basis of this technique is the application of a person from geometric shapes.
This time you will need to make more smaller pieces:
- The arms and legs are depicted from two thin rectangles;
- The human torso is a square or rectangle;
- The head is a smaller square or circle;
For clarity, you can always offer the child a basis from which he can start and continue to act independently: for example, glue torso figures for two people at once onto a piece of paper, and invite the child to glue his hands so that the figures are in different poses.
Of course, all the names of the poses need to be voiced and shown to the baby by example. As experience accumulates, the child will be able to create compositions from several figures depicting active ball games, physical education lessons, swimming, dancing and many other movements familiar to him.
Internal structure of a person
This application is suitable for preschoolers.
It helps the child quickly learn the basic human organs. Step by step execution:
- Draw the outline of a person on white paper. To make it easier, find a ready-made convenient template on the Internet and print it.
- Separately, we draw the contours of the organs: brain, heart, lungs, liver, stomach, bladder. It will be most effective to do this on colored paper. The child will probably like the idea of pictures of the food he ate today. Therefore, select food cards and stick them inside the stomach in advance.
- Carefully trim the organs according to their outlines.
- We glue the details onto the sheet where the previously drawn outline of the person was. Do this in the right places: the brain - in the head, the heart and lungs - in the chest, the liver and stomach - in the stomach, the bladder - in the lower abdomen.
All that remains is to label each organ and cut out the outline of the person. A useful craft is ready.
Studying human anatomy using application
Older children can also use appliques to learn body anatomy. The older the child, the more elements of internal organs will be needed. To begin with, it is enough to use blanks to illustrate the brain, lungs, heart, stomach, liver and kidneys.
The more organs the child knows, the more new elements can be added, for example, adding intestines, spleen, etc. to the application.
Since studying anatomy is a lengthy process, appliqué elements are usually made of durable multi-colored materials, such as felt or colored cardboard.
Organ templates can be taken from human anatomy atlases.
Studying anatomy
Older children will be interested in studying human anatomy using the applique as an example. This game will not only develop fine motor skills and perseverance, but will also introduce children to the structure of internal organs.
Depending on age and level of training, the number of organs may vary. To play you will need:
- template (contours of the human body);
- organs (brain, stomach, lungs, liver, heart, intestines and others);
- diagram with the location of organs on the template and their names;
- glue.
The essence of the game is to introduce the child to internal organs.
- Each organ is taken in turn. Its name is clearly pronounced and shown on the diagram where it should be located. For older children, the purpose of this organ is explained.
- The child takes the organ shown and glues it onto the person’s stencil for appliqué.
- The actions are repeated with each organ.
If this is not the first time an acquaintance with the internal structure of a person occurs, then the child can be asked to independently glue the organs onto the template.
Applications for advanced
All creative tasks develop imagination in children and adults, a craving for handicrafts and art. When we learn to make appliqués with our own hands, then, as with any task, we can approach the matter precisely and strictly “as per the manual,” or we can add elements of play and even mischief.
To further involve your child in the process, use other, non-standard materials in addition to paper:
- Thick knitting threads that can be woven into braids are well suited for hair;
- For hairstyles and beards - cotton wool;
- To depict clothes, you can mix different materials: paper and fabric, glitter, paper curls;
If you have mastered paper applique, you can safely move on to other types: appliques made from beads, from seeds, from autumn natural materials.
The main thing is that children and adults enjoy this process.