Each child is unique, you just need to find your own approach to him. Creating applications with your child can be an interesting and entertaining activity. Such creativity not only makes you fantasize, but also promotes the development of fine motor skills, which is important for the mental development of the baby.
Also, during the lesson on appliqué, perseverance and accuracy are developed. By creating “Vegetables” applications from paper with your baby, you open up a huge world of fantasy and creative thinking for him.
If you choose the right materials and take into account the child’s age, you can create original crafts for each age group of the kindergarten. When making crafts, it is important to consider the age of the child and the materials from which you will create your work of art.
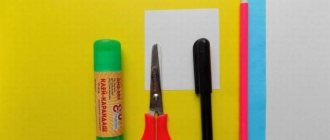
Required materials and tools
Even the smallest kids can make an applique out of paper, but with the help of adults. To implement such a craft, you need to show your personal imagination, or use ready-made instructions for children. You will also need some materials and tools:
- Cardboard (white or colored depending on the child’s wishes);
- Simple pencil (for sketching);
- Colored paper (single-sided, double-sided, velvet or corrugated is suitable);
- Glue for paper (for younger children, a glue stick is more suitable, but with PVA glue you should be careful not to spread it too much and thereby ruin the entire craft);
- Scissors (necessarily with rounded ends due to safety precautions);
- Felt-tip pens and markers (for additional decoration of the created work, since with the help of a little drawing of details, the application can sparkle with new colors and become more attractive).
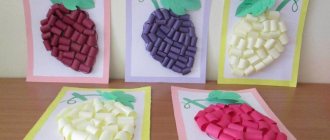
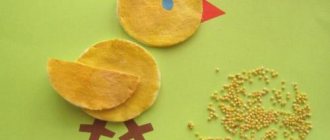
Theme "Fruits on a plate"
In the middle group, when working with paper, they use different options. These include thin napkins, cardboard, smooth glossy paper, and structured thick paper.
In the fall, it is also interesting to propose a “Fruit on a plate” theme. Using paper of different quality and thickness, you can achieve the effect of a three-dimensional picture. Such paper can be purchased at a children's art store. Before starting work, children should hold the parts in their hands and learn to distinguish between grooved and compressed paper. The children also learn to arrange the composition so as to create a beautiful still life: some details first, the rest on top of them, and only then the plate itself. Children understand the spatial arrangement of parts.
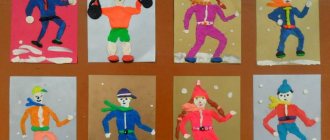
Examples for the younger group
The leading place among handicraft lessons for children 2-3 years old on the topic of vegetables is canning.
At the preparatory stage, it is worth discussing with the children what vegetables they would like to see in their future creations.
After that, they can independently choose what they have voiced among pre-prepared templates and glue it to the base. A jar cut out of cardboard is suitable for it.
Examples for the middle group
From the age of three, children develop basic skills in using scissors. In this regard, you can complicate the tasks a little. A variety of themes using vegetables will work. This is both canning and a basket with the harvest.
For the second theme, you will need pre-prepared cardboard bases in the shape of baskets. If they are cut out of white cardboard, then it would be appropriate to invite the children to draw a pattern on them themselves. At the second stage, it is worth having a conversation on the topic of vegetables. A short description of each would be appropriate: its shape, color. It would also be useful to discuss their taste and beneficial properties.
For demonstration, you can show real vegetables brought from home. If you let babies touch them, they will also be able to feel and feel their texture.
After the introductory conversation, you can start cutting. It is worth once again focusing on shapes and sizes. To make the task easier, you can draw a sketch with a pencil.
It is worth understanding that few children at this age will be able to cut clearly along the contour. But despite this, a children's applique with figurative images can be assembled. In the next step, all that remains is to arrange all the blanks the way the child wants. And stick them with glue. Still life according to the master class for beginners is ready.
Examples for the older group
For older children, the application becomes more complicated due to the additional use of mosaics or adding volume. The following will demonstrate step-by-step instructions on how to make a vegetable applique in the tear-off style.
This craft looks unusual and provides the child with the opportunity to break out of the strict boundaries of cutting.
- A sheet of cardboard is used as a basis. On it, using a simple pencil, you can draw the silhouettes of any vegetables that you would like to see in your work.
- Take paper of the colors that are characteristic of the selected vegetables. For carrots - orange, for potatoes - brown, for tops - green, and so on. Each leaf is manually torn into small squares.
- The resulting pieces fill the space in the sketches. And they are glued on with glue.
- Ready!
Such work will look no less beautiful, but more accurately, if the parts for the mosaic are not torn by hand, but cut with scissors.
A voluminous craft is a little more difficult to make, but children can easily cope with it if they put in a little effort. Thus, a voluminous carrot can be created by folding a long orange strip of paper in half. Form a sharp corner on one side and leave the joint rounded on the opposite side. To which the green tail will remain glued.
You can also use another method. To do this, you need thick paper or cardboard rolled into a cone. Then cover the top with orange crepe paper.
And cover the round hole with green paper, in the center of which several short strips of green crepe paper will remain glued.
Carrot giraffe
This cute and easy-to-make giraffe will not leave anyone indifferent. Instead of carrots, you can use potatoes.
For this craft we need two large unequal carrots, toothpicks and three matches.
- From part of the larger carrot we make the body, from the remaining carrot we cut out the legs, from the smaller carrot we cut out the head and neck;
- We attach the neck and legs to the giraffe’s body with ordinary toothpicks. We attach the tail from the back; for this we use one of the prepared matches. This should be done so that only the head and very little straw remain visible;
- We cut out the head from the remaining part of the carrot and attach it to the neck with a toothpick. We also make horns from matches. Giraffe ears can also be cut from carrots, or you can get by with just the horns;
- The eyes can be easily made from cereals (for example, buckwheat) or pressed in with ordinary black beads. Giraffe spots can be easily made from paper or plasticine.
Related article: Do-it-yourself clothes for Baby Bon with knitting needles with photos and videos
Our cute giraffe is ready!
Recommendations for Improving Collaboration
- When learning how to applique vegetables, it is important to follow each step consistently.
- It’s worth preparing all the required materials and templates in time so that you don’t have to be distracted by collecting what you need later.
- At the time of preparatory work, it is of considerable importance to familiarize children with works of art, as well as demonstrate drawings and photos of vegetable appliqués.
- With children, conducting classes in the form of a game is more suitable, since this way the children’s attention is drawn to what is happening and thereby develops emotional responsiveness.
- Adults should create a small plan so as not to lose track of the sequence of actions. Older children can follow the steps themselves.
- It is worth giving young creators more independent work so that they can express their imagination and learn how to realize it.
- During independent work, an adult is obliged to help the children, especially those who are not doing well.
- Upon completion of all the work, it is advisable to hold a collective exhibition, when everyone can look at someone else’s work and thus learn to enjoy the results of their own and other people’s work.
- In addition to individual work, the proposed ideas can also be implemented in group work, when everyone cuts out their own vegetable and glues it onto a large common base in the form of a plate, pan or cup.
- This approach is suitable for many applications. Especially on the topic of fruits.
Potato pig
This is perhaps one of the simplest crafts that can be made from vegetables.
To do this, we will need one large potato for the mother pig and several small ones for the piglets. Their number is at your discretion. You will also need pink and black plasticine.
- Unpeeled potatoes should be thoroughly washed in water to remove all dirt from them. Dry thoroughly;
- We start creating the pig from the tail. To do this, roll a pink sausage out of plasticine, twist it at one end and attach it to the potato;
- For the heel we make a pink cake of medium thickness;
- Next, we make triangular ears, again from pink plasticine;
- We make beady eyes from black plasticine;
- We glue the resulting plasticine parts onto the potatoes one by one;
- We do this with each pig.
So, with a minimum of financial and time costs, we get a whole family of pigs!