Principle of operation
To complete the application, you can follow simple universal rules:
- Choose the basis for the future work. This is most often cardboard, white or colored. The main thing is that it does not get wet from the glue and can withstand the weight of the future composition. An alternative is thick white paper.
- They think through the composition and idea of the future film. The drawing is applied with light strokes onto the cardboard.
- Choose shades of color for the drawing, the overall color scheme.
- Prepare pieces for applique. They need to be cut into different sizes, but it is better to help the baby with this process. At the beginning he will try to do everything “right”, then it will become easier. It is important to tear the paper carefully, then the drawing will be beautiful.
- Take a glue stick and fill the space of the applied pattern with scraps of colored paper. First, large pieces are glued on, and the area is finished by gluing small pieces.
- The surface of the entire pattern is glued in advance, then the small pieces are simply pressed.
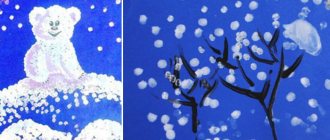
- The finished application will look like a mosaic, especially if there are small gaps between the pieces.
Advice: it is better for a teacher or parent to observe how carefully the child glues the composition in order to direct his strength in the right direction in time. It is important not to go beyond the edges of the drawing.
Decorating the work
Ready-made compositions can be supplemented with decorative materials. Tasks can be different - in level of complexity, topic, scale and amount of materials. The broken applique in the older group will differ in execution from the younger one, so the process can be complicated.
To decorate their work, children can use a variety of available and purchased materials:
- shells, pebbles, pebbles (small);
- dried leaves and flowers;
- beads and seed beads, glass beads, small rhinestones (with precautions and under adult supervision);
- threads, ribbons, bows and wool;
- buttons, buttons;
- parts of old toys.
Children can frame the result of their efforts and present it to a competition or exhibition. But the main thing is that the kids enjoy the creative process. If the painting decorates the interior, the children will be very pleased.
Examples of finished works
For inspiration and ideas, you can look at drawings on the Internet with your children. Examples can be found on various creative sites; it will also be useful to look at art galleries and choose a simple drawing for a further “broken” imitation of the original.
The product of children's creativity can be simple and unpretentious. But this is a very effective means of activating imagination and various skills. And children get great pleasure from working with colored materials. In the process of painstaking work, children become diligent, neat and patient, which is very useful for further development.
Sunshine from CDs
In order to make such a craft, old CDs, preferably with a yellowish tint, are suitable. In addition to them, you need to prepare:
- Beads.
- Glue.
- Lace or a piece of beautiful material.
- Yellow cardboard or foil of any color.
Progress:
- The disc is thoroughly wiped with a cotton pad pre-moistened in water.
- A circle is cut out of cardboard or foil, having a diameter smaller than that of the disk, but suitable to cover its central hole and glued to it.
- Around the glued circle there is decor made of beads and lace or fabric.
- It is better to choose transparent glue for fixing the decor, so it will be less noticeable on the finished craft. After completing the pasting of the perimeter of the circle, it is necessary to similarly paste over the outer perimeter of the disk.
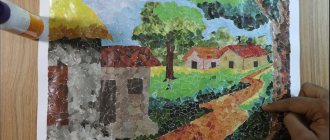
Example of a craft “Autumn Tree”
Let's look at a sample of a broken autumn tree applique. This is a simple and very beautiful option for children in the middle or senior kindergarten group.
For work you will need materials:
- glue stick;
- set of colored paper: yellow, orange, brown, green, blue;
- cardboard base (you can use white paper);
- additional decorations in autumn style: golden beads, small stones;
- a cloth for wiping off glue.
Work algorithm:
- Invite your child to apply the drawing to the base. Let it be a large tree with a lush crown. You can draw the sun and clouds in the sky, and bushes and paths on the ground.
- Next, select the main shade for the wood - yellow, orange, brown. The paper is torn into pieces and evenly pasted inside the contours of the tree. Dark colors are used for the trunk, light colors for the crown.
- They cover the sky with blue pieces, leaving space for clouds.
- The sun is decorated in yellow. Thin rays can be drawn with a pencil or felt-tip pen.
- The finishing touches are glued on – pebbles on the ground, beads on the tree as fruit.
The picture is ready, it can be framed. You can also wipe off any excess glue on the image before the glue dries completely.