Goal: Development of children's creative abilities using non-traditional drawing techniques (drawing with cotton swabs).
Objectives: 1. Introduce children to the technique of drawing with cotton swabs. 2. Strengthen the ability to recognize and name colors (red, yellow). 3. Develop fine motor skills of the hands. 4. Form cognitive interest. 5. Cultivate responsiveness, goodwill, accuracy, and independence. Integration of areas: artistic creativity, cognition, socialization, communication, music. Materials and equipment: Ready-made silhouettes of autumn trees on A5 album sheets, yellow and red leaves, yellow and red gouache, napkins, cotton swabs, plates for used sticks, illustration of the finished work, audio recording of P.I. Tchaikovsky "Seasons. Autumn" Forms of work: conversation, surprise moment, solution to a problem situation, outdoor game, finger gymnastics. Preliminary work: Looking at autumn foliage on a walk. Games with fallen leaves: “Find a pair of leaves”, “One, two, three, take a red leaf.” Making bouquets of leaves. Types of children's activities: Visual, educational, research, gaming.
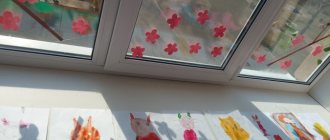
Content of organized children's activities: Children and the teacher enter a group where an audio recording of a work by Tchaikovsky is played. There are red and yellow leaves on the floor. Educator: Guys, have you noticed how quiet it has become on the street... you can only hear the birds singing and the leaves rustling on the trees. Do you hear? How they rustle in the wind: “Sh-sh-sh.” (Children repeat after the teacher as the leaves rustle: “Sh-sh-sh.”) Teacher: “Does that mean it’s time? (Children's answers.) That's right, autumn. Have you noticed how beautifully Autumn has decorated everything around? Everything became bright and golden. “Golden Autumn” dresses the trees in bright outfits. Sends birds to warmer climes. He treats everyone to ripe fruits.” Autumn, the sorceress, took the colors and painted the leaves in different colors. Educator: Guys, how has nature changed? What colors did Autumn use to paint the leaves? (They take the leaves in their hands and look at them, the children’s answers.) The teacher reads the poem: “Leaves are falling, falling - In our garden, leaves are falling... Yellow, red leaves curl and fly in the wind.” (Children perform movements with leaves: swing the leaves over their heads, spin in place, make wave-like movements with their hands. When they say “fly,” they throw the leaves up.) - Now let’s collect the leaves into bouquets - red and yellow. Educator: Well done guys, you completed the task. But look, what is this? The mischievous wind, while we were playing, tore off all the leaves from the trees.
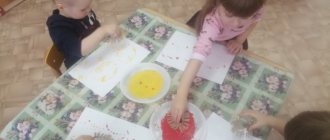
(The teacher invites the children to come to the table on which there are cotton swabs, napkins, gouache and drawing blanks.)
And now they have become boring and not beautiful. How to be? Children's answers. (Draw leaves.) Educator: Indeed, we all need to help Autumn together to return the trees to their bright outfits. But how do we do this? What are we going to draw with? Children's answers: (with felt-tip pens, brushes, paints). Educator: Correct. But we don’t have any felt-tip pens, pencils, or brushes; it looks like the wind was a prankster, along with the leaves, and carried them away. But this is not the time to be upset. I'll show you another way of drawing. Educator: Today we will do unusual drawing. Instead of brushes, we will use cotton swabs. Dip the stick in the paint and press it to the paper at the top of the sheet next to the trunk. Look, there is an imprint. These will be the leaves. The teacher takes a stick, dips it in paint and fills the entire crown of the tree with prints. Indicates that two colors can be used. To do this, you need to use two sticks - dip one in red, the other in yellow. Children do independent work. The teacher helps those who did not complete the task.
Educator: Aren't you tired? Autumn's work is very painstaking. Let's stretch our fingers a little.
Finger gymnastics “Leaf fall”: Leaf fall, leaf fall! Leaves are flying in the wind: Raise your hands up. Shaking your hands from side to side, slowly lower your hands (the leaves fall off). From maple - maple, straighten your fingers and spread them as far apart as possible. From oak - oak, Straighten your fingers and press tightly to each other. From aspen - aspen, join the index and thumb in the form of a ring. From rowan - rowan. Straighten your fingers and spread them slightly to the sides. The forest and garden are full of leaves. What a joy for the children! Clap your hands. Result Educator: Who did we help today? What did you do for this? What did you draw with? What colors did we use? You guys are great. You have beautiful, colorful leaves. I really liked the trees (children's names). What good fellows (names of children) tried, pleased with their work (answer), etc. And Autumn sent gifts for your efforts (the teacher shows a basket of fruit).
Drawing a winter landscape
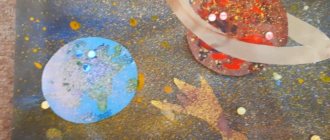
In winter, learning to draw with cotton swabs will come in handy. Using the pointillism technique, you can easily and quickly depict snowflakes. For winter themes, colored cardboard is used as a basis - blue, black or gray. White color is clearly visible against a dark background.
Examples of children's drawings on the theme “winter fantasy”:
Children's work always turns out different, even if only one sample was taken. The drawing reflects the individual vision, character, knowledge, skills and abilities of the little artist.
When children master drawing with cotton swabs, it will be useful to conduct a lesson using several non-traditional techniques at once. The purpose of the lesson is to consolidate knowledge and teach the child to use available objects to obtain the desired texture and realize a creative idea.
Experienced teachers and doctors believe that drawing plays an important role in the development of children. Exercises have a positive effect on the central nervous system. They promote the development of speech skills and fine motor skills. Non-traditional techniques are notable for the fact that they make it possible to introduce very young children to art, since they do not require skillful brush strokes or pencil strokes. Mastering the technique of drawing with a cotton swab is not difficult. During the lesson, each child will be able to feel like an artist creating a work of art.
An unconventional drawing technique using the “poke method”. Master class with photos
Master class “Magic Wands” Non-traditional drawing technique using the “poke method”.
Author: Krutenkova Alena Dmitrievna, additional education teacher, MBOU DO "House of Children's Creativity" p. Molchanovo, Tomsk region The master class is intended for organizing teachers, additional education teachers, primary school teachers, educators of students aged 5 years and above. Works performed using the “poke method” can become a collective endeavor when decorating holidays, interior decoration and a gift for family and close friends. I recently mastered the non-traditional drawing technique “poke method”. At first I didn't like her for some reason. But for the summer camp they requested activities that would contribute to the development of children and create a situation of success. “Nitkografija” (can be viewed here /blogs/al-na-dmitrievna-krutenkova/nitkografija.html), “Monotype” and other methods of non-traditional drawing were already well established. At my own peril and risk, I decided to try drawing with cotton swabs using the “poke method”. That’s why I called the master class “Cotton swabs”. At first I didn’t even have any special thoughts: I decided to let each child write his name along the outline. While the kids were working, I carefully watched them, advised them, and made notes. What worked was that each child liked his own name, which his parents gave him. I wasn’t the only one who liked the result of the first experiment. At the planning meeting, they decided to give the children a task: to make an inscription with cotton swabs: “Happy Birthday!” DOL "Voskhod" - 35 years! We printed out letters and numbers for the children on the computer so that a consistent style was maintained, and distributed a sheet of paper to each child. Children were able to surprise adults again! Each letter was interesting and unusual in its own way. After such experiments, we began to work based on plot pictures: observe, notice, create. We added toothpicks to the cotton swabs - it turned out even more interesting. It turns out that when creating drawings using the “poke method” you can play with color, tone, pressure, and saturation of dots on a sheet of paper. Naturally, the drawings turn out to be decorative, unusual, and most importantly, the children always succeed. Worked with different age categories of children. I printed out drawings on the computer for the little ones, and their main task was not to go beyond the boundaries of the drawing; the older children created their own masterpieces. Goal: creating conditions for experimental activities of students. Objectives: - to introduce children to the unconventional drawing technique of the “poke method”; - create a situation of success in class; — consolidate the technology of tone stretching, the ability to mix paints mechanically; - notice the connection between fine art and geometry; - develop fine motor skills of the hands; - cultivate accuracy and patience; - promote individualization, self-expression, self-realization. Materials and tools that will be useful to you: - Whatman paper, format A-4; - cotton swabs, toothpicks; - gouache; - palette; - a jar for water; - napkins.
So, good luck! For MK I decided to draw a simple plot. Let's make a sketch of the future composition. Mark the stems on a piece of paper with a light touch of a pencil.
Let's mark the place of the bud as an oval. At the top is the largest flower, the second is smaller and below is the smallest. Let's draw three ovals.
Let's mark the center of the ovals.
Let's mark the middle of the colors.
Let’s designate 4 petals: draw them along the guide lines of the stem and class=”aligncenter” width=”439″ height=”625″[/img] Add 4 more leaves to each flower.
Add leaves to the flower using wavy lines.
Use an eraser to remove unnecessary lines. The sketch is ready!
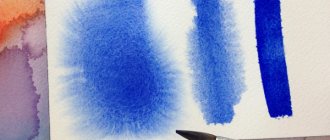
If the children get thick lines, I suggest they go over the entire drawing with an eraser, the drawing is still visible - the work will only benefit from this. On the palette we will use different shades of blue, crimson and green. You can see how to prepare different shades at the link /blogs/al-na-dmitrievna-krutenkova/cvety-dlja-mamy.html. We begin work by filling the background: from top to bottom.
Don’t forget to play with shades of blue (white + blue): our background goes from light to dark. Well done, the background is ready!
We also fill the flowers in the work using the “poke method” from top to bottom, in order: large, medium, small. We begin to fill the flower from the central petal: along the contour we apply a bright crimson tone.
Then we fill the petals inside, row by row. Each subsequent row is a tone lighter. The lightest shade of crimson runs through the center of the petal.
Filling the core of the flower. We'll paint the stems bright green. We fill the leaves with a lighter tone (instead of white paint we use yellow paint, then the green color will appear), but do not forget the main rule: all work is done from top to bottom.
Your drawing is almost ready.
Now look carefully at what happened (move the drawing about a meter from your eyes). The core of the flower is faintly visible. Take and increase the density of the dots, while not forgetting to keep the oval shape. Apply a darker color along the bottom of the middle oval. Along the upper part of the oval - light and white: this creates volume. Use a toothpick to make small accents in the composition. Let's paint burgundy along the outline of the flower petals, and dark green paint along the leaves. Congratulations! Your drawing is ready! You can put it in a frame and give it to your mother, grandmother, or simply decorate your room.
I give examples of the first letters filled in using the poking method.
Scene pictures. First steps. Small sketches. I wish you creative success and unusual drawings!
We recommend watching:
Unconventional drawing technique Blotography. Master class Drawing a landscape using the combined technique “wet on wet” and “dry on dry” Non-traditional methods of drawing in kindergarten for older preschoolers Drawing techniques. Blowing
Similar articles:
Drawing autumn leaves, grades 1-2
Materials and drawing rules
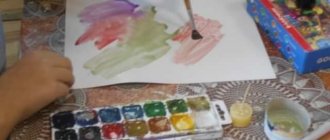
Drawing with cotton swabs is a relatively clean technique. There is no need to cover the tables with oilcloth.
Prepare materials:
- paper, cardboard (can be colored) or coloring;
- paints (watercolor, gouache);
- cotton swabs - according to the number of colors used;
- a glass of water.
Drawing rules:
- Hold the stick perpendicular to the paper.
- After dipping the cotton wool into the paint of the desired color, leave prints with short pokes.
- Fill in the outline first and gradually move from the edges to the center.
- Use a separate cotton swab for each color.