Preparing for a lesson in sculpting donkeys and other toys in the senior group
In the senior preschool group, children are already quite independent in order to help prepare everything necessary for creative activities, however, the substantive aspects of this work must be thought out and clearly planned by the teacher.
Modeling method
Children in the older group practice the combined method of modeling, when parts can be made separately and then combined into a single composition (constructive method), as well as when the entire craft is made from one piece of plasticine (sculptural method). However, to make a donkey, it is preferable to use the sculptural method, since it makes it possible to give the desired shape to each part that turns into another. For Dymkovo toys this is of key importance, because initially whistles were made using this method. And for them it is important to bend and bend the elements correctly so that the sound comes out.
Techniques
As for modeling techniques, in the junior and middle groups the kids have already become familiar with all the basic techniques for creating molded structures, so it’s time to practice their skills
- rolling out “balls”;
- rolling “sausages”;
- pressing indentations on the mold;
- flattening “pancakes”;
- pinching pieces with two fingers;
- pulling an element from a piece of base;
- accessions;
- smearing parts onto the base;
- pinching without flattening;
- stretching elements, but maintaining the original shape;
- smoothing the transitions of elements into each other.
What can children do?
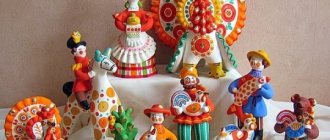
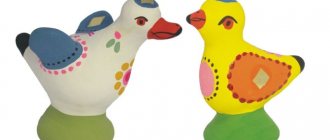
This is interesting. Dymkovo painting takes its name from the place where this craft originated - the settlement of Dymkovo, near the city of Kirov, more than 4 centuries ago. The painting of the Dymkovo toy has its own “handwriting”, which is characterized not only by the strict form of the ornament, but also by the predominance of a certain spectrum of colors. Straight and wavy lines, diamonds, large circles, dots - all these elements are located on the lower background, in such a way that they contrast very much with each other. And the very form of these elements subtextually speaks of some kind of amulets. Each toy is hand-painted, so the soul of the artist is always present in it, and it is impossible to find two absolutely identical Dymkovo toys.
Children aged 5–6 years old can make crafts based on the Dymkovo toy independently, with minimal help from an adult (as a rule, this is required at the stage when individual parts need to be smeared onto the base). If a toy (in particular, a deer) is created in a sculptural way, then in this case help may be required at the stage of distributing the material to parts of the figure’s body. In some kindergartens there is the opportunity to practice clay modeling, which involves a slightly different system of work, and, therefore, greater involvement of an adult in the creative process of children. The same situation is typical for those cases when the modeling of Dymkovo toys is made from polymer clay. All these materials have different plasticity and different methods of drying finished products, which also implies different methods of modeling. As for plasticine, it is a universal material for children’s creativity, allowing children to show independence and a certain professionalism in working with it.
Do I need to color it?
If the craft is made of clay, then it must be painted, since the material can crack without coating, and plasticine is well preserved even without a layer of paint.
The main distinguishing feature of Dymkovo toys is their unique painting, done in bright colors. Products must contain red, yellow, blue, orange and green colors.
Combinations of lines, dots, and stripes also imply the presence of white fields. Thus, the background for coloring should be white. When working with plasticine, this is very easy to achieve: you need to paint the finished craft with white gouache, let it dry, and only then apply a bright pattern with paints (gouache). Painting or decorating a craft with plasticine is a question that the teacher decides based on the level of preparedness of the children, the time allotted for completing the work and specific tasks that are solved in a separate lesson.
How to implement an individual approach?
While preoccupied with the technical intricacies of making the Dymkovo toy, we must not forget about the educational orientation of the activity. This is especially true when it comes to implementing an individual approach to work. Typically, the process of determining the level of difficulty determines how much the child is able to cope with the task without outside help. And in this matter, everything depends on the child’s level of development, his temperament, and abilities. In general, creative tasks can be differentiated as follows:
- if the little one can’t color, then you need to help him;
- those children who quickly cope with rolling workpieces can help those who are less agile;
- The little ones can be invited to make their own painting using Dymkovo colors or, conversely, working with classic patterns, apply shades to their taste, etc.
Goals and objectives of the lesson
The program content of a modeling lesson on the theme of the Dymkovo toy involves
- systematization and consolidation of knowledge about folk applied art of the Vyatka region;
- development of creative abilities;
- instilling pride and respect for the peoples inhabiting the country.
The tasks can be identified
- teaching children to create crafts based on the Dymkovo ones;
- train constructive and combined methods of modeling;
- work on children’s active vocabulary (in particular, expanding the set of adjectives used in speech);
- continued development of the ability to carefully work with plastic material;
- cultivate the desire to solve the assigned creative task independently (regarding the choice of decorative elements);
- encourage creativity and initiative.
Options for crafts based on Dymkovo motifs
This is interesting. Oleshek is a baby deer, fawn.
In the older group, in addition to the deer, children can create
- goat;
- young lady.
Children usually sculpt the Dymkovo duck and horse in the middle group. True, the elements of painting were either not used or were used in a simplified form. In the older group, these same crafts can become more complicated due to more intricate painting.
Step-by-step photo lesson:
The first photo shows a comprehensive set of plasticine blocks, which will be enough to sculpt a miniature of a pet. The main color will be grey, pink and brown - secondary shades, they will be needed for sculpting small details - the udder, horns and hooves.
Mash two portions of gray plasticine, make large and small balls.
Form the torso and head, fasten them by placing the neck between them.
Use the sharp side of the stack to push through the mouth, nostrils and eyes, and attach a miniature beard. If you make the beard larger, the goat will look like a goat.
Prepare four identical gray balls for sculpting the legs.
Extend each ball into a rounded comma.
Attach the legs to the body.
Secure the goat's pink udder between the hind legs.
Add the brown hooves and score each one in a stack.
Attach long, curved brown plasticine horns and a miniature tail at the back.
The last small touch to the appearance of the animal figurine is the eyes.
So the plasticine goat is ready. It can easily be turned into a goat if you add a larger beard and remove the udder, or into a baby goat if you make small horns.
Working on crafts based on Dymkovo motifs
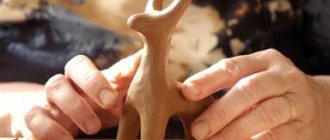
Let's make a deer
To create the deer, a combined sculpting method is used, but, nevertheless, the basis is sculptural, that is, kids sculpt parts of the figurine from a single piece.
Instructions:
- “From a piece of plasticine (you can combine the leftovers after doing other crafts into one ball) we roll 2 sausages (thick and slightly thinner) - these are blanks for the body and head with neck.”
- “We form the body and legs from the thicker one. To do this, we make cuts along 1/3 of the entire length at both ends.”
- “We smooth out the resulting elements into cylinders.”
- “We bend the figure slightly in the middle, placing it on its legs.”
- “We cut a small segment of the second sausage with a stack diagonally.”
- “We apply the place of the incision to the body and smooth out the transitions.”
- “We take small pieces of plasticine for the ears. We form a ball, and then roll up small thick sausages, stretching out one part so that the figure begins to resemble a three-dimensional triangle.”
- “We attach the ears to the head, smooth out the transitions well.”
- “We roll the sausage, bend it in the middle and attach it between the ears - these are the horns.”
- “We complement the deer with a small tail. To do this, we roll up a thin sausage and attach it to the body, smoothing out the junction.”
This is interesting. Since the craft will still be painted, the horns, ears and tail should not be thin, otherwise they will break when applying paint.
Let's start painting.
Instructions:
- “Dip the workpiece into a bowl with white gouache.”
- “Let’s get a craft” (it’s better if an adult does this).
- Let it dry and apply the selected design with gouache.
Example of lesson notes
Vedernikova Natalya Summary of a modeling lesson in the senior group based on Dymkovo toys “Oleshek” (fragments)
| Get your ears ready, kids, This is interesting to know: I want to tell you everything about the Dymkovo toy. In Dymkovo, near Vyatka, Four hundred years ago, for the spring holiday, “Whistling,” They were sculpted by young and old. These Vyatka toys are like a rainbow in the spring: Look, here’s a turkey, A tail like a painted fan, An elongated beard, Like a plume, a comb, Wings with bright eyeliner - The whole toy is like a flower! Nearby there is a beautiful young lady, standing with her arms akimbo; Apron, skirt and kokoshnik: Everything sparkles and burns. Black arched eyebrows, eyes, cheeks, scarlet mouth - It seems that he will wave his hand and immediately begin to dance. Buffoons, water bearers, ladies and roosters - They are decorated with stripes, cages, dots and circles. Red, yellow and green, Scarlet, blue, light blue - All colors on a white background of this painted haze . The whole country and the whole world knows the folk craft; You saw this Russian souvenir today. Teacher: - Look, we found ourselves in front of a workshop where Dymkovo toys . And now I invite you to become masters for a while and invite you to the workshop. Teacher: - But the workshop is closed. To enter it, you need to answer questions. Teacher: - What are Dymkovo toys ? Children: - From clay Teacher: - What other materials are needed? Teacher: — What tools are needed for work? Part 3: The workshop opens. Children enter and sit at their work stations. Teacher: - Check if everything is ready for work? (children answer) Teacher: - Guess my riddle and find out what you will sculpt: Stands on slender legs - All the beauty is in the horns. That's right, it's a deer . Teacher: Pay attention to the diagram! (on the poster there are samples and modeling )...> Try to make your work beautiful and neat. A good master's workplace is always clean and tidy. Physical education lesson Teacher: Let’s stretch our fingers before work. We brought clay from a distant hillock (hands on the belt, turns with a spring) Well, let's get to work, miracle masters! (arms forward, to the sides) Blind, dry - and into the oven! (they sculpt with “palms”) And then we will paint (fingers with a pinch, draw wavy lines) We will toys , (sculpt with “palms”) The stove radiates with heat. (they clench and unclench their fists) But there are no rolls in the oven, (they wave their index finger) But in the oven there are toys ! (hands forward) Teacher: - Before we start work, let’s say the following words: “I’ll sit straight, I won’t bend, I’ll get to work.” Teacher: - Now you can get to work. Independent work. Teacher: - And now I’ll see whose fingers are the most dexterous and skillful. Children begin to work, the teacher monitors the work, advises, and shows working techniques. Part 4: Summary of the lesson . Analysis of works. The children finish their work, wipe their hands, and place the reindeer on the stand. Teacher: - Let's see how our masters coped with the work. Teacher: - Are all the toys okay ? Teacher: - Whose work do you like the most? Why? Teacher: - Which toy is the neatest ? Teacher: - Well, guys! We learned a lot of interesting things in Dymkovskaya Sloboda , met with toys , and tried ourselves as craftsmen. It's time for us to go back. Sit down on the carpet quickly. Another minute and he will leave the ground. Children sit on the carpet - an airplane. Teacher: - One, two, three! Fly! Teacher: - Repeat the farewell words after me: We will remember the Dymkovo toy And now, friends - girlfriends, We will finish our story...> |
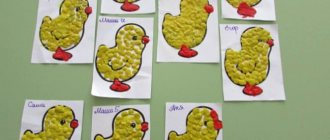
Photo gallery: ready-made children's crafts
You need to paint the craft only after the first layer of paint, that is, the primer, has dried well, otherwise the painting will flow. Some options for making an oleshka involve large branched horns. Due to its age, the oleshka may not rest firmly on its legs
Let's make a goat
As an option for making a Dymkovo toy, you can invite kids to make a goat. When getting acquainted with domestic animals (or after studying the fairy tale “The Wolf and the Seven Little Goats”) in the junior and middle groups, the children were already making a kid. The technique will be the same, only the Dymkovo toy has large horns. Also, sculpting the torso, limbs, head and tail will be similar to how we made the deer.
Let's dwell on the creation of these largest horns and ears.
Instructions:
- “Roll two long sausages.”
- “We bend them in a circle, but leaving one end free.”
- “We stick this edge to the head.”
- Repeat for the second horn.
- “We form 2 balls from 2 small pieces of plasticine and make pancakes from them.”
- “We pinch the workpiece, grabbing it along the edge of the circle, so that we get a spatula.”
- “We apply the narrow part to the head in the place where the horns are attached.”
- “We sharpen the goat’s muzzle a little, slightly extending it for this purpose.”
An example of a lesson plan for sculpting a Dymkovo goat
Organizational moment (1-2 min.) - Look, guys, a goat has come to visit us. What is he like? - A goat, a steep-horned goat, He has a strict character. His pants are on his feet, look at them, kids! - Do you know that the goat has friends, do you want to meet them? Answer the questions: - A beautiful goat. - We'd like to meet you.
Guys, look at the pictures, you see goat toys in them, what are they? - Yes, they are very unusual. Look, goats are a Dymkovo folk toy. Say in unison: Dymkovo toy! - This toy is not simple, but magically painted: let's look at it. -What does the goat have? - What color are his ears? — What color is the tail and hooves? —Look at the pattern on the goat? What does it consist of? — What colors are in the pattern on the goat? - Which of you liked this toy? Fine! The children say in chorus: “Dymkovo toy.” Children answer: - A goat has a head, neck, torso, legs, tail, ears, horns. — The pattern consists of circles.
Let’s take the plasticine in our hands and knead it better. We'll divide everything into pieces, we'll start sculpting the goat: We'll roll out the head, we'll roll out the legs. The pants are like a bell, we connect them. Perform movements following the teacher: (clench and unclench fingers) (show how to tear off pieces) (movement imitating rolling a ball between the palms) (movement imitating rolling a sausage between the palms) (connect the fingers of two hands with each other in the form of a house)
Take one piece of plasticine in your hands and knead it. - After kneading the plasticine, roll out this lump of plasticine on a modeling board. You will get a figure like this - a cylinder (or column). - Take the cylinder (column) in both hands and with your right hand pull out one end of the cylinder (column). - Now bend it in an arc. You will get the neck and head of a goat. - Below, where the neck connects to the body, the goat has legs. To make the goat's legs, take the stem in your hands and make a cut in the middle of the body. After this, pull the plasticine left and right - these will be the goat’s legs. - On the head we will make a beard and horns from plasticine of a different color, for example, yellow. - Pinch off small pieces and roll into round balls and flatten them to form circles - pucks. Decorate your toy with beautiful colorful circles. -Then take some black and make the eyes, nose and hooves of the goat. Children take plasticine in their hands, knead it, and roll it out. Bend and stretch the goat's neck and head. Children make a cut with a stack and stretch out the goat's legs. They stretch out the horns and beard on the goat's head. Multi-colored circles are sculpted from plasticine to decorate the goat’s body. The eyes, nose, and hooves of a goat are made from black plasticine.
A duck walks in a skirt, in a warm sheepskin coat, a chicken in a vest, a cockerel in a beret, a goat in a sundress, a bunny in a caftan, and the prettiest of them all is a cow in matting. Perform movements after the teacher. For each animal name, bend the fingers on the hands, starting with the thumbs. Rhythmic alternating hand claps and fist bumps. 6.. Independent productive activity of children (7–8 min) Children make a toy from plasticine.
What toy did you meet today, what is it called? - Let's look at the fairy-tale goats you made. - What beautiful toys you made! - Who liked to sculpt a goat? - Well done! Come to me, put the toys on the stand, what wonderful friends you have made for the goat! The children answer: “Dymkovo toy.” Children look at the molded toys...> The features of the face can be drawn in stacks |
Dymkovo ram made of plasticine
They rejoiced at the goat, and it was good. But life on the spot is not time to turn him into a sheep. And here we will already use mixed sculpting techniques. A Dymkovo toy (usually a whistle) may have a mouthpiece or a wide stand instead of hind legs.
So we separate the back legs of the goat, bring the body down into a cone (like a fish tail), and divide the freed plasticine into two pieces.
We roll these pieces into cones and curl them in a steep arc, at the same time slightly flattening them in the bending plane. We apply the horns to the existing goat horns and carefully mask the seam. Since the new horns are very massive, so that they do not sag, we rest them with the lower bend on the back of the toy ram.
I am pleased to present my latest work - modeling Dymkovo toys from plasticine. I've been wanting to do this for a long time and here's the result.
Purpose: to replenish the corner of visual activities to introduce children to the Dymkovo toy; to develop knowledge about the features of painting toys, color, and the main elements of the pattern. Continue to educate on folk traditions.
Stages of work on other toys based on Dymkovo motifs
horse
Modeling a horse figurine is no different from creating a deer. Even their ears will be the same. But the horse needs a mane and tail. In addition, painting on the toy can also be done from plasticine.
Instructions:
- “We roll a sausage out of a piece of black plasticine.”
- “We roll it up into a flagellum and apply it to the head and neck, placing it between the ears.”
- “We also use a rope to roll up another sausage for the tail.”
- “We pinch off small pieces of plasticine of different colors, shape them into pancakes and attach them to the horse’s body, imitating painting.”
- “Using pieces of black material we make eyes and a nose.”
Young lady
This craft is also painted with plasticine, which saves time on painting and drying the workpiece.
Instructions:
- “We take a piece of white plasticine and roll it into a thick sausage.”
- “We visually divide the figure into 3 parts, and having separated 1/3, we smear the material in different directions with our fingers so that we get a narrowing - the young lady’s waist.”
- “On the contrary, we expand the lower part downwards - this is the skirt of the figure.”
- “Roll up 2 thin sausage-like handles and apply one end to the top of the workpiece, and the other just below the waist.”
- “Roll a ball for the head.”
- “We make a ball from a small piece, which we turn into a thick, low cylinder - this is the neck.”
- “We attach the neck to the body, apply the details.”
- “We put the head on the neck and apply it too.”
- “We’re dressing the lady. We roll out a piece of green plasticine into a thin pancake and apply it in the form of a blouse.”
- “We use the same thin pancakes from green plasticine to make sleeves.”
- “We lay out a thin blue sausage in the form of a collar.”
- “We roll 4 thin sausages out of black plasticine, twist them in pairs and attach them to the head - this is hair.”
- “We cover the places where the hair is attached with a thin black pancake.”
- “We make a strip for the kokoshnik from a blue sausage, forming a wavy edge with a stack.”
- “Attach the headdress to the head.”
- “Using pieces of plasticine of suitable colors we make dots-eyes, stripes of the mouth, nose and eyebrows.”
- “We decorate the costume with small pancakes and plasticine dots of different colors.”
Photo gallery: toys based on Dymkovo
You can create entire compositions from crafts, for example, a meeting of 3 young ladies. You can give the mane and tail a wavy shape using stacks. If you don’t bend the body too much, the figure will look like a gallop.
Video: sculpting a young lady based on the Dymkovo toy
Dereza goat made of plasticine. Master class with step-by-step photos
Welcome to the page with a detailed description and photo report on the topic “ Plasticine goat master class.”
A goat goat made of plasticine is easy to make if you follow the master class and do not rush in the modeling process. In order to make a goat from plasticine, you need to prepare a minimum set of material and equipment, which is shown in the photo below.
A do-it-yourself plasticine goat, in terms of complexity of execution, belongs to the section - children's crafts from plasticine.
List of materials and accessories for modeling:
- Set of plasticine 6 colors (elements of neon plasticine are used in MK)
- Stacks
- Tweezers
- rolling pin
- Cuticle scissors
- Toothpicks
- Oilcloth or glass backing to protect the table
- crochet hook
In the process of making a goat's udder, a soft pink color is used, which is obtained by mixing white and pink plasticine
Note: Unlike a cow's udder (4 teats), a goat's udder has only two teats!
Sequence of making a goat craft from plasticine :
We sculpt a large oval for the body from brown plasticine
On one side, the oval needs to be flattened and stretched a little to make it look like in the photo
Roll a ball for the head in your palms