We create houses from old furniture
In our version, the dollhouse will be made from an old chest of drawers.
The work will also require: a wood saw, a brush and a brush, glue, white paint, putty, sandpaper.
We make a miracle with our own hands - a step-by-step master class
- If the chest of drawers is tall, you will have to remove the extra partitions, leaving two floors.
- Apply glue to the empty space that appears with a brush, lay wooden slats over it and leave to dry.
- In the meantime, we fill up scratches and gouges on the furniture with putty.
- After drying, sand the entire workpiece with sandpaper until smooth.
- We paint the entire miracle house white. Now it can fit all the dolls in the house.
At what age can you start modeling with plasticine?
It is generally accepted that plasticine is for children 3-4 years old. In fact, it can be gradually turned on by the end of the first year of life. But parents need to remember that the earlier you start classes with your child, the more effort and self-organization will be required on the part of adults.
- In the first year of life, children become familiar with plasticine as a material. At this age, children put everything in their mouth. Therefore, their hands should always be in the hands of adults. It turns out that all the manipulations are done by the mother, but with the hands of the baby.
- In the second year of life, an acquaintance with the qualities of plasticine occurs. The baby can already divide it into several parts, then glue them together.
- In the third year of life, basic modeling techniques are mastered, on the basis of which all figures at an older age are built.
Plasticine crafts for children
But there is so much uncontrolled imagination in them that there is no point in describing the process of their creation. But here came the idea of making a plasticine craft as a gift for one of our loved ones. What should I do? A house, of course, is always a win-win idea, warm, sincere and cozy. Lesha did just that, literally spending a couple of hours on it. And suddenly it turned out great! This is the first house, and there is a well next to it.
And then he himself wanted to make the same one for me, for the woman, for my friend with whom we communicate closely, and for my dad’s beloved woman. Here, you can immediately see the circle of people dear to the child. And, characteristically, everyone has a birthday in the fall (mine is only at the end of August, but also soon), so the idea turned out to be very timely.
The process of creating a house from plasticine turned out to be so simple and understandable, that’s why the idea arose to show it in the article. Keep in mind, this is my son’s original technology, I didn’t add anything on my own, didn’t adjust it in any way - the way he came up with everything is the way it is. If something seems superfluous to you or, on the contrary, you want to do something differently, then everything is in your hands, there is no reason to restrain your creative impulses!
Craft house made of cardboard
This material is the most popular for creating a house. Use materials like toilet paper rolls, small cereal boxes, or large mailing boxes.
House for a gnome
Making this house model will not be difficult. With a little effort, you can create an entire village for gnomes.
For the craft you will need:
- toilet paper roll,
- colored cardboard,
- colored paper,
- White paper,
- glue stick,
- scissors,
- black felt-tip pen.
First, cut the cardboard cylinder in half. Cut 2 white strips from white paper 1.5-2 cm wider than the sleeve. Windows and doors are cut out of colored paper and glued onto white strips. Use a black felt-tip pen to draw window frames and door handles.
Then the decorated white stripes are glued onto the cardboard cylinders. The free edges of the glued strip are folded inward and glued. Roof blanks - pointed cones - are made from colored cardboard. Roofs are glued to the frame of houses.
In another version of the gnome house, you can replace the cardboard roofs with felt cones. Doors and windows are cut out so that they are wide open.
Doll house
Making an exclusive two-story house for a doll is not at all difficult. This will require: a little patience and unbridled imagination. The materials and color scheme for finishing a homemade house are selected according to your own taste, which gives it individuality.
Before starting the craft, collect the necessary materials:
- 2 cardboard boxes, one of them larger,
- 2 sheets of cardboard,
- PVA glue,
- scotch,
- pencil,
- scissors and stationery knife
- colored self-adhesive paper,
- other materials for decoration: scraps of wallpaper and fabric, lace and ribbons.
The folding sides of the boxes are cut off. Place the large box with the open side facing you. Using a utility knife, cut windows and a door on the sides of the box. The first floor is ready!
In a smaller box, windows are also made. Glue it on top first in the same way - with the open side facing you. The roof is glued together from 2 sheets of cardboard of a suitable size.
The sheets are connected using tape and attached to the walls of the building. Then they move on to decorating the house.
House
Fairytale little houses always touch and attract attention. And in this master class we will make such a fabulous house from natural materials. It is not difficult to do. And the process itself is very exciting. Therefore, you can make a house together with your child.
To make a house we will need:
- Twigs;
- Wire cutters;
- Glue;
- Plasticine;
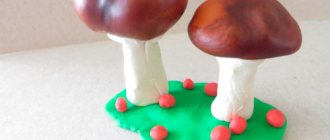
- Cones;
- Berries;
- Mushrooms;
- Grass;
- Any decorative elements.
The house will be round. Take a block of green plasticine and knead it. We make a ball from plasticine and flatten it to make a circle.
This is the basis for "construction". At the same time, plasticine serves as both a foundation and greenery.
Then use pliers to cut the branches to equal lengths. From 7 to 10 cm. The branches should not be too thick. Otherwise it will be difficult to cut them.
We place branches along the contour of the plasticine circle. We stick them into plasticine. This is the basis for the house.
Let's take another twig and cut it into 3 parts. We will fasten them together with glue. You can also fasten it with plasticine, if that’s more convenient. And we attach this blank to the house as a door.
Roll a sausage out of brown plasticine and bend it around the door of the house.
Now you need to make a roof and secure the walls on top.
To do this, take plasticine again (you can take any color).
Roll out the plasticine into the same circle as the “foundation”. And attach it on top above the branches. The branches need to be inserted into this. We also form a cone-shaped roof from plasticine on top.
To make tiles, we will disassemble a large cone into scales. We attach these scales in a circle along the bottom of the plasticine, slightly pressing their upper part into the plasticine in order to secure them well.
Then we lay the second row of tiles. Then the third and so on until the roof is completely ready.
This is what the finished roof of our cozy house looks like.
Let's start decorating the house.
Glue a small mushroom onto the roof. You can also attach a couple of mushrooms to the left of the door and then glue a sprig of bright berries here.
On the right side of the door we attach a small green bump to the plasticine. It will be here as a tree.
The plasticine from below can be covered with grass. And hang a clock under the roof. But if there is no such decorative element, then you can leave the house without a clock.
A cozy fairytale house made from natural materials is ready! You can put it on a shelf and admire it at any time.
How to make plasticine with your own hands
There are quite a lot of recipes for preparing material for hand modeling. They differ in ingredients and cooking time. Usually available substances and products that are not harmful to health are used.
This activity is interesting for children when they are 2-3 years old. The baby is just beginning to learn about the world around him and explores it in all ways available to him. He can put almost everything that comes to hand into his mouth.
You can create a variety of colors using food coloring. They are virtually harmless in small quantities and inexpensive. The brighter and more saturated the color, the better, as the figures will turn out more beautiful.
Components for homemade plasticine
The set of components depends on the type of plasticine and purpose. You can make a material that will not dry out for a long time and at the same time retains its plasticity for a long time. You can also create a figurine that can be baked after work and get a beautiful work of art. This figurine will be kept for a long time.
Regular plasticine is usually made from flour. This product is in every home; in fact, you will get a special dough. By adding different dyes, you will get an excellent material for modeling.
In order to create this material, salt, lemon juice or citric acid, water and vegetable oil are used. After mixing all this in a certain order, you get a homogeneous mass that should stand for some time.
The simplest recipes allow you to easily make plasticine at home. This way, parents will be 100 percent sure that it will be safe even for the youngest children.
Types of homemade plasticine
The following types of modeling material are considered the most popular:
- Ordinary plasticine.
- Smart plasticine.
- Magnetic plasticine.
There are other varieties, but they are obtained by slightly changing one of the three above. We recommend trying each of them. Parents will also be interested in remembering their childhood and spending their free time sculpting.
How to make smart plasticine
This is the name for a material that has high elasticity and quite easily takes on a new shape. It appeared not so long ago and immediately gained popularity among children of all ages. Then they called him “lizun”, many remember those years.
Nowadays it can more often be found under the name hendgam, which means “hand chewing gum.” This is a special polymer that can be made even at home. The manufacturing technology is simple and inexpensive.
Handgam does not leave behind greasy stains; it can be thrown on walls and ceilings.
Scientists have proven that such plasticine well develops creative thinking, fine motor skills and even speech. This toy will be interesting and useful for your baby.
So, to prepare “handmade chewing gum” we will need: 100 grams of PVA glue, a few drops of food coloring and half a bottle of sodium tetraborate. Tetraborate is sold in pharmacies and is inexpensive.
You need to mix everything in a special container, preferably glass. During cooking, you need to protect your eyes and hands.
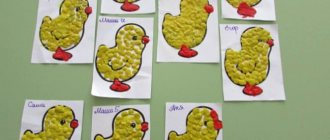
Crafts based on “koloboks”
- Snowman. We roll three koloboks, which we then carefully mold together. We make the eyes and mouth in a stack. The nose can be made into a stack, or you can make a carrot nose with your mother’s help.
- Tumbler. We roll two balls and mold them together. We roll two small buns separately and attach them to the sides as hands.
Caterpillar. We roll small balls - as many as you have patience for. In my opinion, it’s best to make a caterpillar together: the baby makes a few balls, the mother makes a few, and then combine everything together. We make the face in a stack. Attach horns if desired.
Christmas tree. I mentioned this craft earlier in the article “New Year’s Advent Calendar”. For this craft you will need a pine cone, which will be the Christmas tree. The toys on our Christmas tree will be small plasticine balls, or simply pieces of plucked plasticine. At the end of the lesson, mom fixes the Christmas tree on a plasticine base so that everyone can admire it on the eve of the holiday.
Kolobok. The baby, of course, has rolled the bun more than once. This time, invite him to make all the small details from available materials. For example, our little bun has eyes and a nose made of peas, legs made of beans, and a hat made of buttons.
Which plasticine to choose
Plasticine is a universal material for modeling. It is ready for use and does not require special processing. Plasticine is flexible and comes in a wide range of colors. A child can mix different colors of plasticine with each other, obtaining new shades. For children, you need to choose good quality material. It should not be too soft and not too hard. If plasticine sticks to your hands, then it will be impossible to sculpt with it. If it is too hard, then a child’s hand will not be able to knead it, and it will be difficult to connect the parts.
For younger children, it is better to purchase wax plasticine. Due to its base, it is more suitable for fragile children's hands; it is more flexible and soft. Regular plasticine can be purchased from the age of 3. We do not recommend giving flavored plasticine to children under 5-6 years of age. If yellow plasticine smells like lemon, red like berries, orange like tangerine, then the baby will have one desire - to try it. And this is not something you should learn in sculpting lessons.
What else will you need in class?
During modeling classes, in addition to plasticine, you will need the following tools and materials:
- stack;
- rolling pin for plasticine, possibly with patterns;
- modeling board;
- molds for modeling;
- pictures for “coloring” with plasticine.
Children over 3 years old can make crafts with natural materials. To do this, you should prepare pebbles, cones, twigs, and seeds in advance.
Dollhouse
Every girl wants to have the most beautiful home for her favorite doll. However, such houses are quite expensive. It’s easier to apply your skills to inexpensive materials, and you’ll get a real miracle!
- fiberboard sheet;
- a set of colored paper;
- sheets of white and brown cardboard;
- glue and scissors;
- a piece of corrugated cardboard;
- pieces of wallpaper that are in the house.
On a sheet of fiberboard we draw an approximate sketch of the house and cut out the parts.
- We fasten them together with glue. The roof is constructed from corrugated cardboard.
- We cover the outer walls using sheets of colored paper of your choice. We make decorative markings on it.
- For additional decoration, brown cardboard rectangles imitating bricks are glued on.
- The entire structure is attached with glue to a blank cut from fiberboard for better stability.
- We use white cardboard for window frames. Having cut them out, we place them on the sides of all the windows.
- We also cover the balcony.
- The door with the door frame is made of brown cardboard.
- Interior wall decoration with prepared wallpaper or colored paper.
An amazingly bright house is ready to welcome its little owners!
What to make
Before starting a lesson, every parent thinks about what can be made from plasticine. Imagine a little, imagine yourself as a child, think about what will interest your son or daughter most. Children's crafts may involve the use of many additional materials, which include: flowers, leaves, acorns, cones, and chestnuts.
Ideas for what can be molded from plasticine:
- Animals and birds. Interesting and funny hedgehogs, bunnies, and turtles will delight your little one. In addition, such plasticine crafts for children are made very quickly and simply.
- Thematic figures. Undoubtedly, for every child the New Year is a special, long-awaited event, because it is associated with toys and various gifts. Simple crafts made from plasticine in the form of a Christmas tree decoration, a snowman and, in fact, the Christmas tree itself will lift your spirits on the eve of the holiday.
- Flowers. Mesmerizing compositions made with a child will look as if they were alive. Depending on the age of the baby, you can make flowers with a minimum number of details, as well as more complex volumetric compositions.
- Trees. Having mastered easy crafts from plasticine, you can move on to more complex figures. Of course, a child will not be able to mold a tree on his own; he will need the help of an adult. But after taking a few steps in creating a craft, the child will be able to easily complete the job he started.
- Vegetables, fruits, sweets. Even novice craftsmen will be able to master the process of creating miniatures of their favorite delicacies. Select the necessary colors of plasticine, then you can safely start creating.
Isn't it fun and interesting to make crafts from plasticine with your own hands? Let's get started with this exciting activity right now. Prepare plasticine, glass, cardboard and some available materials and you can start working. We will teach you how to make a wide variety of crafts from colored plasticine; such an activity for kids will be entertaining and will cause a lot of positive emotions. Well, let's get down to business?