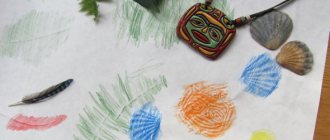
The simplest options
Young artists are able to depict the sad natural season.
Master class for beginners step by step with a pencil:
- The paper canvas is divided by the horizon line.
- The foreground will be occupied by trees whose dark, as if saturated with moisture, trunks have different thicknesses and are located with a slight slope. Their bases are slightly wavy.
- Next, a river with an uneven bank is identified.
- Tree branches, bushes, grass and fallen leaves are drawn in the coastal area.
- Shade the trunk shadow.
- The background has a blurred appearance associated with dampness and cloudiness.
- The sky is filled with heavy clouds.
- A flock of birds flying away for the winter will add to the realism.
The pencil technique conveys light and shade and the three-dimensionality of objects, and errors are corrected with an eraser. Instead of a river, a road in a park alley may be shown, narrowing into the distance, a lonely figure wandering along it, lanterns on the side of the road.
- Having sketched the sketch, trace the contours with a felt-tip pen.
- The crowns are yellow, shaded on one side with a light brown pencil.
- The green spot represents the ground and fir trees.
- Give color to the human silhouette.
When thinking about how to draw autumn with a pencil, they turn to their own subjects or copy from the base.
An interesting idea - an umbrella forgotten on a bench.
- The legs of the bench are drawn at an angle.
- On the open dome there are knitting needles and a handle.
- Puddles and leaves on the asphalt are drawn with strokes.
- You can add oblique lines of a rainfall.
It turns out to be a very nostalgic picture.
Topic: Drawing an autumn forest
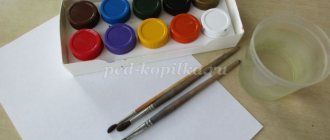
For work you need to prepare: - gouache paints; - white A4 album sheet; - a flat, wide brush (for example, No. 12), - fallen leaves from different trees.
How to draw an autumn forest with children using the technique of leaf prints on paper: step-by-step description
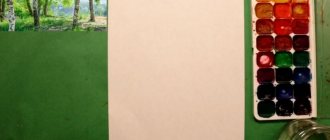
Step 1. Draw the sky on the background.
Let's start with decorating the background. Place the A4 size sheet horizontally. Dip the brush into white and blue paint and, moving from left to right, paint the sky and blur it a little with water. Going down the sheet, we try to take more white paint onto the brush than blue. The sky can be drawn on 1/4 sheet.
Step 2. Draw the earth on the background.
Invite the children to remember what colors autumn has? Let them think about how old trees differ from young ones? What trees will they depict in the drawing? Let's paint the ground with fallen leaves using brown-green paints by moving the brush from left to right.
Step 3. Draw a tree using the technique of leaf prints on paper.
Choose a piece of paper you like, preferably a large one. We paint it on the reverse side with paint of any color in accordance with the colors of autumn. This is an important nuance, since the veins on the back of tree leaves are more pronounced, which means they will give us a more beautiful print.
Reminder: In this painting technique, the paint should be thick enough. Do not wet the brush too much in water, otherwise the print will be smeared.
Also paint the tail of the leaf.
Then you need to take a leaf, place it carefully on the prepared background in the background so that there is no shift of the leaf on the paper. Cover the top of our sheet with a paper napkin. It will protect your work from smearing the paint that has come out from under the piece of paper. Next, you need to press the napkin with your palm or lightly stroke it with your fist.
Remove the napkin. Carefully remove the leaf by the tail.
So the first painted tree appeared in our autumn forest!
Step 4. We draw large old trees with leaf prints.
Similarly, we draw several more trees with prints of different large leaves and paints of different colors. These are old trees, they are larger in size. Try coloring the leaves in several colors. This is what happened to four-year-old Nastenka.
Step 5. We draw young trees and bushes with imprints of leaves.
Now let's select a few smaller leaves - these will be young trees and shrubs. Let's paint them with different autumn colors and make prints in the foreground. Thus we get a landscape - an autumn forest. This is the autumn forest seven-year-old Lisa painted with leaf prints.
Ideas for kids
Sketches can look like mushrooms in a basket, or a vegetable still life. Toddlers will especially enjoy working with prints. Their small palm, printed on paper, will appear as a tree on which they will place numerous colored leaf dots with cotton swabs. They also operate with an ordinary toothbrush.
- The leaf blades of acacia, ash, birch, and maple have a diverse configuration and color. They are outlined and painted, repeating the characteristic veins and patterns.
- After covering with paint, the samples are applied to the painted pot, obtaining a believable bouquet, to which it is easy to attach an image of fruits - acorns, chestnuts, rose hips, a bunch of rowan berries “blazing” with fire.
The overlay method is the answer to the question of how to draw autumn easily and quickly. This way you can depict a real multi-colored forest by painting on the tree trunks and sprinkling an orange scattering of droplets from below.
In the same way, they recreate a whole armful of leaves on the territory of the park, over which birds fly in a flock, and if the adults reproduce a girl’s face, the children will happily imitate the hair of an autumn girl with leaf prints.
In addition to the aesthetic pleasure of creativity, children learn to understand types of vegetation, which will undoubtedly benefit them.
The benefits of learning different drawing techniques
Drawing is one of the simplest and most accessible ways to show your creativity and give free rein to your imagination.
Physiologists and psychologists have proven that creative activities are very beneficial for children. They have a positive effect on development:
- train hand motor skills;
- teach to fully perceive colors and shades;
- improve memory and creative thinking;
- promote independence in decision making;
- Increase concentration and perseverance.
Children who master several drawing techniques often use an unconventional creative approach in life and cope with complex tasks using extraordinary methods.
In preschool and primary school age, it is especially useful to study non-traditional types of fine art: drawing with prints of leaves, palms, plasticine printing, monotype, frottage, grottage, blotography and others. They do not require small movements, straight lines, or shading from the child, which are so difficult to achieve at a young age. Creative activities are always fun and interesting.
Gouache creations
Step-by-step instructions for children:
- Draw a blue horizontal ruler just below the middle of the sheet.
- On top of it there is a sky of the same shade, darkening towards the top, with white clouds.
- Below the main feature a pale blue river flows.
- Closer to the edge, the earth is drawn in yellowish and brown colors.
- Dark brown trees are reflected in the water surface with ripples.
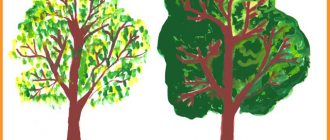
Foliage in red, burgundy, and orange tones is scattered on them, emphasizing the naturalistic autumn color, but the spruce will act as a greenish accent.
Extraordinary picture
A suggestion on how to beautifully draw a landscape of a non-standard nature.
- In the upper left corner, a circle is applied with white paint, then, adding blue, we continue to make circular movements with the brush, expanding the coverage area, switching to a blue gradient.
- Having marked the horizon, we paint the bottom dark blue, and in the center we draw a dark green island with blurred edges.
- Using a thin black brush we depict a tree with branched branches and roots.
- We decorate the leafy cap with a sponge in a reddish color scheme, with an elongated trajectory covering the moon.
- On top of the intricate crown there are additional strokes of yellow color, resulting in snow-white.
- We highlight the lunar disk in relief, chaotically draw falling leaves, and spray stars at the top.
Watercolor
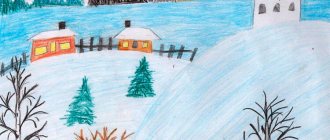
A sketch that includes several trees and a small village house will help you draw autumn step by step.
Execution order:
- On the central hill we place the main object - a large tree. Elevation will allow you to present the foreground and background in a new way.
- Fill the sky with an uneven background.
- In the same way, distant plantings characterized by blurriness are designed.
- Now the grass and bushes in the background stand out. Tall specimens are darker than grass.
- The house is accentuated by the light color of the nearby tree, which attracts attention. We add windows and a roof to it.
- We add volume to the central elements by playing with chiaroscuro.
- We draw a winding path and add some crimson to the bushes.
- Using strokes we highlight the color tints of the crowns.
- Using warm shades we accentuate the background; it has pronounced detail.
The picture needs to be dried and individual details drawn with colored pencils. The final step is checkmark birds flying to warm countries.
Drawing with leaf prints on paper in kindergarten
And here is how children from Saratov drew with imprints of leaves on paper. This photo was sent to our competition “Autumn Workshop” by Natalya Vasilyevna Ilyushina (Saratov, MDOU kindergarten No. 196 of compensatory type, teacher of the 1st category).
Such drawings—prints of autumn leaves—were made by Natalya Vasilievna’s children.
Leaf prints on paper: materials for activities with children
Before drawing with leaf prints, when discussing the subjects of future children's works, read one of the poems about autumn to the children, discuss what color palette autumn has, how autumn differs from other seasons. Place the leaves of different trees around the children and play the game “We walked through the forest” (the description of the game is given below) and discuss how the leaves of different trees differ from each other in shape, size, color, and how they can be recognized.
To help teachers and parents, a small selection of poems for discussing them with preschoolers before drawing autumn trees using the technique of leaf prints on paper: these are poems about the colors of autumn. Choose those poems that best suit your plan and the child’s plan. These poems also contain hints about what can be drawn in the autumn landscape.
Poems about autumn colors for drawing classes using the technique of leaf prints on paper
Autumn mixed colors on the palette: Yellow for linden, red for rowan. Ocher in all shades for alder and willow - All trees will look beautiful. The wind blew and dried the leaves, so that the cold rain would not wash away the beauty. The only thing I didn’t decorate was the pine tree and the Christmas tree, because my girlfriends have too sharp needles. (O. Korneeva)
Who paints the leaves of oaks and birches? maples and aspens - So their outfit throws! In the morning I saw how tiny Autumn was on a maple branch in a green dress, a yellow scarf, and red boots, taking with her various watercolors - deftly painting the leaves in different colors. So, this beauty is born! (G. Ryaskina)
Autumn has scattered colors on trees and bushes. And they burn brighter, like summer fires. Golden and crimson, Yellow festive outfit. The last leaf is falling, leaf fall is coming!
I paint autumn in orange - A leaf that flies away with the last greeting, Unripe berries of tart mountain ash, Small baskets of fragrant flowers. A path to the house with a bed of leaves, And an elegant red fox fur coat. And yellow - grass and weeping willow, And the lush mane of the prank maple. I paint autumn with blue paint: The rain of a page in a slanted line, And a flock of nimble flying clouds, And a puddle with a brave seagull boat. There is a lot of work for the red color: The sun has risen before the wind, Viburnum fireworks are sparkling on the branches, And the berries of late raspberries are hiding. But a fly agaric in a bright red beret stands on a hillock, dreaming of summer. I'll draw him white polka dots and a fluffy skirt on a thin leg. Now I’ll add emerald paint and add green color to the trees. And then, beyond the forest, up to the sky, I draw expanses of winter bread. I’ll spend a little black: I’ll paint the clothes of the crows and woodpeckers. I paint trees and branches brown, And tight berets with white mushrooms. And again I paint the fire of falling leaves... How many colors I need for autumn!
Autumn gives miracles, and what miracles! The forests are decked out in golden hats. Red honey mushrooms are sitting in a crowd on a stump, And the spider is such a trickster! - The network is pulling somewhere. Rain and withered grass In a sleepy thicket at night. Incomprehensible words are muttered until the morning. (Author - M. Geller)
Who painted the leaves in our park today? And spins them around and blows them off the branches? It's autumn!
Poems and game “We walked through the forest” Autumn came to visit us The rain and the wind brought The wind blows, blows, tears leaves from the branches. The leaves are spinning in the wind and falling at our feet. Well, we’ll go for a walk and collect leaves... Next, the children stand in a circle and, moving in a circle, say the words and, among all the proposed tree leaves, find the leaf that is mentioned in the text. We walked through the forest, we found an oak leaf... ...we found a leaf from an ash tree... ...we found a leaf from a birch tree... ...we found a maple leaf!
Autumn took a basket under her arm and mixed some cheerful colors into a bottle: Yellow for the leaves, blue for the sky, A little brown to paint the trunks, A drop of green so that the sun-burnt strands of grass would not be withered. I poured in a little orange paint, To color the mushrooms along the path, Red and white for the fly agaric, I saw a saffron milk cap growing by the fence, Various colors for the russula - Let the world be joyful, like in a fairy tale! Brushes in the basket, easel and tripod, Let them be surprised - this is how an artist is! She went out into the street, waved her brush, and the blue sky filled with clouds. She waved again and the grass, the river, and the meadow all around became gray... -What happened to my paint? Apparently I don't know how to paint at all. -You don’t need to mix the paints all at once. You need to paint with different paints. (O. Goldman)
Children's version
Advice on how to easily draw an autumn picture.
- In a chaotic order, fill the background with yellow, blue, and red tones, using a large brush.
- Use a damp cloth to smear the stains and absorb excess moisture.
- On another sheet we place multi-colored colorful spots.
- We wet the main picture in the lower part, apply the workpiece, smooth it with our hand and remove it.
- On the resulting landscape we draw the trunks of our unusual forest using two brown colors.
- We depict rain with diagonal white rulers.
- To give life to the leaves, we apply different colors to the cellophane and crumple it.
- All that remains is to randomly touch the tops of the crowns with these tools.
Fine arts lessons develop children's aesthetic taste and artistic thinking.
The sorceress-autumn will not leave anyone indifferent with her charming palette, helping in this noble cause.
MAGAZINE Preschooler.RF
Summary of a lesson in a preparatory group on artistic and aesthetic education using non-traditional drawing techniques on the topic: “Late Autumn”Completed by the teacher of MBDOU d/s No. 17 “Kolobok”
g.-k. Anapa Gamretskaya Anna Sergeevna
Program content:
- Introduce children to the painting “Golden Autumn”
. - Strengthen the ability to draw using various non-traditional techniques (raw drawing, blowing, sponging, placing the image across the entire sheet.
- Cultivate interest in the visual arts, the ability to see the beauty of nature.
- Develop creativity, imagination, and the ability to navigate on a sheet of paper.
Technologies used: COR, health-saving.
Material and equipment:
Painting by I. Levitan “Golden Autumn”
, sheets of tinted paper, gouache, palette, blowing tubes, napkins, foam sponge.
Progress of the lesson:
- Look out the window. What time of year is it now? (autumn)
. Why?
What signs of autumn do you know?
Yes, it's autumn now. Almost all the leaves have fallen off. Today I went to kindergarten, the leaves rustled pleasantly under my feet. I wanted to pick up a leaf and bring it here. This leaf turned out to be not ordinary, but mysterious.
Listen to the riddle:
The face of nature is getting darker and darker: The vegetable gardens are turning black, the forests are becoming bare, the bird voices are falling silent,
The bear fell into hibernation. What month did it come to us?
(november)
- That's right, this is the third month of autumn. What other autumn months do you know?
I. Introductory part.
Look at the board, what do you see here? These are reproductions of paintings. Which of these paintings depicts autumn? This painting by Issak Ilyich Levitan, which is called “Golden Autumn”
.
What do you see on it? (nature)
. There are other paintings here, too.
Issak Ilyich Levitan, who painted this picture, was very fond of painting nature. He was a famous artist.
Tired? Let's take a little rest.
Physical exercise.
Imagine that we are in the autumn forest and walking along the paths. So we stopped and:
Hands raised and shook These are trees in the forest. Arms bent, hands shaken
The wind knocks down the dew To the side of the hand, Let's wave it smoothly These are the birds flying south.
We will also show how they sit down. The wings are folded back.
II. Main part
— Guys, imagine that you are all artists. If we are artists, what do we do? (paint)
How? What can we draw with?
- What will help us? (our assistant is a tube)
What can you draw with it?
(trees)
.
How? (this technique is blowing)
.
- Let's start drawing.
Independent work of children. Individual assistance to those who are not quite doing well.
- Look at your paintings, what did you get? What was the mood of the painting? It's very sad, isn't it? Why? (the trees stand without their elegant golden dresses)
.
What are the trees' dresses made of? (leaves)
Our magic sponge will help us with this.
How? (technique – sponge painting)
III. Final part
- What did we draw today? How? (technicians)
Let's make a huge forest out of all your paintings.
Bring all your work here. What a beautiful, magical, elegant autumn forest it turned out to be. All the trees in this forest are very beautiful. Do you like the autumn forest? (yes)
And I really like it! That's what good artists you are!
| Next > |
Photos of finished autumn drawings
0