Why is drawing in different techniques useful?
Studying different drawing techniques becomes a kind of impetus for the development of imagination and creative abilities in children. Classes instill independence and initiative. By combining various methods of depiction in one drawing, preschoolers can show their individuality and fully express their impressions of surrounding objects, phenomena or events in life.
The more drawing techniques a child has mastered, the more freely and easily he can solve visual problems. For example, to convey the materiality of an object. In the process of creative activities, subtle movements of the hand develop. Free use of their hands prepares children for writing, as a result of which they are less tired in school lessons.
Frottage
Frottage.
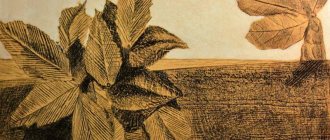
The technique of applying a design to paper, fabric, or, less commonly, leather. To create a pattern, a relief surface is used, which is located on the back side of the paper (fabric); this relief surface is displayed on the front side of the paper (fabric) using friction of a coloring material (for example, a pencil). Slide 13 from the presentation “Non-traditional drawing techniques in children's creativity”
Dimensions: 720 x 540 pixels, format: .jpg. To download a free slide for use in class, right-click on the image and click “Save Image As.” " You can download the entire presentation “Unconventional drawing techniques in children's creativity.ppt” in a zip archive of 599 KB in size.
How and with what to draw?
It is believed that the frottage painting method is best suited for oil paintings - abstract and semi-abstract. Its elements are also good to use in still life, for example, to convey the texture of a wooden tabletop.
Preschoolers in kindergarten are encouraged to use simplified versions of materials:
- thick white A4 paper;
- colored wax crayons, colored and simple pencils, dry and oil pastels, charcoal;
- textured base for the imprint (tree leaves, fabric napkins, tree bark, embossed hot coasters, vegetable grater, etc.).
Execution of the frottage technique:
- You need to come up with and lay out a composition on the table, combining different textured materials. If these are leaves or paper templates, you can glue them to an A4 sheet with PVA glue.
- Cover the composition with white paper and rub it with wax crayons (on the side) or shade it with a pencil.
- Children's drawings in the frottage style are well complemented with applications made of colored paper and mat frames.
Frottage selection:
The frottage drawing technique is very interesting for children. Preschoolers love to look for more and more unusual textured objects that can be used in a drawing. Meanwhile, creative activities are beneficial - they develop the child and broaden his horizons.
Sources:
https://900igr.net/prezentacija/izo/netraditsionnye-tekhniki-risovanija-v-detskom-tvorchestve-208733/frottazh-13.html https://www.maam.ru/detskijsad/netradicionaja-tehnika-risovanija-frotazh -308163.html https://razvivashka.online/tvorchestvo/frottazh-tehnika-risovaniya
Fun drawing: introducing children to the frottage technique
Drawing for a preschooler is an exciting world of bright, amazing images. The frottage technique will allow you to unleash your creativity. It represents an unconventional type of drawing - through a print. Even young children - from 3 years old - can master it. Studying various methods of drawing is recommended in kindergarten and at home for the comprehensive development of children.
What is the frottage technique?
"Frottage" comes from the French word "frotter" and literally translates as "to rub, to rub." The official definition is: “The artistic technique of reproducing a design by rubbing paper.”
To create a drawing, a textured object is placed under a blank sheet of paper, and then stroke-like or rubbing movements are made with a pencil. The result is a drawing-imprint. Many will remember how in childhood they outlined coins on both sides in this way. Then both circles were cut out and glued together. The money turned out to be quite plausible.
