Summary of a lesson on application in the middle group of kindergarten. Flowers
Summary of direct educational activities in the middle group on artistic creativity on the topic: “Flowers.”
Author: Novozhilova Irina Gennadievna, teacher of GBDOU kindergarten No. 104, St. Petersburg. Description of the material: synopsis of GCD for children of the middle group on the topic: “Flowers.” This is a summary of a lesson on applique with non-traditional drawing methods, aimed at the artistic and aesthetic development of children. It will be of interest to teachers of middle and senior groups, as well as teachers of additional education. Purpose: making crafts with your own hands. Program content: Teach children to create a three-dimensional applique on a sheet of fabric paper, decorating it with unconventional drawing methods. Teach children to beautifully build a composition on a sheet of paper, develop imagination, fantasy and fine motor skills. Objectives: To develop independence in creating a composition. Evoke in children a positive emotional response to the beauty of nature. Develop the ability to work in a team, coordinate your actions with each other. Material for clarity: Pictures of flowers. Finished work.
Required material: Beautiful pieces of fabric, cut along the contour of the flower; white paper in the shape of an oval; plate, gouache. A bag with colorful shreds. Glue brushes. Rags and oilcloth. Specially made “pokes” according to the number of children: a cap from a felt-tip pen with foam rubber inserted inside. Preliminary work: Reading poems and conversations about spring and spring flowers.
Examination of flowering plants, illustrations, photographs. Drawing flowers in free time. GCD progress:
Educator: Hello guys. Let's hold hands and stand in a circle. Now close your eyes, I’ll say: “One, two, three” and you and I will imagine that we have turned into beautiful flowers. Educator: One, two, three, we didn’t just stand in a circle, we were a big beautiful meadow. Open your eyes. Oh, how many beautiful flowers there are! Anya, what kind of flower are you? Styopa, what about you? (Asks each child) Children answer : mother - and - stepmother, chamomile, snowdrop, etc. Educator: Great. Let's make one big, beautiful meadow of flowers right on our carpet. He takes out a bag of colorful shreds and offers them to the children. Children : make up a collective composition from multi-colored scraps. Educator : what a beautiful clearing you have created! I just want to walk along it, smell the scent of flowers. What flowers grow in your meadow? What colors are there more? The children answer. Educator : Well done, guys, now let's make the same clearing, only smaller and give it to mom. Go to the table. Look what I prepared for this. Children sit at tables on which there are scraps of fabric, glue, glue brushes, pokes with foam rubber, green paint, and white oval paper. Educator: take and place on your sheet as many scraps as there are flowers in your meadow. Now you need to glue each piece. You need to work carefully, use a small amount of glue so that the work is not dirty. Children do the work, independently arranging the scraps according to their ideas. The teacher helps, if necessary, individually. Phys. just a minute. The children leave the table. “On the lawn in the morning we started a game. I am a snowdrop, you are a bindweed. Stand in our wreath. One, two, three, four Move the circle wider. And now we are streams, Let's run in a race. We hurry straight to the lake, The lake will become big. Stand in a circle again, Let's play sunshine. We are cheerful rays, we are frisky and hot.” (Children perform movements in accordance with the text) Educator : Well done, guys. Take your seats. Look what is missing in our clearing? Children : offer their options. Educator : And I suggest you make our clearing even more beautiful so that the white paper is not visible. We will make green grass on it. To do this, we will take these special pokes, put them in a plate with green paint and apply them to our work. Like this (shows). Now you and I have a real clearing with spring flowers.
Educator : Well done, guys. Now let's put your works on one common table so that each work can be seen by everyone, and together we have a whole flower field.
Lesson reflection : the teacher discusses with the children what they did during the lesson; what happened; what was the most interesting; what was difficult and what was easy and simple.
We recommend watching:
Summary of GCD in the middle group “Visiting the Traffic Light” Summary of GCD in the middle group on the theme “New Year” Summary of GCD for children in the middle group. History of children's toys Summary of GCD for FEMP in the middle group
Similar articles:
Summary of continuous direct educational activities in the middle group
Summary of GCD in the senior group on the topic “So that your teeth don’t hurt”
Summary of GCD in the middle group on the topic “Journey to the autumn forest”
Summary of GCD in the middle group on the topic: “So summer is over”
Types of applications
Paper is most often associated with this occupation. However, there are several criteria by which the types of this needlework are classified. These signs are:
- form;
- color;
- subject;
- application area;
- purpose;
- material;
- performance technique;
- base type;
- fastening method;
- style.
Flowers using the applique technique are the most popular components. This article will help those who want to start making high-quality paintings on the topic: “Flowers”.
"Daisies"
Preschool children will enjoy making this application because it is not difficult to complete. The result will be a colorful craft.
You need to prepare:
- drawing “bouquet of daisies”;
- pencil, PVA glue, scissors, brushes, paints (preferably acrylic);
- colored woolen threads, matching the color of the flower in tone;
- frame.
Master Class:
- First, prepare a frame for the future picture. On thick rectangular cardboard, draw a frame of the desired thickness and cut out the middle. Paint the resulting product (light-colored paint is best). Leave until completely dry.
- Make small flat buttons from threads (the diameter should match the width of the frame) from woolen threads (color at your discretion) and paste them over the entire area of the frame.
- It is enough to finely chop the woolen threads. Place the thread mass into separate containers: white for the petals, yellow for the center of the chamomile, two shades of green for the leaves and stems.
- Place a stencil of the design on the base and carefully trace it with a pencil.
- Carefully grease the centers of the drawn daisies with glue and thickly glue pieces of yellow thread.
- Make the petals in the same way using white threads.
- Create stems in a similar way using dark green threads.
- For the leaves, use threads of a lighter green tone.
- Insert the picture into the frame. This is both a good gift and an interesting home decor.
Applique is a type of creativity accessible to all ages. A huge range of available materials, such as paper, fabric, plastic, cereals, glass, allows you to create beautiful products.
Appliqué practice is very beneficial for a child’s development. Since this is most often a collective work, the child learns to create together, while helping and accepting help.
Children's imagination, thinking, and imagination also develop, and the quality of attention, perseverance, and perseverance gradually increases.
The application in its own way is a guarantee of friendly creative relations between parents and children.
Amazing paintings
Flat applique is the simplest version of creating an original panel of dried flowers. All parts of a dry plant can be used: shoots of various curves, leaves, inflorescences, seeds.
The base for the applique is often covered with fabric or painted with watercolors.
Thick cardboard quite often acts as a similar base for small crafts, since it has excellent adhesion to any glue and is well processed with various paints.
Often, burlap is used at the base of the picture, which is used to cover the canvas. Many craftsmen use this material based on its environmental friendliness. Such applications are suitable for beginners who love floral art.
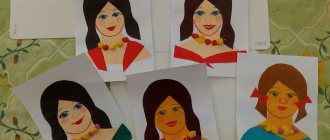
Postcard “Gift for Mom”
A preschool child can handle this work independently. Dad's help is welcome. For the background of the card and flowers, you should choose light, soft colors. For work you will need:
- Cardboard, which will play the role of the base of the product.
- White and colored paper (the color scheme should be adjusted with the child).
- Narrow satin ribbon of a suitable shade.
- Glue, scissors, pencil.
You can start making the gift. It is important to follow the sequence:
- colored cardboard needs to be folded in half (you should decide in advance on the size of the future postcard);
- next step: cutting out tulip buds; small multi-colored paper rectangles are folded in half, the silhouette of the petals is lightly drawn from the fold with a pencil and carefully cut out;
- cut narrow stems and leaves from green paper;
- the bottom of the tulip bouquet can be cut out separately: cut a rectangular strip of green paper from bottom to top, leaving the upper part of the part intact;
- fold all the received elements into a bouquet, placing it beautifully on the base, and glue it;
- a satin ribbon bow will be a wonderful decoration for a bouquet;
- as an addition - small white circles placed above the flowers.
When working on a postcard, it will be useful to give your child more freedom to realize his imagination.
The “flowers” theme is quite common in appliques due to the variety of design options available to adults and children.