Templates and stencils for autumn vytynankas. Simple and complex, light and with many details. Products for kindergarten, for families, for decorating windows, mirrors, walls and other surfaces.
Vytynanki are paper products. Most of them are cut out of plain white or colored paper, but sometimes they are cut out of foil, cardboard and other materials. In simple words, a template or drawing is taken on paper and then cut out. For cutting, scissors and a stationery knife are usually used. There are quite a lot of such tools, so, as you can see, there is nothing complicated about it.
In addition, you may need PVA glue or transparent electrical tape or adhesive tape for gluing the resulting protrusion to the base.
Autumn leaves made from accordion paper
Volume leaves made of paper look especially impressive. You can use them to make bouquets and three-dimensional compositions, or they can be secured with tape or pins on wall newspapers or photo frames with autumn drawings.
Necessary materials:
- paper and stencils for blanks;
- pencil and scissors;
- glue stick or glue.
For design work where only one side will be visible, you can take single-sided colored paper from standard children's sets. If the composition is planned to be voluminous, only double-sided will do.
It is worth checking in advance whether the stem is strong enough when crushed. Glossy sheets are not suitable for such crafts.
You can invite the children to first color the A4 sheets themselves, at the same time telling them about the changes in their color in the fall and showing that in nature there are no monochromatic surfaces. To prevent the paint from being damaged when crumpled, you need to use watercolor. The paper must be completely dry before starting work.
Technique:
- In kindergarten, children trace a template along the contour on paper. Older children can easily make isosceles triangles according to the diagram on their own.
- On the cut-out workpiece, first lay the first fold of 1.5 cm, and then the rest along it “inside-out”. Each fold must be pressed tightly - strictly fixed with a pencil or ruler.
- The finished accordion is folded in half.
- From the remaining ribbon, fold a twig and pass it through the slot of a leaf folded in half.
- All that remains is to crumple the cutting and secure the central part of the product with glue.
Carved leaves are made using the same principle. The basis of this template of autumn leaves for cutting is an isosceles triangle turned into a herringbone.
How to draw an autumn landscape for children
What is landscape? In fact, the landscape is not just the nature outside the window. Have you seen how artists are looking for exactly that piece of nature that they will paint on canvas? They should like the view, the angle, and the lighting. Sometimes the character of nature is reflected in the most inconspicuous picture. And this suggests that the artist saw beauty and was able to convey it in all details, color and light.
How can children master this science? Very simple. You need to show your child a couple of pictures of a beautiful autumn landscape and tell him what makes this picture special. For example:
- In one picture there is a tree strewn with golden foliage. Although the artist painted the leaves as a “cloud,” he highlighted several individual leaves as an accent and drew every detail on them.
- On the other there is a river, which is visible from a high hill, already covered with yellow-brown-green foliage. And it is the shine of the river, and the way heavy autumn clouds are reflected in it, that makes the landscape special.
- And on the third everything is simple: trees, bushes, grass. And only how low the sun is and how it sparkles like sunbeams in the tree branches decorates the landscape.
Kids quickly grasp such details. A little training and they will succeed!
Master class on how to draw autumn trees and sky.
Author
I offer a simple option for children. You will need:
- Brushes
- Paints
- Wet wipes
- Plastic bag
1. We make the background with watercolors. Using a large brush, apply transparent yellow, blue, a little red, apply randomly.
2. Take a damp cloth and smear the paint stains, while the cloth absorbs excess water.
3. On a separate sheet of paper, apply random spots of gouache paint. We make them with the touch of a large brush.
4. Apply clean water to the bottom of the sheet. We turn it over and apply our blank of paint stains to the wet part of the sheet, smoothing it with our hands. And we remove the leaf.
5. If you shoot by the top edge in the middle, you will get a static forest, and if you shoot by the uppermost corner, you will get the effect of wind in the forest.
6. It remains to draw the tree trunks. We do this in two shades of brown to make the picture more voluminous.
7. Let's draw rain. Take a wide brush and remove excess water from it. We put white gouache on the tip and apply strokes with diagonal light movements.
8. Using a thin brush and dark gouache we depict a key of birds that fly away to the south.
9. We put a simple plastic bag on our hand and apply gouache on the bag in spots. Let's crumple the bag a little in our hand.
Now we apply this package in different places of our trees with sharp jerky movements. This is how we get leaves. The forest becomes more alive.
Corrugated paper leaves
Corrugated paper is the most successful material for quickly making autumn leaves. The veins are already determined by the texture of the material itself.
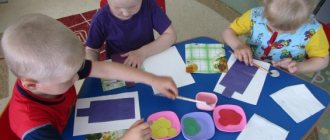
During a creativity lesson at a preschool educational institution, preschool children can be asked to make an applique or collage out of them. Older children can make additional gluing to make the leaf as natural as possible - the effect will ensure multidirectional relief of the paper. In any case, templates will be required.
Making a leaf with hard veins:
- You need to cut out rhombuses from corrugated paper, then divide them into triangles. For maple you will need 10 parts.
- The parts are set aside from the center, turning the workpieces over, the veins are laid out in a herringbone pattern and glued together with an overlap of 2-3 mm.
- The maple leaf template must be applied so that the center of the gluing coincides with the axis of the veins. The outline is marked with a pencil, then the workpiece is cut out.
- Tightly rolled paper becomes a twig.
If you glue the twig carefully, the leaves will look good from all sides. They can be used to make garlands and volumetric compositions.
Possible options for crafts made from leaves
Applique of autumn leaves
It is considered the simplest type of crafts made from leaves.
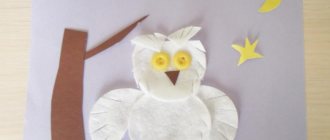
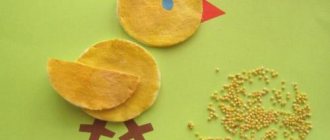
You and your child can easily make an applique in the form of animals or birds. You can create a lot with dry leaves, PVA glue and paper. To make your work more vibrant, use leaves of different colors.
Crafts from leaves and cardboard
Making a craft from cardboard and leaves is not difficult. You just need to cut out the base from cardboard and glue dry leaves to it.
Herbarium
One of the most exciting and common types of crafts for children is an amateur herbarium. You can collect many types of natural material, which will help your child to study with interest the variety of plants growing in your area. Include as many plant species as possible to create a beautiful herbarium.
Garland of autumn leaves
Dry the leaves, then dip each of them in yellow paint to give the leaves a brighter color. Then we hang the leaves to dry in the form of an elegant garland.
You need to take maple leaves of different sizes and colors, then cover them with transparent varnish. After the leaves have dried well, you need to hang them on strings, decorate them with beads or beads and hang them. The resulting pendant will be an excellent decoration both outdoors and indoors.
Vase of leaves
You can use any leaves you like. For one vase you can use several types of leaves, different in color and shape, or you can make them from the same ones.
Instructions on how to make crafts from leaves Applique First, you should prepare all the necessary materials and cover the table with oilcloth.
To create an overlay applique, you should draw the picture itself on cardboard, then put leaves on the drawing, there is no need to cut the leaves, they are used entirely. Anything that is not enough can be painted on with paints or made from other materials.
The most difficult way is to create a modular application. It is made from leaves of the same size. Fish scales or bird feathers are made in this way.
To obtain a symmetrical application, it is necessary to select paired leaves that are identical in all respects.
Note!
Tape - with its help, many details are created in one drawing.
Herbarium
It is better to collect leaves for the herbarium in dry weather, since wet leaves require additional processing. Each part of the herbarium must be straightened with a cold iron; before this, all creases in the sheet must be carefully removed.
If there is constant dampness outside and there is no time to wait for dry weather, then they should be given the opportunity to dry on their own. After the leaves have dried, they are ironed with a warm iron, placing them between two sheets of paper. There is no need to press the leaves with an iron, just press a little so as not to flatten them.
The prepared elements are placed on a sheet of paper, which will serve as a background and at the same time a frame. Fix the leaves with threads or glue.
Bouquet of flowers/rose
In order to get neat and beautiful flowers, the leaves must be even and clean. Place the piece of paper directly in front of you and fold it in half. Then you need to twist half the leaf into a tube, but do not twist it very tightly, the flower should be voluminous.
The result is the core of the flower; we make the petals from the remaining leaves. The core is placed in the second maple leaf. Take turns folding the edges of the sheet to form petals. The sheet can be secured with thread so that it does not fall apart later.
Note!
To make the flower voluminous, you should twist at least six or seven maple leaves in this way, each of which is secured with a thread. To create a bouquet you need several of these flowers.
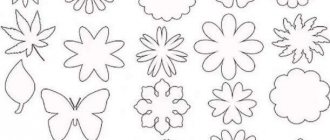
Cutting templates
To work with children, templates for any equipment can be printed on a printer, and then transferred to cardboard and cut out.
The high density of the blanks for tracing will ensure their durability. Having planned lace, requiring the use of a stationery knife, autumn leaves stencils for cutting can be made from thin plastic. Otherwise, the blanks will be disposable.
Volumetric leaves, like real ones
The naturalness of paper leaves is given by coloring. In any case, monochromatic options will look like crafts.
The paper can be tinted so that the colors do not seem rough:
- grated crayons or pencil lead;
- watercolors and blurred watercolor pencils;
- alcohol paints (for example, from a felt-tip pen) and a sponge;
- airbrush or spray drops with any stiff brush.
To make the composition beautiful and realistic, the teacher must tell you in advance which colors are characteristic of which plant and help you choose shades.
You can literally copy the texture of the leaves by simply highlighting it with chalk or a wax pencil. To do this, you need paper thin enough so that the relief of the veins can be clearly felt through it.
Having placed the original under the sheet, you need to lightly touch the surface so that the tinting lies brighter on the folds. If you choose the shade of the paper and chalk in advance, you can get a realistic effect.
The veins of the leaves, even if they are made of plain paper, should be embossed. There are simple ways to corrugate a workpiece without resorting to complex stamping methods. To make embossed veins, you will need:
- a dense but fairly soft base (folded paper sheets, linoleum, thick oilcloth);
- scissors, sharp stick, toothpick or skewer;
- visual diagram.
Having placed the workpiece on a soft surface, you need to push through the veins, observing the natural pattern of the original. The lines should not be rigid or drawn according to a ruler.
For paper-plastic techniques that make it possible to obtain voluminous blanks, scissors are usually used. A part is passed through their cutting edge at a fracture, causing it to begin to curl.
When working with children, you can also use a thin ruler - this will prevent injury. The main thing is to show with an example how pressure affects the quality of twisting.
The veins on the leaves can also be made voluminous. To do this, you will need a glue gun or 3D pens that have become quite common. The relief is simply drawn with plastic, and then painted along with the main plane.
A similar effect can be achieved with simple PVA glue, if you dry it a little in an open container. It is difficult to implement such techniques in a kindergarten, but the use of new interesting technologies will make classes with older children more interesting.
Drawing on the theme of golden autumn with colors
When it comes to golden autumn, the first thing that comes to mind is yellow with its variety of shades, from sand and lemon to the color of ripe tangerine. But this is not entirely true. And just as gold glitters and shimmers with all the colors of the rainbow when a ray of sun hits it, so the golden season can be not only yellow, but also red, and orange, and bright blue, and deep green. All these colors should form the basis of the work about the foliage shimmering in the last warm rays of the sun.
What will help make the drawing even brighter? Paints! They are the ones who are able to color a picture so as to accurately convey the beauty of autumn days. The paints produce richer colors and are easy to mix and match.
I offer a simple and very beautiful work on the theme “Golden Autumn”.
Author
Materials and tools:
- Acrylic or gouache
- Paper – watercolor or any thick sheet
- Brushes
- Sponge
Stages of work:
1. Using a large brush, pick up thick white paint and draw a circle. We take a little blue with some water and apply it along the edges, mixing a little with white. We continue to draw a circle, expanding it.
2. We should get a circle with darker edges and a light circle in the center. To do this, take blue, without mixing with white, and apply further, moving away from the white center. The blue blends smoothly into the blue to create a beautiful gradient.
3. Draw a horizon line - about ¼ of the sheet. We paint over everything above in a circle.
4. Using horizontal strokes, apply dark blue to the bottom of the sheet.
5. Apply horizontal strokes of yellow color in the center. It mixes a little with blue, turning out greenish.
6. Apply white on top of the yellow with light horizontal touches, going down to the bottom of the sheet.
7. Using a thin brush and liquid black paint, draw a tree trunk from the horizon line. We draw with curved thin lines. Do not forget that the tree itself and each branch are always thicker at the base and thinner towards its tip.
At the base we draw roots going into the ground.
8. Tear off a piece of sponge, pick up rich red, mixing it a little with yellow. By applying a sponge and sharply tearing it off, we apply paint. We set the trajectory as if the leaves are twisting around the moon.
9. Apply foliage to all branches with a sponge. We also apply fallen leaves on the sides below.
Now take a lighter color with a sponge and apply it on top of the red along the edge. In some places we leave a dark red color.
10. Take an even lighter, almost white one and make prints on top.
11. Using a brush, turn the tip of the curled ponytail into a moon.
12. Chaotically apply thick paint and a brush to the falling leaves.
13. The final touch is the stars. Apply semi-liquid white to the brush and splash the paint from the brush onto the drawing with your finger.
14. On the water below we enhance the white strokes - the reflection of the moon.
Autumn leaves using origami technique
Origami classes are included in the school curriculum. The complexity of the idea is chosen taking into account the age of the children.
For kids, you can offer modular equipment - maple or currant leaves made from modules. In this case, you will only have to fold the diamond-shaped blanks, which are then glued together into the finished composition.
Registration of a group in kindergarten
For large compositions, cut out and slightly tinted leaves from paper and cardboard are suitable. Large beads or berries from painted acorns can become rowan branches. A more stylish option is compositions using the quilling technique - lace patterns made from colored stripes.
The teacher will have to take on most of the work, although children can also assemble the simplest spirals into flowers using a glue stick.
Technique:
- The selected ornament must be transferred to thick paper. The main pattern is laid out along the contour using pins. In the case of leaves, these are veins.
- Ribbons folded into spirals fill the volume of the sheet. You can play with the color of the parts of the composition.
- The joints are treated with a glue stick or a brush with PVA.
After complete drying, the composition can be removed from the template.
for the new year
Making Christmas garlands is fun and exciting! To make a beautiful and original garland you will need small candle lamps, narrow tinsel and a couple of jars of paint - special for glass or regular acrylic. The light bulbs are dipped one at a time in paint and dried on a cardboard stand (the bases can be wrapped in cling film to prevent them from getting dirty). Then the light bulbs are glued to the tinsel in a chaotic manner, and the unusual Christmas tree garland is ready!
Making another Christmas tree garland is also not too difficult - the main thing is to stock up on a template. For printing, you can use colored paper at once, or you can make one general template and copy it onto paper of any color. Printed or redrawn templates must be cut as shown in the diagram and strung on bright twine.
Printable template (click on image to enlarge):
A garland made of felt balls looks very cozy and very Christmas-like. You can do it together with your child - you just need help. In order to make such an interior decoration, you will need felt balls. No, not even that - A LOT of felt balls.
Making them is quite simple - take some wool for felting in your palm, wet it under the tap, and then lightly roll it into a ball. Add foam or soap and continue rolling. When the ball starts to form, you need to apply a little effort.
If the wool is acting up, try changing the water temperature several times - after a couple of changes from cold to hot water and back, the fibers begin to fall off. The future ball must be thoroughly rinsed from soap. The ball is ready when it becomes hard.
Make a lot of these balls - they can be the same color (then it is better to take a contrasting thread for stringing) or different shades, and then just string them on a thread and a needle, and your cozy winter decor is ready. By the way, you can decorate a Christmas wreath on a door or a New Year tree with these balls.
Christmas tree patterns:
Classroom decorations with leaves
Another spectacular technique is twisted structures using the paper-plastic technique. The relief is created by inverted stripes - internal stripes. Works can be modular. In this case, diamonds of the same type need to be fastened together.
Technique:
- A stencil of autumn leaves for cutting out of paper needs to be traced. Only double-sided paper is used, otherwise the reverse side will be visible when flipped.
- The workpiece is cut along the contour, the internal parts are perforated with a paper knife.
- Thin central ribbons are turned over, making the leaf symmetrical, and secured with glue or a stapler.
All that remains is to fasten a few leaves into a composition. To avoid ruining the look, you can use double-sided tape.
Vytynanki - leaves on the windows
The vytynankas will look impressive on the windows. This is a lace cutting technique. Double-sided options will be equally impressive on both the inside and outside of the window. The technique is only suitable for children who can confidently handle a paper knife.
Cutting should not be offered to children due to the risk of injury. You can offer ready-made schemes for implementation. Older children can come up with an ornament on their own. The design is first drawn on cardboard and cut out, then the blank is used to transfer the design to the main color.
Leaves for dress design
In kindergartens and elementary schools, fashion shows with the simplest elements, including those made of paper, are practiced. For middle classes, such ideas are no longer relevant; they only make teenagers laugh. They can be offered to make crafts from foamiran - dense textiles that hold their shape.
Parents should be warned in advance about becoming familiar with this technology, as investments will be required. To work you need:
- foamiran itself (primary colors can be purchased one sheet per class);
- molds or molds (leaves, petals);
- tongs or iron for heating;
- paints for creating shades and a sponge for coloring;
- beads, sparkles, glue for attaching parts.
The investment will be worth it. This design, unlike paper, will withstand any presentation - after heating, the material holds its shape even when crumpled. Volumetric items can be worn on ordinary days - the fashion for hand-made items is only growing.
There are dozens of original techniques for making autumn leaves. Depending on the age of the children and the final idea, the lesson can be carried out step by step, showing the children the techniques sequentially, or leaving most of the work for independent creativity. In the second case, you need to introduce ideas as a whole, choosing feasible options.
Do it yourself: make an autumn garland and a wreath for the door in the European style
- home
- Design and decor
- Hallway
1 star 2 stars 3 stars 4 stars 5 stars If you can no longer stand the Instagram beauty of doors with wreaths of bright autumn leaves and your soul asks for creativity, our article will help you.
Instagram @nashvillecraftparty
- Base: strong long branch
- Materials for decoration: dried leaves, cut out leaves from strong cardboard, pine cones, acorns. You can diversify the garland with photographs
- Materials for fastening: nails, buttons, second glue, threads
- Tools: sewing needles and awl, hammer
- Additionally: spray paint optional, acrylic paints
On a long branch, use a thin marker to mark the places where the nails will be driven in.
This is important so that there is a step of the same size between the parts of the garland. Ropes are tied to the driven nails (jute looks the most authentic, but other strong ropes can be used), and decoration elements are attached to these ropes
You can fasten them using the same ropes if you make a hole in the decor - using a needle, an awl or a small drill. You can make bows where the ropes are tied to nails and decor to disguise the knots. The finished garland can be sprayed with gold spray paint.
The garland is hung on an empty wall or suspended from a cornice. It can also be used to decorate a false fireplace if you have one.
For the wreath you will need:
- Material for the frame: it can be branches/wire/hoop or a ready-made frame for a wreath from craft stores
- Materials for decoration: you can use dried autumn leaves, dried and artificial berries like rowan, dried roses and other dried flowers, wine corks, ears of wheat, acorns, pine cones, cinnamon sticks and anise, physalis, ribbons, battery-powered LED garlands (your imagination here practically unlimited)
- Materials for fastening: jute rope, glue moment, stapler
Fresh, recently collected branches bend easily, but dry and old branches that break easily are recommended to be soaked in boiling water first so that they bend more easily. At the collection stage, choose thin branches that are easier to bend. It is recommended to take birch, and in the absence of it, willow.
When the branches are prepared, you need to lay them out on the table. Next, separate as many sticks from the total mass of branches as you need to create the lightest layer of the wreath and arrange them on the work surface so that they form the shape of a wreath.
At this stage, you can decide on the size of the wreath. Now the thin ends of the branches need to be connected to the thick ends, as if head to feet. Then wrap the thin ends around thick branches.
Next, we move on to the stage of strengthening the wreath, gradually braiding it with new branches and increasing its volume. Small branches need to be hidden inside the wreath so that they do not stick out.
Now that your wreath is strong enough and does not fall apart in your hands, it should be additionally braided with wire for reliability. Trim the excess wire and hide the ends behind the back of the wreath. Then you can decorate the wreath to your liking.
If you find it difficult to figure out how to weave a wreath, watch the video: