For children from one to three years old
Crafts that develop fine motor skills will play an important role in thinking, the ability to analyze and reason. When it comes to babies who have only recently begun to walk independently, it is important to consider that their perseverance is minimal.
And the ability to correctly hold and manipulate a pencil or scissors in your hands or sculpt figures from plasticine is so rare in everyday life that it is equated to something especially admirable. That is why kids make crafts under the close supervision of an adult.
The goal of an adult when doing joint needlework is to guide, give an idea and provide the necessary tools and materials. During the work, an adult must not only show what and how to do, but also discuss all the actions performed. At the same time, clearly stating all the names and names of the processes.
You can forget about thorough correctness, evenness and beauty when working with one-year-olds. The main thing is that this form of communication brings positive emotions to both, and there is a desire to continue.
On the Internet you can find many photos of educational crafts, the sight of which will inspire you to create them. In this case, a wide variety of materials are used, ranging from leaves, twigs, paper and to specialized paraphernalia.
Do-it-yourself teaching aids for kindergarten
Application of the universal psychological aid “Lukomorye” in the subject-spatial environment of a mixed-age group of preschool educational institutions
Taking into account the project “Features of organizing educational activities in a mixed-age group” and in order to implement one of the objectives of the project to develop a developmental subject-spatial environment in a mixed-age group of preschool educational institutions, taking into account the peculiarities of the organization and content of educational activities, I recommend enriching the group environment with a universal psychological guide “Lukomorye” "
Didactic manual "Lukomorye"
Aimed at developing the mental functions and emotional sphere of preschool children.
Tasks:
- Promote the formation of cognitive processes - perception, memory, attention, thinking, speech.
- Promote the development of precision finger movements.
- Encourage the child to work according to the teacher’s instructions.
- Promote the development of the emotional sphere and the formation of the child’s communication skills.
Category of participants: children from 4-7 years old.
Form of work: individual and/or subgroup.
The manual is multifunctional, it can be placed in any area of the group, and can be used both vertically and horizontally.
In a horizontal position, up to eight people can be used simultaneously. You can create a single picture, work on different parts of the manual in different directions. Several children can work in the crown space at once. When working with the manual, the principle of learning from simple to complex is observed.
The manual performs several functions: educational, developmental, correctional and diagnostic.
Working with the manual is built on the principle of developmental education. Seeing the example of older children, younger children more easily master the program material. The opportunity to exchange opinions and impressions during classes allows children to gain diverse knowledge. Working in pairs, older children teach younger ones.
Using the manual, you can assess the level of knowledge and skills of children, form subgroups of children taking into account mental and psychological characteristics, and plan activities with different levels of complexity.
Work with the didactic manual in a subgroup is carried out on the principle of team play, thereby developing a sense of responsibility and a desire to help each other. Older children try to be an example for younger ones - they show their knowledge, skills, and ways of completing tasks. This makes it possible to increase the effectiveness of learning and creates in children the feeling that together they can solve any problems more easily.
The manual allows you to diagnose the emotional state of children at the beginning of the lesson and at the end, the level of self-esteem, features of peer assessment of each other and joint work. The manual promotes the development of the emotional sphere and the formation of communication skills of preschoolers.
Working with a didactic manual allows the teacher to find an individual approach to each child, taking into account the desires and interests of the child himself. The manual can be used to correct mental processes in preschool children; it promotes the development of imagination and creativity.
I suggest starting classes with an introduction:
Guys, I invite you to the magical land of Lukomorye. Here you can do everything yourself. Weave the sun, clouds and even a tree from threads, rubber bands and laces yourself. The tree is not simple, but magical! And it’s not leaves that grow on it, but geometric figures, pictures, pebbles and even moods. What an extraordinary country! I suggest you go on a magical journey soon.
The lesson can begin with the ritual of entry. “Look at our country. What's missing here? Right. The tree has no crown. Let's do it ourselves. Let’s take a magic ball and use a wonderful thread to form the crown of our tree.” The teacher shows how to work, and the child continues independently. If there are several children, then each takes part in the formation of the crown in turn. After 2-3 lessons, children are given the opportunity to shape the crown as they wish.
List of games: Which figure is missing. Which picture is gone. Find the extra figure. Find the extra picture. Continue the series. Name it in one word. Arrange by size. Name your neighbor. Follow the instructions. What geometric figure does the pebble resemble? Fill in the geometric shapes. Lay out a geometric figure from parts. Lay out the outline of the figure. Orientation in space. The words are the opposite. Not a similar figure. Magic rubber bands. Magic thread. Fill out the form. My mood. Portray the emotion. Replace the emotion. Collect the emotion. Tree of friendship.
This is just a small list of games that can be used using the Lukomorya manual, and teachers can expand the scope of its application.
In general, the didactic manual “Lukomorye” promotes the harmonious all-round development of children of different age groups.
For children from three years old
Most children start kindergarten at three years old.
At this age, they are already more independent, since they can do a lot themselves: draw specific objects, cut out elements with straight sides. Fine motor skills are already quite well developed. In this regard, they are able to cope with more complex crafts. Difficulties may arise in the first stages, but each time it will turn out better. Movements will become more harmonious and confident.
Educational crafts for kindergarten can be made from various materials: paper and cardboard, plasticine, glitter and small beads, feathers, pine cones and acorns. Working with small elements will help in the future with practical issues, such as tying shoelaces, fastening buttons on a blouse, and so on.
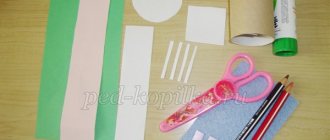
Embroidery
For embroidery you will need:
- a sheet of not too thick cardboard;
- Quite a big needle.
Draw a geometric figure on the cardboard and mark with dots the places where the needle and thread will go. If you are offering a task for the first time, pierce the dots. Slowly demonstrate how you thread the needle and tie a knot at the end. Then, threading the needle down and up, make stitches in the drawing along the points marked on the line.
For children from 6 years old
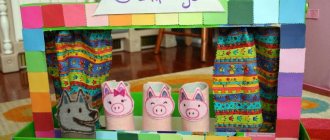
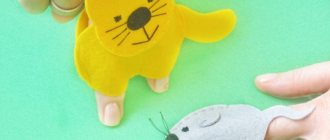
For older children who skillfully handle scissors and other tools, we can offer educational crafts made from felt. This type of work is especially interesting.
At the same time, something special is created, not similar to other copies. This could be a Christmas tree toy, a puppet theater or a stand on the kitchen table. Such a creation can serve the creator for a long time or become a practical gift for a friend.In the process, skills in working with scissors are consolidated, interaction with a needle, thread and additional materials develops. It also trains fine motor skills at a higher level, improves artistic taste and improves patience and perseverance.
Toddler quiz
The main thing in this educational game is the spinning arrow. Cut it out of thick cardboard. Then make a hole in the center of the cardboard sheet and insert a screw into it. Screw the nut onto the screw, put the arrow on top and tighten with another nut. Do not tighten the top nut too tightly so that the pointer can rotate freely. The playing field is ready. Place cards in a circle with objects depicted on them (animals, flowers, fruits, furniture, clothes, etc.). Now rotate the arrow and see which picture it points to. Let the baby say what is drawn in the picture. In addition, you can tell something interesting about this subject.
You can teach letters or spellings in the same way. If the arrow points to a familiar letter, the baby names it. If the letter is not familiar, you name it. You can turn the arrow one by one and name the letters one by one. The cards can depict numbers, colors, geometric shapes, dog breeds and anything else you want to introduce your baby to. For older children, complicate the task a little by asking them to name the material from which the object in the picture is made (this is a glass, it is made of glass) or, say, the benefit that pets bring (this is a cow, it gives milk).
In order to activate the baby’s speech, place photographs in a circle showing the baby doing different activities. Let the child explain what he is doing in this or that photograph: “This is Lisa stroking her pussy. This is Lisa at the zoo. This is Lisa and grandma..."
Tips for successful work
Before you begin your chosen work, you should listen to the following tips:
- Prepare all required materials in advance.
- Scissors for children should first of all be safe, so they are suitable only with rounded ends.
- Consider protecting your work surface. It is better to cover it with oilcloth, and put special plastic boards for modeling.
- When painting with paints, you should make sure that the water is not very cloudy. After completing the drawing, it is good to cover the paints to prevent them from drying out, and wash your hands well.
- When sculpting, if there is no goal to dry the material, you need to wrap it in a suitable material: clay - in a piece of damp cloth, plasticine - in plain paper.
- Markers should be stored with their caps tightly closed.
- It is good to sharpen pencils with a sharpener.
Examples
Below are several options for educational crafts for children of different ages. They can be performed both at home and in a kindergarten group.
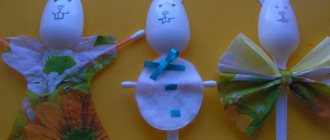
Frames with clasps
Since independence is especially important for a three-year-old, teach your child how to button his clothes. It is difficult to fasten the item you are wearing, so let your baby practice using special material. In the Montessori group, these are traditional frames with fasteners: Velcro, zipper, large and small buttons, hooks or lacing. Make a similar tutorial at home by putting your clothes on an embroidery hoop: it will stretch and the clasp will become easier to handle.
Shark made of clothespins and paper
Necessary materials:
- pin;
- colored paper;
- glue gun;
- toothpick;
- felt-tip pen.
Progress:
- Cut out two parts from blue paper: the upper part of the shark and the lower part. Draw an eye on the top.
- Cut out a small fish from orange paper. One that fits in a shark's mouth.
- Cut a small stick from a toothpick and glue an orange fish to its top. And glue the free part of the stick to the edge of the inside of the lower part of the shark.
- Take a clothespin and glue blue parts to its ends to make a shark. It turns out that when the clothespin is opened, the shark will begin to open its mouth, and the fish will try to escape. But when closed, it will again be eaten by predatory fish.
Rough letters
Although the active development of writing and reading begins at the age of 4, it is recommended to learn letters from the age of 3. For training, use a set of rough letters; they are not difficult, although they are labor-intensive to make yourself. Glue capital letters cut out of velvet onto identical signs. When learning, sounds are called, not letters. The names of sounds are introduced using a three-step lesson.
Cave
You will need:
- thick cardboard from a box;
- large sheet of paper;
- glue gun
Step-by-step instruction:
- Cut out three elements from cardboard: a free-form base and two curved arcs of different sizes.
- Place the arcs perpendicular to the base and secure with hot glue.
- Crumple the paper and cover the resulting structure with it, leaving an entrance on one side.
- The voluminous, spectacular craft is ready. You can place animal figures inside, placing them on a pile of straw or on pebbles.
Mouse from a sleeve
Required tools and materials:
- sleeve;
- cardboard;
- colored paper;
- paints;
- glue;
- scissors.
Progress:
- Paint the bushing gray and let dry. This will be the body of the little mouse.
- Cut out ears and paws from gray cardboard.
- Make cuts in the sleeve to fix the cardboard elements in them.
- Cut an oval out of pink paper and glue it to the base. This will be the tummy.
- All that remains is to draw the eyes with eyelashes, a nose and two teeth.
Educational crafts for kids can be good helpers in studying many topics. For example, when studying shapes, you can make a chest of drawers from matchboxes and label each one with a certain meaning: circle, triangle, square. Then cut out these shapes from colored cardboard. This way the child will learn not only to cut out the simplest shapes, but also to sort them correctly.
How to make “Walkers” for a baby
Walking games with cubes and chips are a constant hit in children's board games.
But all the games that you can buy are not suitable for little ones who cannot count to six. But if your little one already distinguishes between one and two, you can easily modify any game. Make a new cube with one dot on three faces and two on the other three faces. Such a cube will allow you to play any purchased game, because you will only need to move one or two steps forward, and the baby will cope with this. But it will be even more interesting if you and your child come up with and make your own game. Its topic depends on the interests of the baby. Maybe it will be an underwater odyssey, maybe a rally, or perhaps fun adventures with your favorite cartoon characters. On a sheet of paper (it’s better if it’s large), draw a path with circles (they can be made using a stencil). This is your main path. Now design the playing field as you wish. You can draw by hand. You can paste pictures from old books or read children's magazines. If you don’t want to spend too much time thinking about it, buy stickers with cartoon characters. Little princesses will surely love this homemade game about their favorite Barbie doll. Fortunately, there are plenty of stickers with it on sale. And if you spend a little more time and make task cards, the game can become truly exciting. To do this, buy a pack of paper (preferably cardboard) for notes and on each piece of paper write some task: guess a riddle, answer a question, recite a poem, depict some animal using pantomime, etc. If your child is actively interested in mathematics, the assignments can be mathematical. If you are learning to read right now, these could be games with letters, syllables and words to read. It would be good if all the tasks were somehow related to the plot of the game. Now we mark some circles on the playing field with a colored felt-tip pen. When a chip lands on any of them, the player takes a card out of the pack and completes the task. Or maybe you can come up with a collage game based on family photos about your family's adventures? Or a game about the baby himself, about his daily routine? Believe me, this kind of fun will be your favorite, much better than any, even the most wonderful and colorful store-bought one. Here are some more simple ideas for walking games. For the treasures! This unusual and exciting game is very easy to make. It will not only entertain you on a rainy day, but will also help your child master basic counting. Paint a white sheet of paper (preferably a larger one) in two colors: one third yellow (this is the sandy shore) and two thirds blue (this is the sea). Along the sea, parallel to the shore, draw 10-12 blue wave lines. Mark the “port” on the side of the sea far from the shore. This will be the starting line. For the game you will need small shells, pebbles, and coins. Scatter them on the “shore” (these are treasures). Now you need to glue a paper cube with points from one to three (opposite faces contain the same number of points.) The pieces in the game will be boats (the inside of matchboxes). You can paint them and make paper sails on masts using toothpicks that can be stuck into a piece of plasticine. So, let's start the game. The players' ships line up at the right time. We roll the dice one by one and move the required number of waves. Having reached the shore, we load one of the “treasures” into the boat and return to the port in the same way. And then we set sail again. At the end of the game, we count our trophies and determine the winner. This fun competition game is especially fun to play with a group of kids or the whole family.
Fun colors. If your baby is learning about color right now, make alternating circles of six colors on the playing field. The cube, accordingly, must have colored edges. Whichever color appears on the die, move the chip to that circle. First, the baby will learn to match identical colors, and then remember their names. Next to the colored circles, you can draw objects of the corresponding colors: yellow chicken, red tomato, green cucumber, etc.
Boring English. The walking game will also be a good helper in learning English words. Just stick all kinds of pictures on the playing field one after another (you can use the same stickers or magazine clippings), throw the dice and move the chip along them. Whichever picture they stopped at, they named the word in English. You can learn Russian (Ukrainian, English) letters in the same way. Draw circles with letters on the playing field. We stopped at a letter and remembered its name.
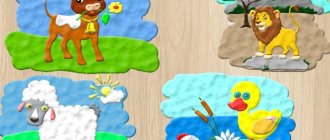
“Moo-moo,” “woof-woof.” There may also be pictures with animals on the playing field. The chip stops on the dog - the baby says: “woof-woof.” They hit the bear and growled menacingly. For an older child, ask them to name the animal or tell something about it: wild or domestic, where it lives, what it eats, what kind of fur it has, tail, ears, etc. In this way, you can get acquainted not only with animals, but also with plants, transport, dinosaurs, dog breeds, in a word, with everything that arouses the child’s interest.
Photos of educational crafts
0