Dedicated to needlewomen. It turns out that it’s not at all difficult to make a puppet theater with your own hands from paper - printable templates are at hand. You need a little patience, which lovers of creativity have more than enough of. And a minimum of items. The ready-made patterns presented in the article will make the task much easier. Here you will find plenty of details for your favorite activity. All that remains is to save the images and then print them on a printer.
Why are such theaters made? All children love fairy tales. Why, even adults are not averse to listening to exciting stories with a happy ending. The works are very interesting to listen to, however, visually they are perceived in a completely different way. They are better remembered and leave more vivid impressions.
There are many variations for making puppet theaters. The easiest one is to make it out of paper. Available materials, a minimum of time, you can involve children in creating - here is a small set of advantages that are enough to resort to such needlework.
Don't be limited by the printable templates below. Diversify your puppet theater with decorations from improvised materials.
Are your children too young to carve on their own? Invite them to collect the scraps in a separate box. Also an important contribution. And then gather a family evening watching a paper play that is interesting not only to watch, but also to present to the audience.
Cardboard theater
An ordinary cardboard shoe box will become magical if you decorate it with fabric, secure it in the form of a curtain, and place a picture based on the plot of a fairy tale on the backdrop. You can make the decorations yourself: print or draw a chair, a chair, a table, a magic castle or a hut.
Cut a hole in the bottom of the box and attach ribbon to the side walls. Such a theater can be hung on your neck, then it will be very convenient to show scenes from figures attached to wooden skewers.
The characters are simply cut out of paper, and the manufacturing process itself is an act of improvised theater. The child can try himself as a costume designer and artist, choosing characters and scenery or a director, changing the plot at will.
Make little characters to put on your fingers. This is a very fun activity for a child.
Kolobok
One of the oldest and most popular fairy tales is represented by the following characters: grandparents, fox, wolf, hare, bear and bun. A fold-out book is perfect as a stage.
Step-by-step description of sewing characters from the fairy tale “Kolobok”
First, it’s better to sew the characters together, and then proceed to the stage and decorations:
- Kolobok
It is sewn from 2 circles of yellow felt, on one of which facial features (eyes, smile and rosy cheeks) are embroidered.
- Grandmother and grandfather. The algorithm for sewing toys is described in detail in the fairy tale “Ryaba Hen”.
- Fox, Wolf and Bear. These characters can be sewn based on algorithms.
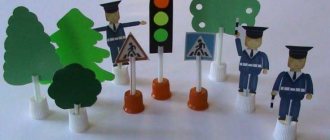
Shadow play. How to do it quickly and easily
Step 1. Setting the stage
Take a medium sized box. Preferably 10-15 cm wide, but a box of a different width will do. You will need a ruler, pencil, stapler, scissors. We separate the box from one long side. You should get a large rectangle, one plane of which is flat without bends. ON this side we measure 5 cm from the edge. Draw the frame of the screen and cut it out. We fasten it with a stapler at the corners so that we get an L-shaped structure with a vertical future screen. Cut off the excess.
We measure out the paper that will cover the screen with an allowance for gluing. The top of the screen can be secured with a stapler. Apply paper glue to the remaining sides.
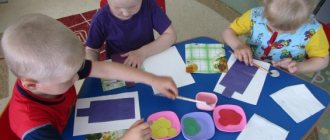
Step 2. Create characters
You will need a pencil, cardboard, scissors, a stapler, and straws for drinks. We draw characters and cut them out. In addition to action heroes, you can make the sun and clouds, birds and trees, houses and castles. Using a stapler, we attach the figures to the straw.
Step 3. Play the play
We learn a fairy tale, install a table lamp behind the screen, and play the fairy tale. Don't forget about sound effects.
Seven kids
To bring this wonderful fairy tale to life, you will need patterns of 3 animals (a wolf, a goat and a kid), as well as scenes with a house.
This is what the finished composition might look like.
Goats
You will need seven baby goat patterns, but to make them different from each other, the finished toys need to be tied with multi-colored bows or numbered.
To make kids you need:
- white and gray felt;
- black beads or eyes (7 pairs);
- multi-colored ribbons;
- prepare a paper pattern and transfer it to fabric;
- trace and cut out 7 sets.
Assembling the kid:
- Glue eyes to the face, embroider a nose and a smile.
- Sew the head from 2 parts, stuff it with synthetic padding, and sew on the horns.
- Sew 2 parts of the body, leaving a hole at the bottom.
- Connect the head to the body, attach a bow to the neck.
- Repeat for 6 more kids.
Goat
The mother goat is sewn from 2 main parts of white fabric according to the pattern.
The eyes are glued on and the nose and smile are embroidered.
Wolf
The wolf is created using an algorithm.
House and stage
These parts of the decoration can be sewn using the examples and descriptions at the beginning of the article.
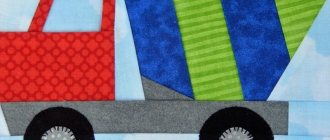
DIY puppet theater
To create a theater you will need a box with sides up to 10 cm high. A cookie box will do. We cover the box with colored paper using double-sided tape.
Let's start creating the curtain. The width of the curtain can be from 3 to 5 cm, the length is the size of the box. On a sheet of red velvet paper, measure the width of the curtain twice and cut off a strip. Then fold it in half, draw the outline of the curtains and cut it out. We cut the finished part along the central fold. We draw folds that imitate the drapery of a curtain with a felt-tip pen. Glue the curtain along the edges of the box.
Then we make a lambrequin. Measure 2 cm in width, draw an outline and cut it out. We measure the length of the lambrequin using the box. We cut it out, draw draperies, and glue it on top of the curtain.
Using a stationery knife, we make a slit up to 1 cm wide on the side of the box, through which the decorations will change.
Backdrops for decorations can be printed or drawn by hand. The size of the pictures must be adjusted to the internal size of the box. If the backgrounds are composed during the course of a fairy tale or play, their change will create the impression of a real theatrical action.
To make the characters you will need juice straws, double-sided tape and printed images of the characters. We fix the cut out figures on the tubes. All is ready! The show can begin.
Three Bears
The tale “The Three Bears” is created very quickly, since one pattern of a bear is used (the clothes of the heroes and the size of the figures change), a pattern of a girl and scenery with a scene.
This is what the scene looks like.
The Bears
To make bear parents, you can take patterns from the cartoon “Masha and the Bear”.
Make the teddy bear similar, but smaller in size.
Girl
To create a girl, use Masha’s pattern from the same cartoon.
House and stage
The scenery is created by analogy with “The Pockmarked Hen”.
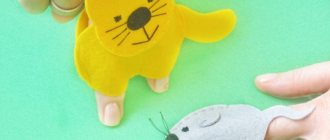
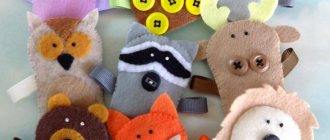
Hand puppets for home theater
Felt doll
Will need
- Sketch of a puppet toy.
- Two sheets of felt, A4 size.
- Small pieces of colored felt.
- Thread and needle.
- Glue gun.
- A sheet of thin cardboard.
We start work by creating a pattern. To do this, draw the sketch onto a sheet of cardboard and cut it out. You will get the main pattern of the figure and individual small details: eyes, muzzle, palms, tummy, ears. The number of details depends on the choice of sketch of the puppet hero.
Then we transfer all the details onto felt. We select the color scheme according to our taste or the content of the fairy tale. The hare can be white, gray or pink, and the fox yellow or orange. If you are doing a craft with your child, let him choose what color the characters in your play will be.
We cut out the parts and pre-assemble the toy, placing all the parts in the places where they should be. If the result is satisfactory, we begin the final assembly. First, we make one main piece out of felt. We sew on all the parts that can be sewn. We sew with a buttonhole stitch. We glue small parts with a glue gun. We put all the parts together in accordance with the sketch.
If the toy has ears, we attach them last. To do this, we fold the two main parts with the right sides facing inward. We apply the ears in such a way that the edges of the part coincide with the edges of other parts, and the tips of the ears look inward. We sew all the details along the edge with a buttonhole stitch and turn the toy inside out. The glove puppet is ready, and the ears will stick out funny on the top of the head.
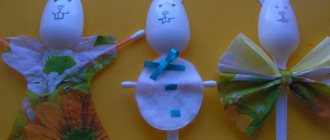
Sock puppet
Original dolls are made from ordinary children's socks.
To make it you will need a sock, cardboard, a small skein of thick thread or yarn, pieces of fabric for the mouth, sewing thread and buttons, and a glue gun. You can take a sock in a plain color or with a pattern, polka dots or stripes - all this will create the image of a future toy.
We make a blank for the mouth from cardboard. To do this, fold a cardboard rectangle 7 cm wide and 20 cm long in half. We round the corners along the width. From the fabric for the inside of the mouth we cut out a blank according to this template.
Trim the toe of the sock. We cut off the edges along the edge of the workpiece. Glue the cardboard blank inside the sock using a glue gun. At the same time, we fold the edges of the fabric onto the cardboard. Glue the fabric interior on top.
Making a hairstyle for the puppet. Take thread or yarn and wrap it around your hand several times. Tie in the middle and cut the ends. If you spread your fingers wide, you will get a long hairstyle. Sew the hairstyle to the sock.
Let's make eyes. We take two buttons and sew them to the sock, overlapping one on top of the other. You can use ready-made eyes or ones drawn and cut out of cardboard. You can complement the image with any details, make eyes from balls of cotton wool or add decorative elements.
Screen
For more serious presentations, you can buy a ready-made screen or make it yourself.
Video for dads who can make their own from wood, plywood or laminate:
The simplest screen for a puppet theater can be made from a large cardboard box from household appliances:
Video:
But Parsley is both a toy and a screen - “2-in-1”. The doll is hidden in a conical base made of a plastic cup using a stick on which it is placed. And it also pops out, which kids really like.
Homemade Parsley, a fair one, who can wave his fists and hide in his glass. Since it was sewn a relatively long time ago, there are no photographs of the production process. But there are no big difficulties either; it can be explained in words.
Two sticks are taken as the basis, the long one is the axis, and the short one is the shoulders. They are tied with a cross, it is advisable to file them slightly at the joint so that they hold tighter. Then a piece of cotton wool or rags is wrapped in a square of white cloth, put on a stick, and tied to create a head. Two opposite ends go to the arms, two are tied under the shoulders. A shirt is cut out of colored fabric, sewn together, and put on the doll. You need to put something in your fists for weight (small pebbles or nuts). Sew hair onto the head and paint the face.
For a barrel, you can take a plastic glass, make a hole in the bottom into which to insert a stick with Parsley. Cover the glass with fabric, tie it at the bottom, and sew a shirt on top. Decorate with braid. Now Parsley can turn around, waving his arms, hide and jump out for the amusement of the children.
But according to the Waldorf method, fairy tales are told without any screens, using ordinary toys and dolls on a toy stage:
Well, the simplest puppet theater is a shadow theater. Surely many people have been able to show a dog or an ostrich since childhood, but here are other options:
As they say, it couldn’t be more convenient