First crafts
One of the most important moments in organizing the process of children's creativity is creating a situation of success. A child, especially a small one, should see and feel that everything worked out for him, that his gift really pleases his parents.
A postcard, applique or three-dimensional model will turn out beautiful if the task is appropriate for the child’s age.
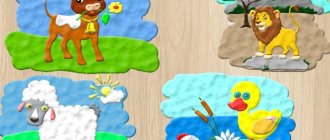
It is not surprising that teachers choose crafts made from colored paper for children as their first experiments. This is a light, pliable material, easy to use and creates a festive mood with its rainbow colors.
Forming the skill of working with colored paper, as a rule, begins with applications. For the little ones, you need to prepare handouts - pre-cut details of the future picture.
Looking at the sample, children must place them correctly on the base - a piece of paper or cardboard - and then glue them in a certain order.
As a gift, a mother can be presented with a postcard with a picture of a flower: a narrow strip-stem, a circle-core, ovals or circles-petals, a pointed leaf are glued onto a sheet of cardboard folded in half; smiling sun: yellow or orange circle, ray stripes, drawn or pasted eyes and mouth; bouquet in a vase: shape of the vase, shape of flowers and leaves.
A baby can surprise his dad, uncle, brother or grandfather with an applique depicting an airplane flying in the clouds, a ship sailing on the waves, or a tank.
Creating simple three-dimensional figures of animals also turns into a fun game, which very young children who have barely learned the basics of working with glue can handle. They are based on a cylinder or cone onto which parts are glued - ears, paws, eyes, noses.
The figures turn out to be very cute and evoke sincere affection. The variety of types of applique and the ease of its production will, over time, in the process of improving skills and abilities, push children to independent creativity.
Cup "Best Dad in the World"
For such a cup you will need to print out several templates - this is the template of the cup itself and the template of the box that will play the role of a pedestal.
Next, follow the step-by-step instructions.
- First, assemble the pedestal box. Cut out the template, trace it on cardboard and cut it out. You bend the sides and, after gluing them, connect them, forming a box.
- Glue a light brown rectangle onto the finished box - this is a plate for the inscription.
- Using templates (in the form of a flower or a sun) for the cup, we draw and cut out details from thick cardboard in yellow or gold colors. We bend and glue along the fold, forming cups that we glue together with the bases. It turns out to be a cup.
- Making handles for the cup. Tightly wrap a thin strip (30x1.5 cm in size) of cardboard around the pencil, and then unfold it. You will get curled handles that need to be glued to the cup on both sides.
- All that remains is to glue the cup to the pedestal and make the inscription “To the best dad in the world.” Various sweets or something that dad will need for work or leisure are placed in the cup: an office stationery or a set of fishing hooks.
Templates and stencils
Having learned to confidently arrange a sheet of paper, cut it and glue it on their own, the child can move on to the next stage of mastering applied techniques - working with templates and stencils. This, at first glance, is a simple task, but in fact it requires increased attention and good coordination of movements.
Working with stencils is easier than with templates, so it’s better to start with them. It is important to introduce children to the basic rules: how to economically and conveniently arrange a stencil or template, how to hold it, how to trace an outline with a pencil.
It is better not to rush into moving to this level of difficulty. Failure can lead to disappointment, which can seriously stunt creative growth. Let the first template be a child’s palm: children like to trace their hand, tickling their fingers with a pencil, and there are a great many options for crafts consisting of such details.
Does your palm look like a maple leaf? Let's make a picture with an autumn bouquet! Does it resemble a peacock's tail? Let's glue together a proud, handsome man walking through a blooming garden! Or maybe these are hedgehog thorns?
Let's make an applique with a hedgehog bringing home a fragrant apple! Adults can suggest a direction and, together with young artists, formulate an idea for a paper craft for children, which they will be happy to implement.
Safety precautions at work
When working together with your child to create a craft, you should follow certain safety precautions:
- Avoid contact with parts that are too small.
- Work with scissors and glue only under the supervision of an adult.
- Do not allow paint, glue or other liquid components to get into the child’s eyes.
We recommend reading:
Crafts from plasticine: the best master class for children at school or kindergarten. 90 photos of the best ideas for creating plasticine figuresFelt crafts - the best patterns and templates. Step-by-step instructions and master class for beginners (130 photo ideas)
DIY crafts from egg trays - the best step-by-step master class, with description. TOP 100 photos of original ideas for crafts
If these simple conditions are met, the work will bring only joy and unforgettable impressions to the child.
Natural materials
You can learn to love and appreciate nature not only by observing its natural beauty, but also by using its fruits in applied creativity. This type of activity develops associative thinking and, perhaps more than other educational activities, is similar to a game.
Hand-made figures made from cones, acorns, seeds, twigs and shells awaken children's imagination and stimulate cognitive interest. A variety of techniques for working with natural materials allows you to choose the one that best suits your age, training and design.
Themed crafts for children 5 years old will help them get acquainted with the surrounding world of their native land, study the seasonal characteristics of plants, the habits of animals, and make an original and beautiful gift.
A plasticine oval with a pointed nose, studded with cones, ash parachute seeds, sunflower seeds, spruce needles or acorns, turns into a hedgehog; with a long, gracefully curved neck, complemented on the sides with a pair of leaves or large shells - like a swan; a flattened ball with an elongated head, decorated with walnut shells - like a turtle.
A tin coffee can tightly covered with plasticine, decorated with an ornament of seeds, will become a cute vase, and a tea box, covered with peas, leaves or crushed eggshells, will become a box for needlework.
Not to mention the numerous options for making people from cones and acorns, genre scenes from vegetables and fruits, panels from dried flowers and leaves.
Working with natural materials, like any creative activity, is an excellent option for interesting and rich children’s leisure time and an opportunity to create something beautiful and useful that can please friends and family. And this is also very important for children!
Available materials
Acquaintance with this type of creativity usually also occurs in kindergarten. The materials used are cardboard and plastic plates, disposable cups, spoons and forks, colored bottle caps, buttons and much more.
Starting with simple crafts, children gradually move on to more complex models that require diligence, good coordination and constructive thinking. Ordinary objects used in everyday life or out of use, which have become crafts, for children - a miracle created with their own hands, a little magic!
Application for March 8
An original craft will be an applique in the shape of a big heart. To make it you will need:
- Colored cardboard.
- Scissors.
- Glue.
- Thread and needle.
First of all, the heart itself is made: a blank is cut out of colored cardboard according to the template. The edges of the future applique are stitched with thick thread to create a relief pattern.
From voluminous woolen threads, a rose or chamomile stem is laid out on glue on top of a cardboard base (at the request of the master). The bud can also be made from a ball of snow-white yarn.
Cotton pads
This material is popular in works with winter and New Year themes. Fluffy snow-white “rounds” seem to be asking to be used in an applique with a snowman! They easily become dense snowdrifts and light snowflakes, but can also be a sheep's coat.
Painted discs can be used in narrative pictures and panels in almost the same way as colored paper. But these works will be distinguished by volume, special warmth and softness.
Pasta
Thanks to the variety of sizes, shapes and even colors, this food product has long established itself as a material for creativity. And not only for children! Not every traditional material can boast such a variety of forms of use - from simple and complex paintings to decorative dishes.
It is better for younger children to master the technology of flat paintings, where pasta can act as sun rays, flowers or flower petals, elements of folk ornament. Later, you can get acquainted with semi-volumetric panels, and then move on to making three-dimensional models.
A rustic house assembled from pasta tubes, flower bouquets from pasta shells or spirals, cups, teapots, candlesticks or boxes are excellent DIY craft options for children 9 years old and older.
Snow figures for school
You can involve children in making school figures. The manufacturing technique is no different, although the scenarios may be more exotic. If you wish, you can get outdoor garlands and decorate the figures with them.
Tiger
In 2022, a figure of a tiger made of snow is almost a mandatory attribute in the ice town. It is only installed in December, although this is not entirely correct. According to the Asian calendar, the New Year will begin on February 1, and the tiger or tiger cub will come into its own.
The main details are the body, paws and head with an elongated muzzle. First, general shapes are compacted from wet snow, then smoothed and volumes are added for details. The final image is created by colors - a bright orange background and black stripes.
Tiger
Tiger cub
Tiger
Plastic bottles
Once you are carried away by this type of creativity, you can not only surprise your friends with your wild imagination, but also, in the meantime, decorate a summer cottage for the delight of your beloved grandmother! So, a squad of cheerful gnomes can line up along the garden path, and one plastic bottle of any size is enough to make each of them.
It is enough to cut off the bottom and paint with paints, drawing a suit, hat, hair, beard, eyes, nose and mouth. Of course, creating complex models requires the participation of adults, since it involves the use of sharp knives, such as stationery knives.
But most of the work - cutting, coloring, assembling - the child can do on his own.
Before you begin this work, you should carefully consider the procedure, prepare all the necessary materials and follow the step-by-step instructions for making crafts for children, invented independently or taken from other sources.
Plastic construction, in a sense, is akin to Lego: it combines three-dimensional parts made from source materials of suitable shape (bottles of different sizes and shapes).
So you can make the heroes of your favorite cartoons - Winnie the Pooh, Minions, Stitch or Pony, characters from folk tales - the Old Man, the Old Woman, the Fox, the Wolf and the Hare, and make themed compositions. And during the summer holidays, the dacha will turn into a Magic Land!
Multi-colored palms
Little children love to draw with their palms. But this task is quite labor-intensive for mom, in terms of subsequent washing and cleaning, because multi-colored prints can remain on both clothes and furniture. It is much safer to use paper palms for creativity.
To save time on cutting, fold several sheets of plain or multi-colored paper into a stack, trace your baby’s palms, or let him trace them himself. Cut out the whole pile of sheets at once - and you will get a large amount of material for creativity.
Your imagination will tell you what to do with these palms. A child can draw a sun and cover it in a circle with yellow palm rays. Green palms, pasted in layers from bottom to top in the form of a pyramid, will depict a Christmas tree.
Multi-colored palms glued into a circle will turn into a flower. A smooth line in gouache will depict the neck of a swan or peacock, and white or blue palms will form its tail. If you choose colored paper of a contrasting color for the background, the craft will look very elegant.
Salty dough
An amazing material that successfully competes with plasticine, natural and polymer clay and other plastic masses. Its beauty for children's crafts also lies in the fact that the finished product can be colored at your discretion, using an unlimited number of shades.
The dough itself is prepared from flour, salt and water, taken, for example, in the amount of 300 g X 300 g. X 200 ml respectively. Completely dissolve fine salt in cold water, and then gradually add flour to it, stirring as long as possible. Knead the mixture on the table until smooth.
The required softness, density, viscosity and stickiness are achieved by adding little by little (if necessary) water or flour. The finished dough is wrapped in film and kept in the refrigerator for about 3 hours. Although not edible, the eco-friendly, hypoallergenic material is ready for use!
Kids will be happy to knead it, roll it out and twist it, smear the parts one on top of the other, cut them into a stack, creating the effect of fur or grass. This is an excellent option for making crafts for Children's Day - individual or collective - in which you can make children's dreams, fantasies and desires come true
Whether it be games with friends and fairy-tale characters, flying on an airplane or firebird, traveling to distant lands or meeting aliens - salt dough will make the work expressive and bright, and the process of creating it enjoyable.
Speaking about the development of creative abilities, a few words should be said about the role of adults in the development of a little master. After all, the best incentive to encourage a child to learn and create is a keen interest in his activities on the part of his parents. In joint creativity, spiritual intimacy is born. Studying technologies and techniques together allows you to get to know each other better.
Repeat at home what your child learned in kindergarten or at school, get acquainted with interesting new products offered by teachers and craftsmen, look at photos of crafts for children, and figure out together how you can make the one you like. And please each other and your loved ones with masterpieces made by yourself.