Cooking is an ancient profession, for which Ancient Egypt is considered the birthplace. The active development of the profession contributed to the creation of cooking schools. For the first time such a school appeared in Ancient Rome (400 BC). Modern cooking began its development in England and then spread to France.
The first culinary school in Russia opened only in 1888. It is quite difficult to draw a chef, since the image contains a large number of complex details. This work is suitable for older children.
DIY toilet paper roll cook
Master class “Cook”
Paper crafts for children of senior and preparatory groups
Author of the master class: Kupricheva Ekaterina Anatolyevna, teacher of GBOU kindergarten No. 2444, Moscow
Purpose of the master class : used in the design of a kindergarten, in introducing the profession, in theatrical activities. This master class is useful for teachers of senior and preparatory groups when teaching children aged 5-7 years how to model from cardboard.
Goal : We consolidate the children’s acquired knowledge about the profession of a cook. Teach children to model chefs out of cardboard. Strengthen the skill: folding, cutting, gluing parts. Develop: sense of shape, proportions, eye, fine motor skills, imagination, creativity. Evoke an emotional response to the crafts created (your own and other children’s)
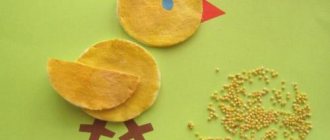
Materials: toilet paper roll, white and colored paper, a piece of cotton wool, glue, scissors, a rag, colored pencils. (Fig. 1)
Progress of the master class:
I want to share an interesting idea for modeling from a toilet paper roll. This craft is not very difficult to do. I work as a kindergarten teacher and love to please my students with something unusual. By making crafts from material that is often simply thrown away, without thinking, you can use it in your creativity. That's why I offer you my master class.
Walks around in a white cap
With a ladle in hand.
He cooks us lunch:
Porridge, cabbage soup and vinaigrette.
1. Before starting work, you need to measure your roll, since the thickness of the base of a toilet paper roll varies.
2. Cover the roll with colored paper. To do this, take green paper (or the child’s choice) and twist it around the roll until the ends join, marking the length of our roll, and the width is slightly more than half, and paste over the bottom of our tube. We cover the top part with pink color. Make sure that there are no wrinkles when gluing; to do this, use a cloth to smooth them out (take your time when gluing).
3. Take a white rectangle and fold it in half, holding it by the fold and cutting out a square in the upper right corner
We unfold and glue the resulting apron in front, add ribbons to it like a real apron.
4. Next we make our chef’s hands. For this we need cardboard or thick paper. We cut out two identical rectangles from it. We round it on one side at the base, depicting hands. Afterwards we also paste them with the chosen color. Let it dry.
5. Glue the arms to the body
6. Next, we make our chef’s cap. To do this, take a white strip of paper and glue the edge along the length and glue it on top of the pink one.
Next, take a piece of cotton wool and a white circle (5 mm larger than the roll), glue a piece of cotton wool on all sides and glue it to the white circle and insert it into our roll. Let it dry.
Source
Pencil drawing
A cook (a pencil drawing for children is given below in the text) is a difficult profession.
It is believed that due to the high level of stress, heavy schedule and many external stimuli, this specialty is only suitable for men. These, as well as other opinions, lead to a constant battle between women and men for the right to be considered the best chefs.
Pencils, paper and supplies
To complete the work you will need:
- a simple pencil;
- eraser;
- sharpener;
- paper.
It is best to use several pencils with different leads.
Step-by-step execution process
The step-by-step process of completing the work can be divided into 5 stages:
| Stage | Description of the stage | Image |
| Creating the big picture | 1. On a blank sheet of paper, draw an oval head. It should follow the curves of a person. 2. It is important to make small depressions in the places where the eyes will be located, indicate the cheekbones and slightly sharpen the chin. 3. Divide the head area with a vertical arcuate line into 2 parts, different in width. 4. Use a small line to indicate the level of the eyes, nose, mouth, eyebrows and hair growth. Schematically indicate the location of the ear and draw its outline. 5. To draw the chest, you will need to draw a rectangle, and then add a triangle and a small rectangle for the shoulders. 6. Using tubular elements, draw the hands. On the mannequin's left hand, draw a finger in the form of a curved tube. 7. Draw a large oval in the hands of the mannequin. Add a thin border at the bottom to show the volume of the element. | |
| Essential elements | 1. Visually mark a point located just above the ear. From this point, draw an arced line across the entire surface of the head to mark the bottom edge of the chef's hat. 2. Place the halves of the ovals on the lines drawn for the eyes. Sharpen the ends of the figures. 3. Use arched lines to mark the lower part of the nose and lips. Using curved lines, draw the shape of the cook. Add pleats at the fold of the sleeve. 4. On a plate, by connecting several semi-ovals and curves, depict a chicken. Oval shapes with lines inside - baked sweet potatoes. Triangles with smooth corners - carrots. | |
| Drawing of the face and clothes | 1. Draw an uneven rectangle above the chef’s head and add a slightly curved line in the middle. On the face, draw the nose, nasolabial folds, eyelids and eyebrows. 2. Add creases to the sleeves of the suit - small lines of different sizes in a chaotic order. On the chest - draw 2 columns of buttons in 3 rows. 3. Using arc-shaped short lines, draw cuffs on the chef’s wrist. On the right side of the suit, draw a pocket - a thin rectangle. | |
| Additional elements of face, clothing | 1. Using an eraser, remove unnecessary elements of the picture. You can also correct some shapes. 2. At the temples draw hair coming out from under the cap. Use uneven vertical lines to depict folds on the cap. 3. Using short thin lines, draw the cook’s thick mustache, add small lines under the eyes and in the direction “from the ear” - the lower eyelids and cheekbones. 4. Using lines of various shapes and lengths, add folds to the chef's clothes. 5. On the lower part of the chicken carcass, draw small dots located close to each other - the texture of the element. On potatoes, the dots should be larger but sparse. You can draw a small rectangle on top - a piece of butter. To convey the texture of carrots, you will need horizontal small lines. | |
| Applying shadow | 1. Using a simple pencil, shade the left side of the cap and the area of the head under it. 2. Add an active shadow to the lower part of the sleeves, as well as the suit where several elements touch. 3. Using a thin pencil, lightly darken the bottom of the chicken. Apply a more active shadow to the bottom edge of the potato. |
To complete the work you will need pencils with soft and hard leads.
Soft pencils can be used to draw the first lines, as they create a light drawing that can later be removed or corrected. The hard lead makes a clear line and also leaves a characteristic mark. When doing work, it is important to use well-sharpened pencils.
Using a paper chef's hat
It is a great pleasure for any child to help their parents with household chores. Mom prepares a variety of dishes every day and the baby wants to participate in all processes. To give this activity a more playful mood, the baby is dressed up in a chef's costume. To do this, just put an apron on him and give him a ladle or rolling pin. However, the image will remain uncompleted. You will need a chef's hat. This costume is also suitable for other events and activities, such as:
- children's party;
- classes in a circle;
- themed birthday;
- competitions at adult parties;
- parties;
- games at home;
- children's holiday.
Making paper crafts is simple. To do this, you will need available materials that can easily be found in every home.
It is not necessary to make a white hat; if your baby loves yellow and blue, then use the material of your favorite shade.
Necessary materials
The usual color for a chef's hat is white. But you can get a little creative and make it pink or blue. This option will help separate the boys and girls at the party. To create crafts use:
- white A4 paper;
- a simple pencil;
- scissors;
- ruler;
- measuring tape;
- glue stick;
- scotch;
- adhesive tape;
- decorative elements.
Making a chef's hat will take a little time. There are several master classes for creating a similar look.
Gouache
The cook (drawing for children from 2 to 4 years old) is a complex character. It can be depicted using geometric shapes. Even a child can handle this kind of work, and you can color the finished image with gouache.
Pencils, paper and supplies
To complete the work you will need:
- ruler;
- a simple pencil;
- set of paints;
- palette;
- eraser.
You will also need brushes to work with paint. It is best to use brushes of different sizes.
Step-by-step execution process
When performing work, you need to focus on the presented image:
Cook - drawing for children step by step
Stages:
- Draw a flattened oval at the top of the sheet. Using a ruler, add 2 rectangles of different sizes. Arrange the shapes as shown in the picture.
- Using trapezoids and rectangles, assemble the outline of the fell.
- Add 2 trapezoids to the bottom figure - as shown in the figure. Pre-smooth the corners to get the boots.
- From the top of the tall rectangle (the character's body), draw 2 tubular elements. Attach a palm and 4 fingers to the end of each.
- From the previously formed oval in the upper part of the drawing, create the top of the cap. To do this, divide the oval into 3 parts and draw arcuate lines. Connect the resulting shape with the lower figures.
- On the next figure, draw a face, and also add an ear on each side around the circumference.
- Divide the body with a vertical line, add a triangle at the top on each side, and then draw buttons.
- Fill the area of the chef's cap and body with white paint.
- Paint the boots with brown paint.
- Fill the character's pants with black paint, and also draw the buttons using a thin brush.
- Mix some brown and white paint on the palette. Use the resulting shade to paint the cook’s face, ears and hands.
To be neat, draw out the elements of the face using a felt-tip pen or marker. Dry the paint first.
How to make a paper cap
The craft in the form of a chef's hat is made in different ways. There are schemes suitable for children and beginners, for professionals. In fact, everything is done simply, the craft will not take much time and will greatly delight children at a children's party or at home.
Step by step assembly
There are two master classes for assembling a chef's hat from paper with your own hands. The simple option looks good, but won't last long. A complex scheme suitable for adults. Children will not be able to complete the craft on their own. He lacks skills and perseverance.
What cereals are there?
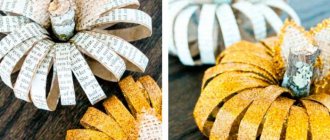
Semolina, buckwheat, millet, pearl barley, millet, rice, wheat grains can be supplemented with legumes (starting with lentils and ending with multi-colored beans) and any seeds and sunflower seeds of vegetables and fruits, perfect for creating all kinds of crafts for every taste.
Each cereal is different in shape, color and size. Properly selected varieties of ornamental materials allow you to create bright and rather unusual products.
Even if the baby is too small, simply sorting through cereals is a more useful activity than watching cartoons.
Varieties of crafts made from cereals
- Painted crafts. Skilled artists will need a baking sheet, cardboard, glass, photo frame, plain tray, round ceramic, plastic, cardboard plates, etc.
- Adhesive products. Little craftsmen will need a brush and PVA glue, fabric, a bottle or jar, which can be supplemented with decorative elements.
- Press-in applications. Different types of cereals are placed and pressed onto carefully kneaded plasticine and leveled over the surface.
- Pourable crafts. Cereals, multi-colored salt, and granulated sugar are poured in separate layers into jars or bottles.
- Stringing things. The technique of putting various seeds on strings allows you to create original decor.
In turn, luminous and embossed surfaces provide a lot of new opportunities and create a festive atmosphere.
The variety of cereals and additional materials are selected depending on the intended result.
Where to begin
First of all, you need to prepare your workplace. A beginning artist will need the following materials and tools:
- a sheet of white paper, but not smooth (glossy), but slightly rough;
- a set of simple pencils of various markings (hardness) - T, M and TM;
- soft eraser.
Now you have everything you need to draw a chef step by step.
Gift for the chef. | Country of Masters
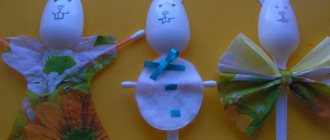
Good day, dear Masters and Craftswomen :) On December 17, my good friend and wonderful young lady Olga had her birthday. She is a professional cook. In connection with this significant event, I got a gift for her - a cook :) From the moment the idea was born to the end of sewing It took only two days for the wonderful girl-cook to be born.
The dress is made of white fabric with a blue flower pattern.
This is such a fluffy skirt.
And this is a cap and a closer face. Here is a cook without a mouth. And, to be honest, I like this option better.
And these are pale blue slippers.
Here the cook got an apron.
The belt is made of a wide satin ribbon.
The apron is embroidered with lace and beads.
Here's a bow on the butt :)
Well, what’s a cook without a ladle? :)
They can even interfere with the soup, and, if something happens, defend themselves from hooligans :))
And this is a bunch of spices - star anise and a pea of allspice.
Based on the opinions of those around him, it was finally decided to make a mouth for the cook.
Well, for the right cabbage soup you need the right “cabbage” :))) So, pot, cook. )
And this is a summer photo with the hero of the occasion.
Glad to everyone who stopped by
What not to do?
Some parents buy special colored sand for crafts in stores. You should know that it is less environmentally friendly and safe for children two to three years old.
The main thing when creating original products from cereals is the child’s interest.
Adults should not interfere with the work process. Children's creativity should be independent!
Monkey made from cereals
Adults should supervise the youngest students as they may put small items into their mouths.
Creating crafts should bring pleasure and joy to the child.
Works
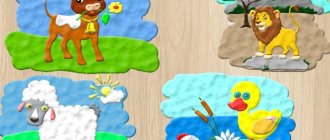
Applications from cereals for the little ones
Adults should prepare templates or large drawings of a snail, sun, lion, ladybug, giraffe, butterfly, Cheburashka, etc. You can draw the future applique yourself or print it out on the Internet.
The topic of work can be anything.
Applications from cereals for the little ones
Technique for creating an application:
- Glue is applied to the image.
- Pre-prepared cereal is poured on top in a thin layer and carefully leveled.
- If desired, the craft is decorated with additional materials.
3D drawings and three-dimensional objects
Younger schoolchildren like to add volume to their figures through different textures of the croup and relief surfaces.
The final result depends on your own idea: for example, your favorite cartoon character can be decorated in an original way and given an interesting and unforgettable design.
Beautiful picture of cereals
Crafts from semolina
This type of cereal is excellent for preschool and primary school children.
- The first step is to take a dark-colored tray or a bright sheet of cardboard/paper to emphasize the contrast.
- The second step is to pour grains of semolina onto the work surface and level it over the entire area of the tray.
Finger drawing of simple shapes (triangle, square, circle), colors, numbers, letters and simple words is perfect for kindergarten-aged children. In case of any failure, you should level the semolina with your palm - the base is again ready for new creative ideas.
Semolina craft made by a child
School-age children can create a simple lamp, candlestick, vase, and pencil holder. The main material is a bowl, jar or any other glass vessel. PVA glue should be applied to the outer part of the glass and sprinkled with cereal. The final stage is to coat the surface of the jar with nail polish or protective enamel.
There are matchboxes in every home. Crafts from matchboxes - options with photographs. Use the ideas provided and choose what you like.
See options for crafts on the topic of traffic rules here.
Crafts can be made not only from boxes, but also from matches themselves. You can create the most bizarre souvenirs from matches. Photos of the works are presented in this article.
Photo frame
Take cardboard of a round, rectangular or square shape, in the center of which a photograph is glued. Using a simple pencil, draw the outlines of the desired patterns around.
Glue is applied to the future decorated surface and cereal is glued on top in a thin layer.
Buckwheat photo frame
The combination of contrasting grains looks original. The finished product is coated with spray varnish or aerosol enamel.
Combined crafts
An interesting play of textures is created by alternating large and small grains and tea leaves, round or long-grain rice, seeds and legumes. This technique is great for decorating furry animals - bear cubs, dogs, cats, monkeys.
Cereal ornaments
Similar to the previous crafts, you can create all kinds of patterns in ethnic style. Cereal jewelry can be of interest to true craftswomen who enjoy the creative process. The finished results are varnished, framed and used as decor in the nursery.
Interesting ornament from cereals
Bird food
Various types of cereals can be used for handicrafts and for their intended purpose. These homemade birdhouses make excellent food for birds.
- Add gelatin to boiling water and, stirring constantly, cook for 5 minutes.
- In a separate bowl, mix the cereal and gelatin.
- Place baking paper on any surface and place cookie cutters on top, which are carefully filled with the prepared mixture.
- Loops of the required length are prepared from twine and compacted inside each cookie.
- All molds are placed in the freezer for half an hour, then taken out and left to dry for the whole day.
The last stage is when the finished cookies are hung on tree branches. All that remains is to wait for the feathered guests.
Not only cereals, but also pasta are suitable for creating crafts. DIY pasta crafts for children - pasta magic in your home.
We will tell you in this publication what crafts can be made from plastic bottles.
Parents who want to develop their child’s thinking and imagination often opt for creative activities.
Making crafts from cereals is an interesting type of needlework, which is often used in pedagogy.
Progress of the lesson.
Let's study now
Don't be lazy, but work hard,
1. Distinctive features of the pastry chef profession .
How many of you love sweets? ANSWERS
Q. What sweets do you know? ANSWERS
The teacher draws the children's attention to the screen.
Q. What profession do you think the person is depicted on the screen ? answer
Q. Why did you decide this? Answers (clothing)
Q: What clothes does a pastry chef ?
Q. What does a pastry chef ? answers
Q. What exactly does the pastry chef ? answers
Q. Today I want to introduce you to the profession of the person who prepares all these sweets. This profession is called pastry chef .
2. Introduce the process of preparing confectionery products
Q. To make a cake, what should you do first?
D. Prepare the dough.
Q. Do you know what products the pastry chef uses to prepare the dough ?
Q: Why does a pastry chef ? Answers
Q. Do you think that in order for a cake or pastry to be more soaked, juicy and tasty, it needs to be greased.
Q: Do you know what cream is made from? Answers
a pastry chef needs a pastry syringe for ? answers
We remember the dough with our hands (we squeeze and unclench our fingers)
Let's bake a sweet cake (as if we're kneading dough)
Lubricate the center with jam (circular movements with palms)
And top with sweet cream (along the plane of the table)
And coconut crumbs
We'll sprinkle the cake a little. (“sprinkle crumbs” with the fingers of both hands)
And then we’ll make tea,
Invite a friend to visit.
3. Helping items.
Q. Now let's see what equipment a pastry chef to prepare sweets.
Q:What is a mixer? Answers
Q: What other tools does he use?
What is the oven for? Answers
What forms does the pastry chef ? Answers
Q: Let's talk about what tools a pastry chef to prepare confectionery products ?
Lying on the table (or on the screen)
mixer, rolling pin,
pastry syringe , table scales, cup, molds.
While showing the children, the teacher asks what this or that device is for.
Didactic game "Fourth odd"
.
(Various tools, including
pastry chef’s ) Finger gymnastics “Washing your hands”
1. “Washing your hands”: rhythmically rub your palms, imitating washing your hands. Ah, water, water, water! Let's always be clean!
2. “Shake off the water from your hands”: clench your fingers into a fist, then straighten your fingers with force, as if shaking off the water.
Our body became wet!
3. “Wipe your hands”: energetic movements simulate wiping each hand in turn with a towel.
Let's wipe our hands very quickly
Final part. Let's repeat what we learned today. To prepare a cake, the pastry chef must put on a form , it is necessary from products (flour, egg, sugar, yeast, water or milk)
prepare the dough, roll it out with a rolling pin, cut out a shape
(circle or oval)
with a mold, bake in the oven, cool, grease with cream or jam from
a pastry syringe . And only after that we can try it. You see how difficult the work of a pastry chef .
Well done guys, everyone answered well. And we learned a lot of new things.
Summary of an integrated lesson on speech development in Art. group “All professions are important, all professions are needed. Tools" Topic: "All professions are important, all professions are needed. Tools". Goals: Cognitive: to form the cognitive sphere, expand and strengthen.
Summary of an open lesson in the senior group “All professions are needed, all professions are important” Topic: Professions Goal: Early career guidance for preschoolers through cognitive, playful and experimental activities. Integration.
Summary of a lesson on cognitive development in the preparatory group “All professions are needed, all professions are important” Goal: to expand children’s ideas about the work of people of different professions. Objectives: 1. Develop attention, memory, thinking, interest in choice.
Notes on cognitive development in the preparatory school group. “All professions are needed, all professions are important” Notes on cognitive development in the preparatory school group. “All professions are needed, all professions are important” Goal: To develop attention.
Lesson summary in the middle group “All professions are important, all professions are needed” LESSON SUMMARY IN THE MIDDLE GROUP “ALL PROFESSIONS ARE IMPORTANT, ALL PROFESSIONS ARE NEEDED” GOAL: To generalize and activate children’s knowledge about work and professions.
Mini-project in the middle group “All professions are needed, all professions are important” Relevance of the project: In middle preschool age, further development becomes particularly important for the full development of a child’s personality. Project activity “All professions are important, all professions are needed!” in the second junior group. There are so many professions in the world! Even the youngest children know this! Moms and dads work so that the family budget grows! Let's say it together. Educational didactic game “I Know All Professions” for children of senior preschool age Good day, dear colleagues. I bring to your attention the educational game “I Know All Professions” for children of senior preschool age.
Source