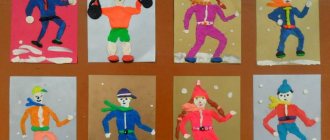
Step by step crafts for kids for kids of all ages. The works are grouped based on popular techniques and materials used.
For crafts, you can use a variety of materials (from familiar and popular to unusual). In addition to paper, plasticine, chenille wire, you can create from foam plastic, cocktail tubes, beads and even pasta. In this case, they use their own fantasies, modern techniques, and the best practices of teachers.
At the bottom of each photo there is a link to step-by-step work. All master classes are located within the site and do not lead to third-party resources.
Multi-colored rainbow craft - a simple craft made from colored paper
You need colored paper, 2 cotton pads, 2 pieces of cardboard, glue and scissors. Production time is 20-30 minutes.
This simple but colorful craft can be done while studying weather, precipitation, spring, rainbows, English, mathematics and counting. And also when repeating colors with children of an earlier age - 3-4 years old.
Origami technique
Paper toys, animals, plants, vehicles, birds, and various objects made using the Japanese origami technique will delight anyone to whom they are presented - parents, close friends.
Origami differs from appliqués, cutting out silhouettes and many other types of art in that it is the art of the whole. There is no need to cut or glue anything, you just need to use one whole sheet of paper. It is possible to add expressiveness to the craft and individuality by adding some details. For example, eyes, animal faces, patterns on the body, clothes.
Recently popular modular origami, which is more difficult for children, consists of several pieces of paper.
Animals using origami technique
Origami trees
Origami steamer
Origami girl
Origami pelican
Origami bee
Origami ice cream
And various other ideas that can be found in the origami for kids section.
A simple plasticine craft - a willow in a vase
In this lesson, children will learn how to sculpt thin sausages from plasticine and make beautiful applications from them. They will decorate a vase with willow and make branches from cotton swabs.
The craft can be done with children 5 years old when studying nature, preparing for the Easter holiday, as well as when preparing a gift for mother and grandmother. Grandmothers will especially be happy with such a homemade gift!
Crafts for children: Top 200 ideas step by step
For successful work, use the following tips:
- Study the list of materials required for making crafts so that before you start work, prepare everything you need;
- Be careful with sharp objects. It is important to use only children's scissors with rounded tips. If holes need to be made, blunt punches should be used and always under adult supervision.
- Care is important when working with materials. Paints and plasticine can stain the surface, and hard objects can scratch it. Therefore, you need to protect the work surface, cover it with oilcloth or put special plastic or wooden planks;
- When using paints, you should change the water often, and then wash your hands and hands thoroughly. To prevent the paint from drying out, the jar must be closed tightly, just like a box of paints.
- After working with clay and plasticine, they are stored wrapped to prevent them from drying out. It is better to wrap the clay in a piece of damp cloth, and the plasticine in plain paper.
- Pencils should always be well sharpened. You cannot use a knife or blade for this. Sharpening should be done with a special sharpener.
- Felt-tip pens need to be capped so that they are always ready for further work.
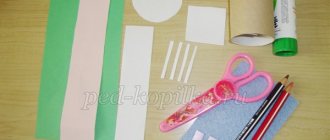
Binoculars
You will need: yellow cellophane, 2 sleeves, scissors, tape, black paint, brush, green and black paper, glue, rubber band, wine cork, string or elastic band.
Master Class
- Cut out 2 circles of yellow cellophane and tape them to the circumference of the sleeves as binocular lenses.
- Paint the circumference of the wine cork with black paint and cover it with green paper.
- Cover the bushings with green paper and glue the black stripes as shown in the image.
- Glue the bushings together and secure with a rubber band. After a while, remove the rubber band.
- Glue the taped cork between the bushings.
- Prepare an elastic band or rope of the required length, make a hole in the side of the bushings and secure the elastic band.
The binoculars are ready!
Let's start with Santa Claus
Santa Claus is the most popular New Year's character, and therefore you need to start with him. There is simply an innumerable variety of Santa Claus crafts. Let's talk about a few of the simplest ones that any kindergarten child can do.
Santa Claus made of cardboard and cotton pads
It is done like this:
- Cut out a circle from thick cardboard. This is the face of the future Santa Claus;
- Cut out a hat for Grandfather from red paper;
- decorate it with snowflakes, stars, pompoms, etc.;
- glue the cut out hat on top of the circle (head);
- Glue purchased eyes and a nose cut out of paper onto the circle. It turns out a face;
- We take cotton pads and stick them on the bottom of the face in a semicircle. It turns out to be a beard;
- We cut another cotton pad in half and stick it under Santa Claus’s nose. This is a mustache;
- We glue several cotton pads onto the bottom of the hat (that is, at the place where the hat connects to the face). In this way we close the joint formed by gluing the hat and face. And in general it turns out beautifully;
- Or you can simply stick a white strip of paper onto the ugly joint.
The result is a cute New Year's card with a picture of Santa Claus. The photo below shows a few examples.
Santa Claus made of colored cardboard and a disposable plate
It's easy to do:
- Cut out an isosceles triangle from colored cardboard. Any color, at the child’s discretion. This is the body of Santa Claus, dressed in a fur coat;
- take a disposable plate and cut it in half;
- Glue store-bought eyes and a nose cut out from colored paper onto its bottom. The face of Santa Claus is ready;
- cut out a small circle from white paper, cut it in half, glue both semicircles under Grandfather’s nose. This is a mustache;
- glue half of the plate approximately in the middle of the triangle. You need to glue with the cut part up and, accordingly, in a semicircle down. The result is a complete figure of Santa Claus with a face, a beard and a fur coat;
- cut out another small circle from paper and glue it to the very top of the triangle. This is the pompom on Santa Claus's hat;
- Finally, cut out a small strip of white paper and glue it on top of the glued half of the plate. This is the lower part of Santa Claus's hat, which will separate the hat itself and the face.
To make it completely clear, look at the photo of what this Santa Claus looks like in its finished form.
For more information about Santa Claus's children's crafts, watch this video.
Preparation
Sitting at a craft, drawing, cutting, coloring it, the preschooler is diligent. His attention is absorbed in the process of creating a craft. His hands tenaciously hold objects and do what needs to be done. His mind is busy solving a problem. This is almost a 1st grade student. Everything is done in a playful way.
But it’s not just paper that a preschooler needs to work with. All children's crafts for the preparatory group include working with plasticine and cardboard. Ability to use glue and thread.
The ability to properly control your body. A preschooler needs the ability to perform certain movements so that these movements become familiar to him while studying at school.
What you need for creativity
With paper and cardboard everything is almost clear. We create from what we find at home. A wide variety of paper products are suitable:
- white office paper;
- tracing paper;
- wrapping paper;
- old newspapers, magazines;
- old tattered books, scraps of wallpaper, scribbled school and music notebooks;
- paper for scrapbooking, designer and speckled;
- any colored paper, including corrugated and metallized paper;
- cardboard packaging for cereals, cereals, dairy products, sweets, disposable cardboard plates;
- large parcel boxes and shoe or clothing boxes;
- regular student cardboard is white or colored with different textures - from velvety to corrugated.
In addition, other auxiliary tools should always be at hand:
- cutting and piercing: scissors, stationery knife, awl, stapler (if available, then a special one - figured);
- ruler and compass;
- PVA glue or glue stick and glue gun;
- paints (gouache or watercolor), colored and simple pencils, felt-tip pens, colored gel pens, markers, brushes;
- plasticine, salt dough or other modeling mass;
- various materials for decorating products: sequins, beads, beads, braid, lace, scraps of fabric and fur, woolen threads... in general, everything you can find at home.
And for some crafts you will need stencils. If you know how to draw, you can make them yourself or print them from the Internet and then cut them out.
There's no point in starting a project to make something exciting and interesting if you don't have the essentials on hand. Of course, it is possible to postpone creativity until the next evening, but when it comes, this next moment is unknown and the child will be disappointed.
We create with the whole family
Tasks involving drawings, applications, figures and toys arouse children's interest. Often the child is unable to cope with the idea and implementation of the idea, then parents come to the rescue.
Joint creative work brings family members closer and helps to get to know each other better. When making crafts with your own hands, a child in kindergarten should not set the goal of perfecting the product. Much more important is the process and the participation of the older generation and kindergarteners in it.
Parents and kindergarten teachers teach children how to independently use scissors, glue, threads and needles. In addition to practical skills, crafts have a good pedagogical basis: they help develop creative thinking and imagination, try your hand at crafts and demonstrate independence. Original products made from paper and cotton wool, leaves and fabric, and any available materials become the pride of a young “artist” or “designer.”
Cutting templates
As an additional decoration for the crafts prepared for mom on March 8, you can use coloring books and templates. Print them out and use them to create a huge bouquet of paper flowers.
- Flower patterns.
- Beautiful eights are symbols of International Women's Day.
- Vytynanka on the windows by March 8:
Children of any age make beautiful and original crafts for gifts to beloved grandmothers, mothers, and sisters with great pleasure. Their production does not require large material costs. Usually the simplest materials are used, which are on sale at the nearest stationery store or lying on the shelf at home. And the result is a unique masterpiece, the author of which will be a little genius.
New Year's toys for the Christmas tree made from salt dough: step-by-step master classes with photos
Salt dough can be considered a universal material for making New Year's crafts, Christmas tree decorations, or even garlands. It's easy to prepare it yourself. The dough is considered a completely safe material, so it is ideal for getting creative with your children.
You can make a very interesting garland from salt dough. You will only need materials that are always at hand. This garland looks very unusual.
Materials:
- 2 cups of flour;
- 1 glass of salt;
- 250 ml water;
- tubes;
- tape or rope.
Step-by-step production:
- Mix water, flour, salt and knead the dough. It should turn out very cool, but at the same time flexible. To prevent it from sticking to your hands, you can add 1-2 tsp to it. vegetable oil. But you should not exceed the dosage, as this will lead to a deterioration in the properties of the dough.
- Roll out the mass on a work surface into a layer about 0.5-1 cm thick.
- Cut out the figures using a stencil. You can use cookie cutters. If there are no molds, you should cut out circles using a glass.
- Make holes in the blanks using ordinary plastic tubes.
- Dry the products, thread a rope through them and hang the garland in a visible place.
On a note!
Using this technology, you can make toys for the Christmas tree. It is not necessary to make holes throughout the entire area of the products. You can simply make a hole at the top and thread a thread through it.
There are a lot of options for decorating crafts made from puff pastry. You just need to show your imagination. Christmas tree decorations with satin ribbons threaded through them look unusual. You can make many holes under each other, and then thread the lacing through them. Crafts made from puff pastry with an outer layer decorated using the decoupage technique look very impressive.
You can make a very interesting candle from salt dough. It is permissible to use a paper towel roll as a base.
Materials:
- salted dough (2 cups flour, 1 cup salt, 250 ml water);
- dye;
- cardboard base from a roll of paper towel or toilet paper;
- corrugated paper in red and yellow colors.
Step-by-step production:
- Knead the salt dough by mixing water, salt, flour.
- Divide the dough into 2 parts. Tint one part with red paint, and the second can be left light.
- Roll the dough into ropes and place them on a toilet paper or towel base, alternating light and red rings.
- Make a flame out of crepe paper (roll up red and yellow paper) and insert it into the tube.
On a note!
This craft is suitable for activities with very young children. She perfectly develops fine motor skills.
Interesting ideas
Light children's paper crafts are pleasing to the eye and can be a good gift for a loved one. There are several simple options that are most popular with both children and adults.
Symbol of 2022 DIY felt tiger
For the New Year, you definitely need to make a craft in the shape of a Tiger. This is a wonderful talisman. You can leave it at home or give it to friends and acquaintances, and the manufacturing process will cause a lot of delight.
Materials:
- felt in several colors;
- needle;
- threads;
- narrow tape;
- filler;
- eyes;
- scissors;
- glue;
- black outline on fabric;
- patterns.
Step-by-step production:
- Transfer the patterns to felt. You can pre-draw them on paper yourself. You will need 2 oval parts (width about 6 cm, height about 5 cm), 2 orange parts for ears (height about 3 cm), 2 white parts for the inside of the ears, a black nose, muzzle, and a pink tongue.
- Cut the ribbon to the required length and make a loop out of it.
- Attach the ears to one of the large parts, glue the white parts of the ears inside.
- Glue a ribbon loop in the center.
- Cover the central piece from above with exactly the same one and stitch around the perimeter, leaving a little space for stuffing the craft.
- Glue the muzzle, tongue, and eyes onto the tiger's head.
- Stuff the toy with stuffing and sew up the part that remains unsewn.
- Draw stripes with acrylic paint or a black outline. It is very convenient to use paint in a tube.
On a note!
Stripes on the tiger's head can also be made from black ribbons. But first they need to be cut into narrow strips and their edges melted.