After the walk, the teacher seats the children at tables and shows them a craft - this is an applique called migratory birds. It is shown below:
This activity can be carried out both in the fall and in the spring, that is, during the migration of birds. On walks, children notice that birds gather in flocks and fly somewhere. The teacher explains that in the fall birds fly to warmer regions and come back in the spring, and this happens every year, but there is a bird that lives with us all year round.” What kind of birds are these on the branches?” - asks the teacher. The children recognize the sparrows and begin to run and pretend to be birds.
Age characteristics of children
A child of preschool and primary school age has different developmental characteristics. The variety of application techniques allows you to implement them, regardless of category. For example, putting together a composition from ready-made elements will interest children; the appliqué “Birds of Migratory” in the senior group of a preschool institution is more complex in nature (children are asked to independently cut out parts of the composition and put them together in the required sequence); a child 5-8 years old can independently design a craft.
In this work, you can use many techniques that will allow you to fully unleash your child’s creative potential. In this case, not only elements made of paper and cardboard are used, but also various natural materials, such as feathers or down.
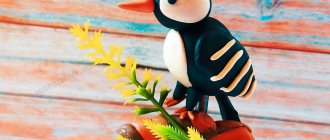
Three-dimensional applique made of colored paper Bird - Autumn for children 6-7 years old
Application made of colored paper on the theme of Autumn for kindergarten. Preparatory group
Volumetric applique made of colored paper “Bird-Autumn” for children of senior preschool age.
Master class with step-by-step photos. Author of the work : Mlada Vebertovna Karakozova, teacher of the MADOU “Kindergarten No. 14 of a general developmental type”, Syktyvkar, Komi Republic
.
Purpose : the master class is intended for children 6-7 years old, their parents, and preschool teachers. The application is intended as a guide for writing short stories, fairy tales about a subject, a gift for friends, parents. The application can be both collective and individual. Goal : teach how to make a three-dimensional applique from paper. Objectives : - develop the ability to create a subject image; - develop the ability to depict a bird according to your own design; - consolidate the technique of cutting out several objects from paper folded like an accordion; - fix the names of the colors; - strengthen the skills of neat cutting and pasting; - develop a sense of color and composition; — develop interest in the application; - encourage creativity. Preliminary work : - reading P. Ershov “The Little Humpbacked Horse”; - viewing illustrations of the Firebird (examining the length of the tail and wings, the crest on the head); - twisting the cut fringe of paper with open scissors.
Teacher : - The most beautiful time of the year has begun - autumn! It's a shame it won't last long. I wonder how the leaves on trees turn from green to colorful? ( children's answers
).
Let's fantasize a little: maybe an Autumn Bird is flying over the forests? It flies over the trees, flaps its multi-colored wings, and instantly the forest changes its color, becomes so beautiful that you can’t take your eyes off... What color do you think, children, could the Autumn Bird’s feathers be? ( red, yellow, orange
).
And if she has such wings, what kind of bird do you think the Autumn Bird is like from which fairy tale? ( on the Firebird from the fairy tale “The Little Humpbacked Horse”)
.
Teacher : - Let's try to use colored paper to depict what the Autumn Bird will look like. For work we will need materials : - colored double-sided paper (one sheet each: red, orange, yellow); - colored cardboard (a blue sheet and a small piece of black - for the bird’s beak); - a piece of wallpaper 26x33 cm (for the frame); - stencils: body with head, wings; - simple scissors; - curly scissors; - glue stick; - a simple pencil; — sequins (in the shape of flowers) in yellow and red; - a small piece of black plasticine.
Progress:
1. Make a frame: cut a sheet of blue cardboard along the edge with curly scissors and glue it in the middle of a piece of wallpaper. The frame is ready. Advice: put the frame under a press for a day (thick books are suitable) so that the frame straightens, since under the influence of glue, it may begin to curl a little inward.
2. Trace the template of the body and head on yellow paper. Cut it out. Glue it to the top right corner of the blue cardstock.
3. Fold the red sheet of paper into an accordion shape.
4. Trace the stencil of the leaf. Cut it out. It turned out to be a lot of red leaves.
5. We make oblique cuts on the sides of the leaf, slightly short of the middle.
6. With open scissors, make “curling” movements in one direction along the cuts of the leaf. The leaf will curl slightly inward (if the child is still not good at such movements, you can simply bend the cuts inward with your fingers). Here's what happens:
7. “Curl” all the red leaves.
8. Then we’ll cut out and “curl” all the yellow and orange leaves. In total you will get 3 types of feathers.
9. We begin to make the tail. The first feather is orange, glue it by the edge to the back of the body, as in the photo:
10. Next, next to the orange feather - red, then orange again. We use this color combination of feathers to highlight the yellow color of the bird’s body.
11. Next row of feathers: add feathers, alternating in color. We glue each next feather in the next row, slightly lifting the previous feather.
12. Thus, we make 7 more rows.
13. Now we begin to reduce the number of feathers in the row, bringing it to one in the last row. Finish the tail by gluing an orange feather. Here's what happens:
14. Let's make wings. On the sides of the body (on both sides) we glue the feathers in this order: orange - red - orange.
15. There will be 4 rows in the wing: 2nd row – 3 feathers, 3rd row – 2 feathers, 4th row – 1 feather. We glue the feathers, following the technique of gluing the feathers as on the tail. We finish the wings with an orange feather. Here's what happens:
16. Let's make a crest for the Autumn Bird - glue the crest (orange feather) up onto the head. Cut out a piece of black cardboard and glue a small triangular-shaped beak to the side of the head. From a piece of black plasticine we will make a small round eye. Here's what happens:
17. Decorate the Bird with yellow and red sequins, gluing them on top of the feathers, body, crest, and the last feather in the tail in this order:
The Autumn Bird is ready! View of the applique from different sides: This is what a beautiful “autumn” tail our Autumn Bird got! It is pleasant to stroke it by running your hand from the beginning to the end of the tail.
Application options : 1) Use fewer colors of paper for feathers;
make a tail with fewer rows. 2) You can glue a real feather in place of the tuft. 3) The bird can fly in the other direction. 4) Instead of sequins, you can use other decorations; you can decorate the feathers with yellow, orange, and red gel pens. Thank you for your attention!
We recommend watching:
Applications on the theme of Autumn using the iris folding technique. Application with drawing elements for primary schoolchildren on the theme: Autumn. Volumetric applique made of colored paper. Hedgehog on the theme of Autumn for kindergarten. Application from plasticine. Autumn tree. Master class with step-by-step photos
Similar articles:
Application from cereals for kindergarten on the theme “Autumn”
Application made from natural material. Rowan
Application made from natural material. Autumn flowers