Poultry
As a rule, children's acquaintance with the world of birds begins with poultry, because this is most expedient. Therefore, already in kindergarten, children know perfectly well what poultry is and what they look like.
It is advisable to start getting acquainted with this type of creativity with familiar images, so it will be much easier for the child to consolidate the acquired knowledge in memory.
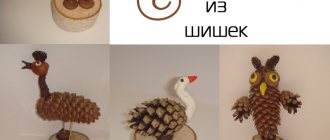
Poultry includes ducks, chickens, geese, turkeys; all of them are quite easy to make from paper, cardboard or other improvised means that you decide to use in the craft.
The easiest way to assemble a craft is from paper or cardboard, because it is a hard material from which absolutely any shape can be cut.
For the craft you will need:
- Base (colored cardboard)
- Watercolor or gouache
- Plasticine
- Glue stick
- Cotton pads, napkins
Assembly
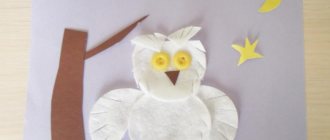
Let's start assembling the small chicken.
The assembly instructions are very simple; the body will be a solid cotton pad, which needs to be glued to the base using a glue stick.
Next, to complement the image, giving it an increasingly realistic look, you need to place another cotton pad a little higher; it will serve as the head of the craft. Please note that these 2 cotton pads should be touching each other.
At this stage it is necessary to paint the workpiece using yellow paint. It is worth remembering that cotton pads absorb moisture well, so you should try to squeeze out the brush, leaving only paint with less water on it.
Once they are carefully painted yellow, you need to give them some time for the paint to dry.
When it is dry, you can begin further assembly. To make chicken wings, you need to take a new cotton pad and use scissors to cut it into 2 equal parts. Only one half is needed for this craft.
It should be placed on the body so that the rounded part of the disk is at the bottom. The part of the cotton pad itself should be located exactly in the middle of the body.
The wing also needs to be carefully glued, wait until the glue dries, and then paint it yellow, like the rest of the parts. All that remains is to make the beak, eyes and legs.
For the beak and paws, red or burgundy plasticine is used. A part of the desired shape is carefully molded from it, after which it is glued to the base with a slight movement.
To make an eye, it is recommended to use a black felt-tip pen; you just need to gently press once on the desired place, and an even circle will be ready.
This completes the assembly of a simple craft; the time spent on manufacturing and combining all the parts does not exceed 30 minutes, which is very convenient.
To avoid boredom, the bear needs friends
When the child has learned to make a simple bear, you can complicate the task. To do this, he is asked to make bears for friends. An example is shown in the photo below.
To awaken children's interest in such an idea, it is necessary to captivate them with an interesting story about forest inhabitants.
You can combine them into groups that will make one application together. You can add other forest inhabitants to the craft.
Chickens and geese
These poultry have abundant plumage, which also needs to be indicated on the applique. Depending on the age of the child, applique with these birds can be of different types.
For the little ones, the same approach is used as when making chicken. As a final step, the child will need to place cotton wool on it, which will imitate plumage.
For older children, for example, for the second or third year of being in kindergarten, pre-prepared bird templates are used. They are printed on paper and given to children. And they, in turn, must correctly fill the template with cotton wool where it is needed.
The remaining parts should be colored with felt-tip pens, pencils or colored pens, whichever is more convenient for you.
For this craft you will need:
- Glue stick
- Outline drawings of birds
- Paints, pencils, pens
- cotton wool
- Scissors
Beautiful teddy bear made of paper or cardboard
Paper applications are common as a useful activity for children in kindergartens, in creative child development studios, and at home. In the photo below there is a bear applique, which we will analyze as an example.
List of required accessories:
- Colored cardboard and colored paper;
- Adhesive for paper and cardboard;
- Stationery scissors.
When creating an applique, you can try to reproduce an exact copy or use your imagination to decorate the bear and make it memorable.
Before you start, you need to take care:
- So that everything you need lies nearby in a complete set.
Preliminary preparation will allow you to maintain the child’s interest longer and prevent distraction.
- Take a brown sheet of paper and draw on it the following elements shown in the photo below. Then, you need to carefully cut out the resulting elements of the bear.
- Green grass is carefully glued onto the blue cardboard.
- Bazromushki are made like this. The edge of the colored paper is cut (across the entire width, at the same distance from each other). Provide visual fluffiness to the grass.
- The parts of the bear, previously cut out, are glued onto the finished background backing. The photo below shows how to glue the body.
- The shorts, straps and upper legs are glued to the body, as shown in the photo below. Let's wait a little, because the application should dry.
- Then, as in the photo, glue on the head, eyes, nose, mouth, ears, tie or bandage (for decoration).
- At the request of the child, you can decorate the teddy bear. Glue the pocket, the inside is gone, the sun, clouds - whatever your imagination allows for.
If the bear isn’t quite neat, that’s okay. It is necessary to explain to the child: that we are still learning how to make crafts with our own hands, next time it will work out better.
Crafts addition
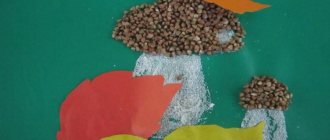
So that the craft does not seem empty, you need to create the right environment for the birds. For example, for a chicken craft, you can create scattered food around it.
To imitate it, real seeds glued to the base of the craft are perfect. However, gluing small parts is a very painstaking job that requires maximum care.
In addition, working with small parts is not recommended for children under 3 years of age without parental or teacher supervision.
You can also create a small house, make grass, sun and clouds. You can add virtually anything, the child must imagine the environment himself, there is no need to interfere with his creative impulses.
It only makes sense to guide him, telling him how to correctly make this or that detail for his craft.
Creating a house
The simplest thing would be to make one or more small bird houses in the background. To do this, you first need to cut out a square or rectangle that will serve as the base.
Next, you need to make a roof; for this, a triangle is cut out in size suitable for a square or rectangle. Its color may differ from the base, at the request of the child.
All this is glued to the base of the craft using a glue stick. Next, you need to make windows; for this, small squares are cut out of white or blue paper, which are then glued to the walls of the house.
To make frames, you can draw classic crosses on top of the window blanks with a pencil or felt-tip pen. All that remains to be done is the chimney, an integral attribute of village houses.
For this purpose, you need to cut a small strip from the same paper from which the roof was cut. Next, you just need to glue it to the roof in any place where it will be most convenient.
Middle group
Children from the middle group already have basic knowledge and skills in creating beautiful applications. Therefore, they can be given more complex versions of crafts so that they improve their skills.
Frog in a water lily
A very simple craft that middle school children can definitely handle. It's no secret that frogs hide in water lilies. Therefore, such an idea will become a relevant option for a bright applique.
Cheerful frog
A non-standard applique that children will enjoy making. For making, it is recommended to take double-sided colored paper so that the craft looks neat and beautiful from all sides. If desired, the blank can be decorated with decorative elements, felt-tip pens or glitter.
Frog with an umbrella
Volumetric applique is a task that children of the middle group can cope with without problems. To make a frog, you will need to cut out the necessary parts and then connect them together. The situation with an umbrella is a little more complicated. To do this, you need to cut out a semicircle and fold it like an accordion. The result will be a colorful applique that every child will be proud of.
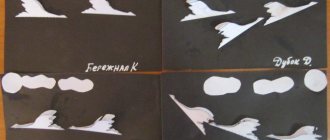
Photos of applications in the form of birds
Detachable composition “Dove”
- Draw the silhouette of a bird on cardboard:
- Tear a white A4 sheet into pieces:
- Apply glue to the design.
- Place tear-off pieces on top.
- Glue a paper beak and eye to the dove.
Third option
A more complex method for older children.
Sequencing:
Create an original background on a landscape sheet that will match the theme of the work. In extreme cases, the sky and grass will suffice.
Mark with a pencil where the rest of the elements will be located. Cut out parts of the house from colored sheets and glue them to the base, which should already be dry.
Download a black and white drawing of a chicken and a rooster from the Internet. If you know how, you can draw it by hand on a white sheet. Cut out the silhouette.
Prepare colored elements that will correspond to the sizes and shapes of body parts: wings, comb, body, tail feathers, etc.
Glue the blanks and decorate the top with colored paper pieces.
All this work can be done collectively, entrusting the child with the responsible work of gluing the parts in the right places.
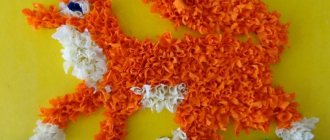
Firebird
A fairy-tale character who looks as fantasy suggests. An ideal composition for beginners.
Second way
A simplified way to create chickens or geese will be possible even for the smallest.
Sequencing:
- Draw or print a picture of a bird.
- Paint the comb, paws, eyes, etc.
- Take regular cotton wool and tear it into small pieces.
- Using craft glue, attach the white lumps in the places where the feathers should be.