Applique is one of the most interesting and fascinating types of creativity, because using figures cut out of any material, you can create any image with your own hands. All you need to create an applique is the right materials and creativity.
Application is a relatively inexpensive and at the same time useful form of creativity for children, since the necessary materials are not expensive, and the field for creative implementation and development of creativity is extremely wide!
The benefits of creating applications for schoolchildren
Starting from preschool, children are offered classes in this type of creativity. The application is of great interest to children and quickly captivates even the most restless children into the world of creativity and creativity!
What are the advantages of creating applications for schoolchildren?
- Development of hand motor skills
The process of creating an applique consists of a whole complex of different actions: cutting out various shapes with scissors, determining their location, attaching the shapes to paper with glue and finalizing the resulting applique using colored pencils, felt-tip pens or pens.
- Understanding the world around us
In addition to the fact that you can create any image you want, you can also use a whole range of materials: paper, scraps of fabric and natural ingredients.
The paper can be colored, corrugated or craft. When choosing fabric, the choice becomes even greater: cotton, wool, velor, felt, silk and so on.
Among the natural ingredients, sunflower seeds, pumpkin seeds, various cereals, pre-dried flowers, leaves and branches are most often used.
The use of all of the above materials broadens the child’s horizons. Children get acquainted with various types of materials of natural and non-natural origin and with all kinds of geometric shapes. With the help of them they embody their images in reality.
- Development of creative thinking and imagination
Creating applications is possible on any topic. Within a certain topic, be it fruits, vegetables, animals, landscapes or people, schoolchildren are given the opportunity to fully realize their vision of a particular topic on paper.
If a child has a talent for creating visual images, then appliqué is an excellent opportunity to reveal and increase their abilities.
Even if one of the children is not always able to create something interesting, the more the application is practiced, the faster the ability to create develops, and the imagination is enriched with new ideas and solutions.
The development of creative thinking is extremely important from an early age, since in adulthood it is much more effective to solve many issues using a creative approach.
- Aesthetic education
In the process of creating an image, you need to make a lot of effort: choose the shape of the material, choose colors that harmoniously combine with each other, and combine all the blanks into a complete work of art.
Each action in this creative process is aimed at developing aesthetic taste and the ability to correctly combine colors and shapes.
- Developing concentration and accuracy
Applique practice requires care. Working with scissors, glue and other materials, the child makes an effort to turn neat blanks into an equally neat image.
Extreme concentration on the creative process is also important. Only by completely immersing yourself in the process and concentrating all your attention on the moment “here and now” can you create something truly interesting and extraordinary.
At different stages of primary school education, applique classes always take place. But depending on the class, the process is somewhat modified, corresponding to the age and level of development of primary school students.
Child-parent project “Children’s Book Week” in the middle group
Bibliographic description:
Klementyeva, E. E. Child-parent project “Children’s Book Week” in the middle group / E. E. Klementyeva. — Text: direct // Questions of preschool pedagogy. — 2022. — No. 5 (15). — P. 86-89. — URL: https://moluch.ru/th/1/archive/100/3540/ (access date: 01/29/2022).
Childhood... The time of the most vivid impressions, the deepest experiences, the most amazing - first - encounters with this world. Every child's acquaintance with literature begins with short poems, nursery rhymes, and Russian folk tales, which accompany his entire childhood and remain with him throughout his life.
Children's fiction, being a treasury of spiritual wealth for children and adults, makes it possible to compensate for the lack of communication between preschoolers and people around them, broaden their horizons, and enrich their life and moral experience. Literary works involve students in thinking about the actions and behavior of people and current events; encourage their evaluation and enrich the emotional sphere.
A child, immersing himself in a fairy-tale world, ascends both to the level of already mastered sociocultural material, and to the level of something not yet known by humanity (“the image of the needed future”).
In a fairy tale there are always indirect indications of points of growth of human capabilities and abilities. Penetrating through a fairy tale into the thickness of the cultural and historical layers of human development, the child acquires a creative vector, and his individual creative potential as a future active reader increases.
Raising a future reader is a long and difficult process, but if the initial stage of introducing a child into book culture is successful, then the number of young people who are unable or unwilling to join the spiritual experience of humanity through books will be significantly reduced.
Relevance of the problem.
A decrease in reader interest, on the one hand, and the obviousness that reading in the modern world is an essential component of life success, on the other hand.
The goal of the project: to introduce children and their parents to reading children's fiction.
Project objectives:
– to develop an interest in books and children’s reading, to acquire a stock of literary artistic impressions and listener experience;
– develop cognitive, creative and emotional activity in the process of introducing preschoolers to literature;
– broaden children’s horizons, enrich and activate their vocabulary;
– develop children’s basic design and creative abilities by involving them in the design of homemade books for kids;
– cultivate a value-based attitude towards a book as a work of art;
– involve parents in creating conditions for developing children’s interest in books at home and in kindergarten, and revive reading within the family.
Preliminary work with children:
– thematic design of a group room;
– drawing together with parents the characters of your favorite fairy tales;
– reading children's fairy tales, stories, poems;
– selection of poems and preparation of expressive reading for memorization;
– selection of portraits of children's poets and writers.
Type, type of project : short-term.
Participants: middle school children, parents, teachers.
Final event: presentation of homemade books to younger preschoolers.
Expected result.
– Acquaintance with fairy tales will develop the first moral standards in middle preschoolers, and step by step will form an interest and love for literature.
– Children’s horizons will expand, their vocabulary will be enriched and activated.
– Family reading will be revived.
With the development of various modern technologies of smartphones, tablets, and computers, a book has ceased to be an important subject not only in the lives of preschool children, but also of their parents. Not so long ago, a book was considered the best gift for every child; now its place has been taken by technology and all kinds of electronic toys. The tradition of home reading, unfortunately, has faded into oblivion.
Children's book week in the middle group was divided into five topics.
Monday is fairy tale day. Opening of “Book Week”. The group organized a thematic book exhibition. The children got acquainted with the exhibition, looked at the books, and remembered familiar Russian folk tales “Sister Alyonushka and Brother Ivanushka”, “The Zhikharka”, “The Cockerel and the Bean Seed”, as well as fairy tales by V. G. Suteev, S. Mikhalkov, the Brothers Grimm, Sh. Perrault, K, Chukovsky. We learned new games: “Body with fairy tales”, “Guess the fairy tale”. We held a quiz “Journey through Fairy Tales”.
On Tuesday, on the day of book experts, we introduced the children to the history of the book, talked about the rules for handling it, looked at book covers, learned what illustration, literary text, binding, page are, and became acquainted with the concept of printing house, library. We thought about the topic: “Why do we need books?”
On Wednesday, on the day of the game and theater “We are playing a fairy tale,” theatrical and play activities were organized in the group at the request of the children, conditions were created for independent creativity in the game using the “Ramming” corner. By coincidence, on this day artists from the Samara Philharmonic came to our kindergarten. Our children enjoyed watching the children's performance. Children consolidated such concepts as theater, performance, stage, artists, spectator. In the afternoon, the role-playing game “In the Bookstore” was played.
On the day of creativity “We do it ourselves - with our own hands,” the children and I tried to illustrate a fairy tale, and although our illustrations were not entirely successful, our drawing skills failed us, the children were very pleased with their creative result. After sleep, work was organized to repair old books in the corner of the “Knizhkina Hospital”.
On the closing day of Children's Book Week, children brought homemade books for children, made together with their parents, and looked at and discussed them with great interest. And after breakfast there was a presentation of the books made to the children of the group.
Event plan
| Theme of the day | Operating procedure | Children's activities | Activities of educators | Parents' activities |
| Monday Day fairy tales "There are many fairy tales in the world..." | Opening of “Book Week”. Design of a thematic book exhibition in a group. Work in the book corner. | Conversation “Rules for handling a book.” Learning games: “Body with fairy tales”, “Guess the fairy tale”. Collaborative and independent games with table theaters. Looking at illustrations in books. | Design and review of the exhibition of methodological literature, Teacher’s story “The History of the Book” - A teacher’s story about the development of writing with illustrations. | Consultation "Theater on the kitchen table." Read the leaflet “Instilling in Children a Love of Reading.” |
| Tuesday "Day of Book Experts" | Educational lesson “Such different books.” A conversation about the rules of handling a book. | Participation in the quiz “Journey through Fairy Tales”. "These funny animals." Reading and listening to fairy tales, stories, poems, riddles about animals, works by E. Charushin, V. Suteev, V. Bianki, S. Marshak, K. Chukovsky. | Design of the memo “Introducing preschoolers to fiction.” Design of a card index of didactic games, selection of works of art on the topic. Design of a thematic book exhibition. | Participation in the quiz. Assisting in creating conditions for theatrical and role-playing games (production of the necessary attributes). |
| Wednesday theater day "We are playing a fairy tale" | Organization of theatrical and play activities for children, creation of conditions for children’s independent creativity in play. | Role-playing game “In a bookstore.” Dramatizations of your favorite fairy tales. Theatrical and role-playing games at the request of children. Listening to Russian folk tales. | Design of the memo “Introducing preschoolers to fiction.” Design of a card index of didactic games, selection of works of art. | Consultation “So that the fairy tale does not become boring.” Tips for decorating a children's home library “Books in our house.” |
| Thursday Creativity Day “We do it ourselves —with our own hands.” | “Knizhkina Hospital” - organization of work on the repair of old books. Organization of children's productive activities based on literary works. Exhibition of works of joint creativity “We do it ourselves - with our own hands.” | Organization of work in the “Knizhnik Hospital” corner. The plot is a role-playing game “Book Hospital”. S/r game “Book Publishers” - Drawing, modeling, appliqué based on the plots of literary works “My Favorite Fairy Tale”, “Portrait of a Fairy-tale Hero”, “Amusing Town”. | Teacher's story «A journey through the shelf of smart books." Design of the booklet “For parents - about children's reading.” | Consultation “What and how to read at home?”, “Children’s reading circle.” Making homemade books is a joint creativity of parents and children. Participation in the creative exhibition “We do it ourselves - with our own hands.” |
| Friday Closing day of Children's Book Week. | Presentation of a group book corner, book exhibition. Summing up the results of Children's Book Week. | S/r game "Library". Presentation of homemade books for younger preschoolers. | Preparation for the presentation of homemade books to younger preschoolers. | Creation of a creative group to produce the thematic magazine “The Book of Our Childhood.” |
| Closing of Children's Book Week. | ||||
Result of the project:
– got acquainted with the works of children's writers;
– remembered Russian folk tales;
– the horizons have expanded, the vocabulary has been activated when familiarizing yourself with illustrations of children's books (cover, binding, illustration, typography, font, letters, etc.);
– the rudiments of children’s elementary design and creative abilities were formed by involving them in the design of homemade books for kids;
– systematic home reading to a child at night formed the preschooler’s habit of daily communication with a book, developed an interest in children’s fiction, and brought all family members together.
Future plans.
– Continue to work on developing our students’ interest in books and children’s reading, acquiring a stock of literary artistic impressions and listener experience.
– With the help of parents, replenish the group’s book corner with new illustrated editions of their favorite books.
– Visit the children's district library.
Literature:
- Thematic weeks in kindergarten /Auth.-comp. T. N. Sergeeva. - M.: Planeta, 2013. - 128 p. - (Preschool education)
Key terms
(automatically generated)
: fairy tale, children's book, book, child, day, children's reading, game, children's fiction, presentation of homemade books, creation of conditions.
Application for 1st grade
For children who have just come to school from kindergarten, it is necessary to organize exciting and interesting activities.
The main goal is to attract children to creativity as much as possible, to capture their attention and accustom them to active mental activity, initiative, flexibility and the desire for creative discoveries.
If children are interested in these activities at an early stage, then interest and involvement will grow in the future.
The most optimal method of conducting a lesson is a lesson in the form of a game with the addition of educational moments.
For example, when studying the topic “animals” or “plants” in the subject “Man and the World”, in a creative lesson you can be given the task of creating an image of an animal of your choice, while giving an additional task of memorizing some information on the topic.
Then it is worth organizing a presentation of the work, where each of the children will present the image they created with their own hands in public, accompanied by a short story.
Children 6-7 years old love fairy-tale and cartoon characters, because they actively watch cartoons, and their parents often tell them fairy tales. It is worth taking this feature into account and organizing classes on relevant topics.
Application for 2nd grade
Having become one year older, the children feel an even greater need to understand the world around them and creative self-realization. Applique lessons need to be made more challenging.
For example, by adding even more creative materials and increasing the choice of topics. After studying for a whole year at school, children begin to realize that with effort, it is possible to achieve something: both a good grade and praise from the teacher.
During this period, it is worth paying attention to technology and practical skills. Children should remember key points, if necessary, take notes on the course of actions and practice them.
Application for 3rd grade
As you grow older, your creativity grows. By the third grade, children had already mastered the skill of working with scissors, colored paper and glue. My horizons have expanded significantly and I have an idea of the world. At this point, it is necessary to give children freedom of expression and creative flight.
Lessons should be conducted using methods to develop imagination, and also introduce children to various techniques for cutting and folding materials. Some of the most interesting techniques are: cutting off shapes, accordion folding, cutting out complex shapes and decoupage.
Text of the book “Applique with children 3-4 years old. Class notes"
Daria Nikolaevna Koldina Application for children 3–4 years old
From the author
By the end of the third year of life, the child acquires basic ideas about color, size, shape; listens to fairy tales; learns to compare real objects with their images in paintings; looks at the landscapes.
It is easier for a small child to express his impressions with the help of visual activities (three-dimensional image - in modeling, silhouette - in appliqué, graphic - in drawing). He conveys images of objects using plasticine, colored paper, and paints. The child should always have these materials at hand. But this is not enough. It is necessary to develop the child’s creative abilities, show modeling techniques, teach how to cut out colored paper, and introduce various drawing techniques. To improve visual skills, one should develop the perception of form, color, rhythm, and aesthetic concepts.
A 3-4 year old child can do a lot: wash his hands, brush his teeth, feed himself, dress and undress, use the toilet. The baby develops simple verbal reasoning. He answers questions from adults with pleasure and is eager to communicate with other children; His gaming skills and voluntary behavior develop.
To develop children's creativity and mastery of visual arts, it is necessary to take into account the interests of children, use a variety of lesson topics and forms of organization (individual and collective work). It is very important to create a friendly environment in class.
At first, the child is interested in the process of making the craft, but gradually he begins to be interested in its quality. He strives to stick the object as neatly as possible, and after class admire his work, tell him what color he chose, what this object can do, and what kind of applique he turned out to have.
In this manual, we provide notes on exciting activities for children 3–4 years old on appliqué made from colored paper and natural materials.
These activities contribute to the implementation of the following tasks: introducing the child to the surrounding beauty; development of imagination, independence, perseverance, the ability to complete work, accuracy and hard work, skills in processing various materials, which in the future the child will be able to independently use to make similar crafts.
The classes are organized according to the thematic principle: one topic unites all classes (on the surrounding world, on speech development, on modeling, on appliqué, on drawing) during the week.
It is advisable to conduct an appliqué lesson after the children have sculpted the item.
An appliqué lesson for children aged 3–4 years is held once a week and lasts 15 minutes. The manual includes 36 notes of complex plot-game activities designed for the academic year (from September to May).
Read the lesson notes carefully in advance and, if something doesn’t suit you, make changes; prepare the necessary material and equipment. Preliminary work is also important (reading a work of art, becoming familiar with surrounding phenomena, looking at drawings and paintings).
By observing each child in class or playing with other children, you can learn more about them and deal with challenging behavior.
If a child quits his activity
, as soon as something doesn’t work out for him, it means he doesn’t know how to overcome obstacles. This can be taught by offering the child other ways to achieve what he wants. Then he will understand that there must be a way out of any situation. For example, if a child wants to draw a snowman, but he can’t do it, invite him and you to make an applique of a snowman from white paper on a dark background.
If your child quickly loses interest in an activity
, perhaps it is too simple or, on the contrary, complex for him. Understand the reason and make the task harder or easier. For example, a child needs to applique a turnip with tops. If this is too easy for him, have him stick a basket and place different vegetables in it using colored paper. If the task is too difficult for the child, you can invite him to stick a turnip without tops.
If your child gets tired quickly
, cannot sit for even five minutes, try to develop his endurance using massage, hardening, and sports exercises. In art classes, alternate between active and calm actions more often.
To ensure that the child understands the task and completes it
, it is necessary to develop his attention and ability to concentrate. Play the game “What Has Changed?” with your child. (place 3-4 toys in front of the child, and then quietly hide one of them or swap the toys).
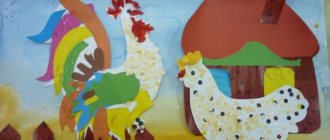
Try to find as many ways as possible to involve the child in bringing the task to its logical conclusion (for example): “Let’s stick balls on the elephant, otherwise he has nothing to play with” or “Let’s make a big house for the bunny and the rooster, otherwise they have nowhere to live.”
We recommend conducting appliqué classes with children 3–4 years old in accordance with the following sample lesson plan.
1. Creating a gaming situation to attract children’s attention and develop emotional responsiveness (riddles, songs, nursery rhymes; a fairy-tale character in need of help; dramatization games; exercises to develop memory, attention and thinking; outdoor games).
1. Acquaintance with the subject that children will subsequently depict in the appliqué; determining the sequence of laying out pre-prepared parts, applying glue to them; attaching forms to paper and gluing.
2. Bringing the application to the desired image with the help of additional decoration with felt-tip pens or decorating the work with small pieces of colored paper (in this case, it is necessary to draw the children’s attention to expressive means: correctly selected colors and interesting details).
3. Review of finished works (they are given only a positive assessment). Children should be happy with the result and learn to evaluate their crafts.
There are three types of application:
Subject
– individual objects are depicted that do not participate in any events (fruit in a vase);
Plot
– a composition is compiled based on events (actions) in fairy tales, stories, poems, nursery rhymes; by personal recommendation;
Decorative
– a pattern is made of geometric shapes on a strip, square, circle.
We list the application methods that are used in working with children 3–4 years old.
Application from prepared parts of an object
– the child must assemble an object (pyramid, bear) from the proposed parts and stick it on paper.
Application from prepared silhouettes of objects
– the child makes a composition from one or more cut-out objects, and then pastes it onto a sheet of paper (cucumber, tomato).
Breaking-mosaic
- small circles, triangles, squares or torn pieces of colored paper are glued inside the outline (autumn leaves on a tree).
Cutting along the contour
– colored paper is torn along the intended contour to convey the texture of the object (the curly body of a lamb, a fluffy cloud).
Rolling paper
– the paper tears into small pieces, each piece crumples and rolls into a lump (rowan berries, fluffy chicken).
Overlay applique
– parts that are identical in shape but different in size are glued onto each other, starting from the largest to the smallest (snail, turtle, flower).
Application of dried leaves
– the leaves are laid out and arranged into the intended object, then glued onto a sheet of paper (fish, swan).
For applique classes you will need: colored paper, magazine paper, colored napkins, dried leaves, album sheets, colored cardboard, felt-tip pens, PVA glue, oilcloth lining and a rag.
Expected skills and abilities of a child by age 4:
• has an interest in the art of applique from pre-prepared figures;
• knows how to select colors that match the color of objects;
• knows the order of gluing (first you need to lay out all the prepared parts of the application on a sheet of paper and make an image of the object, and then gradually stick them on);
• knows how to carefully glue (first you need to put the part with the colored side on the oilcloth, carefully pick up glue on a brush and apply it in a thin layer from the middle to the center, apply the side with the glue applied to a sheet of paper, gently pressing it with a cloth or napkin);
• knows how to stick simple objects (fruits, tree leaves) onto a sheet of paper;
• knows how to compose a subject application from 2–4 parts (house, traffic light);
• knows how to create a simple composition (a plate of fruit, flying airplanes);
• knows how to make patterns on a strip, square, rectangle, circle from prepared geometric elements, alternating them by color, shape and size (decorate a scarf);
• knows how to decorate a product using felt-tip pens (draw the eyes and nose of a hare);
• knows how to create an object not only from colored paper, but also from magazine paper, dried leaves and napkins.
If your child can't do any of the above, don't worry. You will still have time to catch up.
We wish you success!
Annual thematic planning of application classes
Class notes
Theme of the week: “Toys”
Lesson 1. Cube on cube (Colored paper. Applique from prepared parts of the object)
Program content.
Teach children to lay out cubes and squares in a certain sequence (by size). Introduce the method of applying glue with a brush to the back side of the figure from the middle to the edges; teach to apply the glue-smeared side to a sheet of paper and press it tightly with a cloth. Introduce the color blue, learn to correlate the color with its name. Cultivate compassion and kindness.
Demonstration material.
Cubes of three colors.
Handout.
Half of an album sheet; 3 blue squares (large, medium and small), cut out of paper; PVA glue, glue brush, cloth, oilcloth lining.
Progress of the lesson
Read the story “Cube upon Cube” by Ya. Taits to the children:
“Masha puts cube on cube, cube on cube, cube on cube. She built a high tower.
Misha came running:
- Give me the tower!
- I'm not giving it!
- Give me at least one cube!
- Take one cube. Misha reached out his hand and grabbed the lowest cube! And instantly - bang-bang-bang! “The whole Machine Tower has collapsed!” Ask the children: “Which cube should be given to Misha so that
did the tower collapse? (Upper.)
Let's help Masha build a new tower."
Place a landscape sheet and 3 blue squares (large, medium and small) cut out of paper in front of each child. The child must find the largest square and place it at the bottom of the sheet, then find the middle square and place it above the large one, and place the small square on top.
Tell the children that they now need to glue the cubes onto a piece of paper. Show them how to put glue on a brush, apply it in a thin layer from the middle to the edges, not on the colored side, but on the back of a small square, press it firmly to a sheet of paper with the greased side and blot off excess glue with a rag. The large and medium squares are glued in the same way.
Look at the resulting towers with your children and ask: “What color are the cubes from which your towers are built?” (Blue.)
Theme of the week: “Vegetables”
Lesson 2. Turnip (Colored paper. Applique from prepared parts of the object)
Program content.
Teach children to make a whole from two parts. Strengthen the ability to apply glue to parts and stick them onto a sheet, pressing with a cloth. Continue to introduce the color yellow, learn to correlate the color with its name. Develop memory. Learn to retell fairy tales based on illustrations.
Demonstration material.
Six cards, each of which depicts a hero from the fairy tale “Turnip” (grandfather, grandmother, granddaughter, Bug, cat, mouse) or a sheet of paper with schematic images of the heroes.
Handout.
Half a landscape sheet, blanks for turnips, cut out of colored paper (root crop and tops); glue, glue brush, rag, oilcloth lining.
Progress of the lesson
Read the Russian folk tale “Turnip” to the kids in advance.
During the lesson, remind the children of this fairy tale, show cards on which the heroes of the fairy tale “Turnip” are drawn and offer to arrange the heroes of the fairy tale in the right order: grandfather, grandmother, granddaughter, Bug, cat, mouse. (If you don’t have cards, you can sketch the characters on a piece of paper, leaving space in front of them for a turnip.)
Help each child make a turnip from two parts (root and tops). Show the kids how to apply glue evenly with a brush on the back side of the root crop from the center to the edges and stick it on the sheet, pressing with a cloth, and then stick the tops in the same way.
Ask the guys: “What color is the turnip? What color are the tops?” Ask the children to retell the story based on their work.
Theme of the week: “Fruits”
Lesson 3. Fruits in a vase (Colored paper. Application from prepared silhouettes of objects)
Program content.
Teach children to apply glue to the part and stick it to the sheet. Continue to introduce the color green, learn to correlate the color with its name. Cultivate a friendly attitude towards others.
Demonstration material.
Doll.
Handout.
Colored cardboard on which the vase is glued in advance; apples and pears cut out of colored paper in yellow and green colors; glue, glue brush, rag, oilcloth lining.
Progress of the lesson
Show the children the doll and say: “Guys, the doll Masha came to you for help. She got sick. The doctor said that she needs to eat more green apples and pears because they contain a lot of vitamins. But the doll doesn’t know which apples and pears are green.”
Invite the children to help the doll - put only green apples and pears in the vase. Place in front of each child colored cardboard, on which a vase and blanks cut out of colored paper have been glued in advance - apples and pears in yellow and green colors.
Children select green apples and pears and place them on a sheet of cardboard.
“Thank you,” says the doll and “takes” from one of the children a cardboard with fruit preparations (apples and pears fall). “Oh, how can I carry apples and pears home?”
If the guys don’t guess that apples and pears need to be labeled, tell them. Remind how to put glue on a brush, apply it in a thin layer to the workpiece and press it tightly to the sheet with a cloth.
At the end of the lesson, say: “Well done, guys! Now the doll won’t lose the fruit.”
Theme of the week: “Berries”
Lesson 4. Strawberries (Colored paper. Applique from prepared silhouettes of objects)
Program content.
Continue teaching children to stick parts on the sheet in the right place. Continue to introduce the color red, learn to correlate the color with its name. Cultivate compassion and kindness.
Demonstration material.
Doll, object picture, which depicts a strawberry bush with berries.
Handout.
Half of an album sheet on which strawberry bushes without berries are drawn and red strawberries cut out of colored paper; glue, glue brush, rag, oilcloth lining.
Progress of the lesson
Show the children the doll and say: “This is the girl Zhenya. She wanted to pick strawberries in the garden, but did not find a single berry. Zhenya is very upset.”
Invite the kids to plant berries on the strawberry bushes and treat Zhenya.
Place in front of each child half of a landscape sheet on which strawberry bushes without berries are drawn and red strawberries cut out of colored paper. Examine strawberry bushes with your kids, determine the shape and color of the berries.
Remind the children to apply glue to each berry and stick it to the tip of the branch.
At the end of the lesson, invite the children to give Zhenya a treat: give her strawberry bushes and berries.
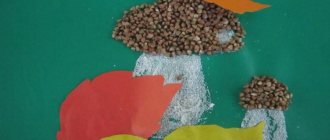
Theme of the week: “Mushrooms”
Lesson 5. Mushroom (Colored paper. Application from prepared parts of the object)
Program content.
Improve children's ability to make appliques and apply glue to parts. Learn to accompany the words of the poem with movements corresponding to the text. Develop precision and coordination of movements.
Handout.
Landscape or tinted sheet of paper; blanks cut out of colored paper: grass, mushroom details; glue, glue brush, rag, oilcloth lining.
Progress of the lesson
Talk to the guys about mushrooms, tell them where mushrooms grow, what time of year they appear. Tell the children: “Today I invite you to go for a walk in the forest. I will read a poem, and you repeat the appropriate movements after me:
In the morning the children went to the forest (Steps with high knees.)
And they found mushrooms in the forest.
(Measured squats.)
We bent over, collected,
(Bent forward.)
We got lost along the way.”
(Rhythmic spreading of arms to the sides.)
Invite the children to depict a mushroom in the applique.
First, they must place the blanks - the details of the mushroom and the grass on the sheet, then apply glue to the stem of the mushroom and stick it on, then apply glue and stick on the cap. The grass is glued last.
Tell the kids a riddle about a mushroom:
Antoshka stands on one leg.
Ask the guys: “Can we say that the mushroom has one leg? (Can.)
What else does a mushroom have?”
(Hat.)
Theme of the week: “Autumn trees and bushes”
Lesson 6. Maple (Colored paper. Collective applique from prepared silhouettes of objects)
Program content.
Strengthen children's knowledge about the rules of sticking. Introduce the color orange, learn to correlate the color with its name. Consolidate knowledge about yellow, green, red colors. Continue to learn to understand and analyze the content of the poem.
Demonstration material.
Half a piece of Whatman paper with a maple tree without leaves on it.
Handout.
Maple leaves cut out of colored paper (yellow, red, green, orange), glue, glue brush, rag, oilcloth lining.
Progress of the lesson
Read the poem “Maple” by D. Rozalieva to the children:
The maple moves its branches, shedding its leaves. A cloud runs across the sky, dropping droplets.
Give the children one maple leaf cut out of paper. Draw the children's attention to the shape of the leaves - it resembles a star. Tell the children: “Run up to me, everyone who has yellow leaves!”
Children, holding yellow maple leaves in their hands, run up to the adult and then return to their seats. Then the guys with red (green, orange) leaves run up.
Show the children a piece of whatman paper with a maple without leaves on it and suggest: “Guys, let’s give the maple its leaves back.” Each child must apply glue to their own leaf and stick it to a tree branch.
At the end of the lesson, say: “Well done, guys! You’ve got a real autumn maple!”
Theme of the week: “Autumn”
Lesson 7. Sun in the clouds (Colored napkins. Cutting along the contour and appliqué from large lumps of paper)
Program content.
Teach children to create a plot composition from a broken circle along the contour and crumpled lumps of napkins. Learn to glue rolled up large lumps of paper onto cardboard. Strengthen the ability to understand and analyze the content of a poem.
Handout.
Napkins of yellow and white colors, a sheet of blue cardboard, glue, a glue brush, a rag, an oilcloth lining.
Progress of the lesson
Read the Armenian song to the children:
– Where does the sun spend the night? - In grandma's bed. - Who is his grandmother? - Blue sky. - What will it cover with? - A woolly cloud. -Who will cover him? - Grandfather is the wind.
Ask the children: “Where does the sun sleep? (In the sky.)
What color is the sky?
(Blue, blue.)
What covers the sun?
(A cloud.)
What color are the clouds?
(White, gray.)
Now you and I will also put the sun to bed.”
Show the children a blue piece of cardboard and ask: “What does it look like?” (To the sky.)
Then show them the yellow napkin and ask: “What do you think can be done with this napkin?”
(Sun.)
Give each child a yellow napkin and help them tear it in a circle to make a “sun.”
Show the children a white napkin and ask: “What can you do with this napkin?” (Clouds, clouds.)
Place a white napkin in front of each child and offer to tear the white napkin along a line into four parts, crumple each part - you get four clouds. Now we need to place the sun and clouds in the sky. The child sticks on the sun first, and then the clouds.
Theme of the week: “In the forest”
Lesson 8. Leaves from the forest (Applique from dried leaves)
Program content.
Show children that the applique can be made from dried leaves. Learn to relate an object to its shape. Continue to teach how to accompany the words of the poem with movements corresponding to the text. Cultivate compassion and kindness.
Handout.
A landscape sheet on which colored outlines of two leaves of different shape and color are drawn; dried leaves of appropriate shapes and colors; leaves cut out of colored paper; glue, glue brush, rag, oilcloth lining.
Progress of the lesson
Give the kids leaves cut out of colored paper and invite them to play with these leaves while listening to the poem:
The leaf flew up, (Flash the leaf).
The leaf is spinning, The leaf is spinning,
(Twist the leaf.)
It falls under your feet.
(Lower the leaf to your feet.)
The leaf is torn, torn, torn.
(Tear the leaf.)
The leaf wrinkles, wrinkles, wrinkles.
(Crumple up the leaves.)
Play out the situation that two Leafs came to visit the children from the forest: everyone in the forest tramples them, the Leafs want to find their home.
Place in front of each child a landscape sheet with colored outlines of two leaves of different shapes and colors drawn on it, and ask them to find a house for each leaf.
Tell the children: “In order to prevent the leaves from losing their houses again, they need to be glued: apply glue to the back of the leaf with a brush and press it to the paper with a cloth. So we hid the leaves in the houses.”
Applications for 4th grade
At the last stage of primary education, children finally develop the skills necessary for creativity. All that remains is to focus on further developing skills in working with materials and revealing the abilities of each student.
Classes must be conducted with the aim of maximizing creative potential, so that each student creates a completely unique and extraordinary work.
At this stage, applique classes should be partially transferred to home in the form of homework. Parents can help their child in the creative process by bringing in their ideas and showing other techniques for creating an image.
Plus, working on an applique together is a great way to spend time together!
Regular applique practice can significantly enrich your imagination and even develop accuracy. This is a rather painstaking process, and, moreover, when the work is finished, it is necessary to clean the workplace.
Creative development when practicing applique in childhood helps people of all kinds of professions in adulthood, for example, designers, architects, engineers and constructors, since this type of creativity develops creative thinking.
Striped furniture
Applique:
Striped furniture.
To consolidate children’s knowledge on the topic “Furniture”, to activate the vocabulary on this topic;
Develop children's creativity and imagination;
Foster independence and activity;
Reinforce techniques for careful use of glue;
Learn to compose an image from strips of different lengths, following a certain sequence; place it correctly on the sheet;
Materials:
strips (10 cm and 5 cm * 11.5 cm), flannelgraph, strips of velvet paper, glue, napkins, maples, brushes.
1h
. Creating a game situation.
Reading the fairy tale “The Three Bears.” Remember the fairy tale “The Three Bears” with your children. Find out what Mashenka broke.
Show the children the stripes (one long, one short, for each child) and say that such stripes remain after the application and should be thrown away. But one day the stripes “revolted” and said that they could also be useful: “We can make different furniture,” they said.
Conversation with children about furniture. Find out what kind of furniture can be made from such strips.
You can sleep on the bed,
Chairs, table - rearrange.
I will put books in the closet,
I will cover the chairs.
Invite the children to draw an image of a table or bed on a flannelgraph. The teacher accompanies the drawing of the image with a comment, while naming the parts of the furniture: table top, legs, back, etc.
When laying out an image on a flannelgraph, the teacher asks the children to lay out the same image on sheets of paper.
We slept on the bed
Things have already been put away in the closet.
We sat on a chair
And we ate at the table.
3h
. Independent work.
After the children have posted all the images, offer to stick on the piece of furniture they like and give it to the three bears in the hut. When doing the work, the teacher reminds you of the sequence of laying out: first you need to lay out the long strip, and then the short ones; about the correct location on the sheet - in the middle, about accuracy. When gluing, learn about the rules for working with glue.
Ask the children what they did? What is this or that furniture for? Name the parts.