Fairy tales are limitless material for work. To awaken an interest in creativity in young children, it is better to make crafts based on the themes of children's stories.
This will hold the child’s interest for a long time, and while working, you can read fairy tales with your baby.
The child’s imagination will run wild, and it will be easier for him to make figures of certain characters.
Materials for work
The set of materials depends on what kind of craft will be made, because they have their own characteristics. The main materials will be plasticine, glue, colored paper, paints and brushes. Materials for crafts can also be natural materials: acorns, dried flowers and leaves.
Craft ideas based on children's fairy tales
There are a huge number of ideas for creations on fairy-tale themes; you can depict individual characters, as well as entire scenes. Crafts can be either flat in the form of paintings or three-dimensional with small sculptures.
Plasticine Alyonushka and little brother goat
Based on the fairy tale “Sister Alyonushka and Brother Ivanushka,” where the main characters were the girl Alyonushka and her brother, who turned into a kid, you can make a composition from plasticine.
To create a picture you need to take colored cardboard of blue or cyan color, indicating the sky:
- Prepare in advance an image of Alyonushka and Ivanushka, turned into a kid, so that you can visually see the picture.
- To make panels, take plasticine of different colors or salt dough. If you take the dough, then prepare more paints and brushes in advance.
- Looking at the picture, you sculpt the figures of the characters.
If you are making a craft from colored plasticine, then the colors are selected in accordance with the picture.
If you decide to sculpt figures from salt dough, you need to make the material itself. To do this, take flour, salt and cold water. Water 200 ml, flour 300 ml, salt 300 gr.
If you plan to make a very small product, then you can take fewer ingredients, the main thing is to maintain the proportions, the same amount of flour and salt, and less water. The dough should have the consistency of plasticine.
Rocker with buckets made from popsicle sticks
Based on the famous fairy tale “Emelya and Pike,” you can create an interesting composition with wooden ice cream sticks, depicting a rocker and buckets:
- You need to make two small tubes, glue thick cardboard so that you get a small roller. Cover them in a circle with ice cream sticks on top.
- Cut narrow strips from pieces of leather or thick brown fabric and tie them around the bucket in two places, top and bottom.
- Next, you need to make a rocker from a piece of leather cut in a semicircle.
- Wrap the leather with wire and secure the edges of the wire to the edges of the buckets so that the composition looks holistic.
- You can make “legs” underneath the buckets - attach a wire tightly wrapped in a spiral, and you can wrap a rope around it on top for greater aesthetics. And at the bottom, fashion bast shoes from brown plasticine or colored salt dough.
Paper bun applique
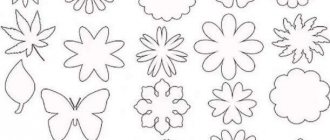
You can make a simple applique out of colored paper even with the youngest children. To do this, you need to stock up on paper glue, colored paper, cardboard, brushes and scissors with rounded edges if you are doing this with a child:
- You can take a picture from the fairy tale Kolobok for help and try to reproduce this picture from colored paper.
- Cut out the bun itself in a circle from yellow paper and create surrounding objects - a Christmas tree or a tree, a green background that will represent the grass and the house from where the bun escaped.
- Initially, you can take blue cardboard so as not to cut out the sky background separately.
- Glue everything with paper glue. It is better to spread the glue with a brush so that there are no unevenness on the application. It will be interesting for the child to do this work, because he will see how a whole picture comes to life from ordinary pieces of paper.
Pasta bun
A three-dimensional Kolobok figurine can be made from a food product - pasta. No matter how unusual it may sound, you can make a lot of different products from pasta, not only edible ones:
- To make a Kolobok, you need to inflate a medium-sized balloon to make it easier to create a ball shape.
- Next, it’s a matter of technique, you need to take pasta, preferably in the form of stars or flowers, and good quality glue that can glue such products together - PVA glue or superglue.
- Then the pasta is glued together in the shape of a ball until it forms a hemisphere.
- When the Kolobok is almost ready, you will need to burst the ball and pull it out until the entire space is sealed.
- Next you need to add the ball shape. You can glue eyes, a nose and a mouth cut out of colored paper to the finished bun.
- This work can decorate your kitchen or child’s nursery.
Craft “Frog Princess” made from salt dough and colored paper
The next work on the basis of which the craft will be made is “The Frog Princess”. The composition will be voluminous from salted dough, the recipe for which is described at the beginning of the article. Colored paper will be used here.
Before making this composition, it is better to read this fairy tale with your child so that he can imagine who the frog princess is and why she is famous.
To create a three-dimensional figure, it is better to take images of the frog princess to make it easier to recreate the shape:
- The backing for the composition should be made of blue cardboard - this will be water.
- It is better to cut out the water lily leaf under the frog from a thick green sheet of paper.
- Before sculpting, you need to prepare acrylic paints, with the help of which the main character will be painted.
- Frog parts are molded separately from salt dough, and a figurine of a sitting frog is molded from them.
- The frog's body is painted green, the belly is a light yellow tint.
- An arrow, which was shot by the famous Ivan Tsarevich, is placed in the frog's legs.
- A crown is attached to the head of the “princess”. A reed made of colored green paper is glued around the edges of the island with a figurine.
- Characteristic reed inflorescences are made from toothpicks and plasticine.
You and your child will love the resulting scene; it will bring an element of a fairy tale to the children's room.
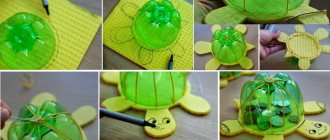
Volumetric craft on the theme of the fairy tale “Turnip” made of cardboard
You can make almost an entire “theatrical” scene for the Russian folk tale “Turnip”. Based on the famous work, the whole family tried to pull a turnip out of the ground, and only the mouse was able to exert maximum impact, and thanks to it, the turnip succumbed.
To make the work, you need to take thick cardboard, preferably from an old box. On this substrate, make an impromptu vegetable garden - cut out grass from green paper and glue brown paper to represent the ground.
The turnip itself and the characters can be cut out of cardboard, made into cardboard stands in the form of cones and placed in the sequence in which they are described in the work. Or sculpt them from plasticine.
You can create an environment near the characters - sculpt a house and attach trees cut out of cardboard. It turns out to be a whole “live” scene.
Winter hut made of cotton swabs
A winter hut made from cotton swabs will be a very interesting and beautiful product, especially during the New Year holidays.
For production you will need hygienic cotton swabs, glue and cardboard.
This house is made according to the principle of making a house from matches. The sticks are folded parallel to each other:
- A small drop of glue is applied to the place where the cotton wool begins to run out.
- Next, sticks are placed on top, positioned perpendicular to the first sticks. They are held together using glue, thus creating the entire house.
- After the frame is created, the roof is made.
- You can make it up by putting the sticks next to each other and gluing them together with the body. But it is very difficult and you need a lot of glue to keep the sticks in place. You can simplify the situation and fold a thick sheet of paper in half, it will represent the roof.
- Cotton swabs are glued tightly to each other on top of it. The beautiful snow-white house is ready!
On top you can decorate it with rhinestones, rain, beads, snowflakes or stars and the holiday atmosphere will enter your home along with this beautiful craft.
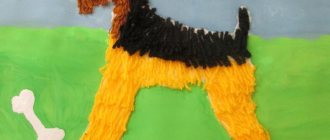
Miracle tree made of buttons
A Magic Tree made of buttons can become a beautiful picture that decorates any, even the most modern and fashionable apartment. In many fairy tales there are good helpers - magic trees. You can recreate the same helper and talisman for your family from ordinary buttons.
You can depict it on a uniform background, or you can create an all-season look using colored cardboard or colored paper. To do this, you need to take a large A3 sheet and visually divide it into four parts with a pencil. Next, cut out 4 different backgrounds from colored paper for winter, spring, summer and autumn.
Glue the colored rectangular pieces onto the surface, it will be divided into several parts. Then you can cut out a tree trunk in the middle from brown construction paper, or you can paint it with acrylic or any other thick paints.
Then buttons are selected according to the color of the season: for winter - blue, white and light lilac, for spring - light pink, light green, light yellow. For summer - bright and dark green and for autumn - orange, red and bright yellow. They will represent the leaves of the tree.
Next, the buttons are glued evenly in accordance with the time of year on the background. The result is a very bright and unusual picture, reflecting the changing seasons.
Pushkin Goldfish made of beads
Well, what would we do without the fairy tales of the great Alexander Sergeevich Pushkin. A wonderful and unusual character in his tales is the goldfish. You can try to create it together with your child.
If you have the skill of beading, you can weave it, but with children it is better to use a simpler option, making the craft by gluing it onto a flat surface. For production you will need: blue or light blue cardboard, yellow, orange and golden beads, PVA glue:
- On cardboard with a pencil you need to draw the silhouette of a fish.
- Next, use orange beads to lay out the main body of the fish, then the tail can be depicted with yellow beads and the tip of the tail highlighted in gold.
- The upper fin should be larger in size, it can also be made by combining two colors - yellow and golden.
- On the head of the fish, mark it with black or dark blue beads, or better yet, with a button for its eyes. It should be larger than the main beads from which the picture is made.
- On the sides of the fish, cut out algae from colored cardboard and place them on the sides.
The finished painting can be framed, it will be a very beautiful “fairy-tale” work.
DIY laptop “Visiting a fairy tale” for kindergarten
Kosova Lyubov
Lapbook “Visiting a fairy tale” for kindergarten with your own hands
Master class on making a laptop with step-by-step photos .
Description: a master class on making a laptop will be interesting and useful for preschool teachers, additional education teachers, parents for joint activities with their children and , of course, direct child participants.
Purpose: to introduce the stages of making a laptop .
Literally translated from English, lapbook means “book on lap”
. This is a book that needs to be assembled, its individual parts glued together into a single whole, and creatively designed using all sorts of colors and shapes.
The laptop meets the requirements of the Federal State Educational Standard for a spatial subject-development environment and provides:
• the ability to take into account the individual abilities of children (tasks of varying complexity)
;
• variety of game tasks;
• integration of different types of children's activities (speech, cognitive, play)
;
• the opportunity to diversify the most boring topic;
• teach a simple way to memorize;
• unite a group of children (the whole family)
for a fun and useful activity;
• compact storage (a large number of different games and tasks in one folder)
;
• variability in the use of tasks;
• the ability to add new tasks to “pockets”
.
Working with a laptop corresponds to the main directions of organizing partnership activities between adults and children:
• involvement of the teacher in activities on an equal basis with the children;
• voluntary participation of preschoolers in activities (without mental and disciplinary coercion)
;
• free communication and movement of children during activities (subject to the organization of the workspace)
;
• open time end of activity (everyone works at their own pace)
.
To create a lapbook you will need the following materials:
Ready-made templates for a laptop or custom-made ones. I used ready-made templates from our website.
Cardboard for the base. I used a shoe box.
The tape is double-sided and transparent.
Laminator. It is advisable to laminate the cut out templates and then cut them out again.
Adhesive based film.
I took the box, took it apart and cut off the excess. Covered it with film.
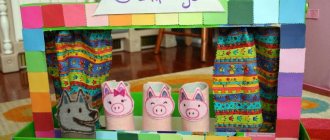
"Gates"
I combined it with a proverb and pictures of a bunny and a fox.
I collected a big pocket. a “gate” to it
with the image of a bunny and a fox. Then I glued the central background. I glued the assembled pocket to the base. I glued a pocket at the bottom and a window with a mouse at the top, having previously cut the window and attached a picture with a mouse.
I also designed side backgrounds that fold from the edge to the center.
I designed the external background of the laptop .
I filled all the pockets with pictures on the topic.
Lapbook is ready.
Thank you for attention.
"Fantasy Territory" Decorating kindergarten plots with your own hands The long-awaited summer has arrived. I really want the kindergarten area to look bright, lively and interesting in the summer! To stay on site. Photo report “Do-it-yourself summer decoration of a kindergarten site” for the senior group Dear friends and colleagues, I invite you to look at the photographs of our summer site. Goal: creating the necessary conditions for walking and... Photo report “Let's grow flowers for kindergarten with our own hands” Photo report “Let's grow flowers for kindergarten with our own hands” Spring has come. The snow has melted. I already want green foliage and warm sun. "Visiting a fairy tale." DIY toys Author: Marina Romakhova. The educational subject-spatial environment plays a huge role in the process of musical education of children.
Master class “Do-it-yourself non-standard physical education equipment for a kindergarten from waste material” Do-it-yourself non-standard physical education equipment for a kindergarten from waste material. Goal: production of non-standard equipment.
Master class “Cheerful little man”. DIY crafts for the kindergarten area Every year, during the summer, many educators try to update or diversify the educational environment in their group's area to create. Decorating a kindergarten plot with your own hands “Fairytale plot” In order for the plots next to kindergartens, decorated with your own hands, to be interesting for children, many conditions must be met. But.
Source
DIY crafts made from natural materials
Volumetric compositions and applications can be made from natural ingredients: dry leaves, cones, grass. You can make an old forest man from a pine cone and dry twigs:
- Take two cones, one longer, it will indicate the character’s torso, the other small, more rounded one will represent the head.
- The cones are glued to each other, small on top, extended underneath with the narrow side down.
- From the bottom to the long cone, two small branches are glued with PVA glue - the legs of the forest tree. They are “shoeed” with bast shoes made of brown plasticine. And eyes are glued to the top round cone; you can buy them at a sewing store or make them yourself from plasticine.
- The next step will be the forest tree’s hat, it can be made from a dry leaf of a tree or from birch bark, it needs to be folded into a cone and attached to the top of the cone.
- The old man's mouth is sculpted from a thin strand of plasticine.
- The woodsman’s hands are like tree branches, proportioned to the right size. In one of the “hands” you need to glue another branch as tall as the character. This is the staff of a magical forest dweller.
The unusual character is ready.
From dry leaves and twigs you can continue the composition and create a surrounding forest. This craft can be taken to a kindergarten competition dedicated to fairy tales; it will delight children and teachers.
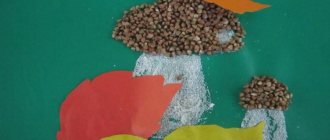
Application “The Fox and the Gingerbread Man”
The famous cunning Fox and Kolobok, who left his grandfather and grandmother, can be personified on a flat surface. Doing this type of creativity with your child develops their imagination very well.
For production you need cardboard, paper, paints, brushes, glue. To make drawing easier, you can take a ready-made picture of a fox and a bun and transfer the outlines through a transfer onto cardboard.
And you can also paint the background in the picture in advance, so as not to stain the characters with paint later. After the background has dried, you can glue wheat groats along the silhouettes of the characters. The world around the Fox and Kolobok can also be made three-dimensional, for example, trees and grass can be covered with grain.
After everything is ready and dry well, you can start painting. This must be done carefully so as not to touch unnecessary elements. After the paint has dried, the work is ready! Can be framed and hung on the wall.
Thus, we can come to the conclusion that, using various materials, imagination, ready-made pictures that you can focus on, you can create your favorite character from any fairy tale.
The child will be happy, the children's room will be filled with cozy and unusual compositions that will surprise your guests. It is very useful for children to engage in this type of activity, as they develop imagination, logic and hand motor skills.
You can experiment with different materials, complement them according to the logic of creating certain compositions, bring in something new and unusual, perhaps the child himself will suggest new ways.
You need to listen to your child, because children do not have a blurred view of things, like adults, and they can quickly find new approaches to solving a particular problem.
Russian fairy tales are distinguished by their unusual characters, they teach kindness, helping each other, not being greedy, not being afraid to go on adventures, and, of course, that good triumphs over evil.
Photo report about the project “Visiting a Fairy Tale” in the first junior group
Anna Golubyatnikova
Photo report about the project “Visiting a Fairy Tale” in the first junior group
Project type .
— Group.
Project implementation period : December 16-23
Project participants : children of the 1st junior group , teachers, parents.
The fairy tale has a pure soul ,
She comes slowly
In the cool hour of the night.
The native people are its creator,
He put his dream into it,
Like a golden casket.
Introducing children to fairy tales improves the child’s mind, helps them master speech, learn about the world around them, and develops a sustainable interest in fairy tales . Figurative, vivid expressions, comparisons, “ fabulous ”
linguistic means contribute to the development of expressive speech.
Low level of development of children's creative abilities and interest in reading fiction
Objective of the project :
- To form in children the concept of a literary genre - a fairy tale .
— To introduce children to reading fiction in the process of getting acquainted with folk tales .
— Teach children to emotionally perceive the content of a fairy tale .
— Cultivate a love for oral folk art.
— Instill interest in theatrical activities.
— Activate children’s speech activity.
Thematic week in the first junior group “Visiting a fairy tale” Topic: “Week in the first junior group “Visiting a fairy tale” Purpose: Introducing children to Russian folk tales! Tasks:1. Recall. Photo report of an open lesson for kindergarten in the first junior group “Visiting Grandma Arina” Hello dear colleagues! I would like to provide you with a photo report of an open lesson for kindergarten in the first junior group. Lesson notes. Photo report on the “Friendly Family” project in the first junior group Project type: Informational and educational. Project direction: Cognitive-speech, creative. Goal: Creating conditions for development. Photo report about the matinee entertainment “Snowman visiting the children” in the first junior group Photo report about the matinee entertainment “Snowman visiting the children”. The hall is elegantly decorated, there is a Christmas tree in the center, and children line up to cheerful music. Summary of the GCD in the second junior group “Visiting the fairy tale “Kolobok”” Purpose. Continue your acquaintance with Russian folk tales and consolidate the fairy tale “Kolobok”. Tasks. Develop the ability to listen and watch. Master class on making a lapbook “Visiting a Fairy Tale” for the first junior group Russian folk tales occupy an important place in a child’s life, starting from an early age. Through fairy tales, children learn about the world and develop speech. Autumn leisure in the first junior group “Visiting Grandma” Good evening, dear colleagues! I bring to your attention a leisure activity in the first junior group, “Visiting Grandma.” The hall is beautifully decorated.
Source