Children's creativity not only contributes to the development of artistic taste and fine motor skills, but also broadens the child's horizons. Creating landscapes using the appliqué technique will help kids learn the concepts of perspective and horizon. The theme of the autumn forest will help kids learn the signs of this time of year.
Tell your children about autumn and let them make crafts according to their taste, without being limited by rules. Even if the first works do not really meet the requirements, they are still beautiful, because the child filled them with his imagination and sincere love for this world.
Where to start?
So, regardless of which group you are conducting the lesson with, it is initially necessary to introduce children to the varieties of trees and shrubs.
After all, only a few of them will be able to name you more than 2 types of trees, not to mention shrubs. How can you do something you don’t know? Therefore, the teacher’s task is not only to tell, but also to show what this or that tree looks like. Perhaps you have teaching material on this topic: hand-drawn or printed from the Internet. But I recommend that you purchase demonstration pictures “Trees and Shrubs”, which can later be used in other classes. They cost just a penny, and the thick cardboard and large size of the cards will make you very happy.
The thematic picture dictionary “Flowers, Trees” will also serve well in classes where you need to get acquainted with the diversity of the plant world, depict it in the form of an applique or draw it. These two manuals will provide invaluable assistance to the teacher both in the initial stages of preparation for creative work, and in the case of a more in-depth study of the topic.
And of course, you will need templates to work. For the little ones, you will need to cut them out yourself, leaving only small elements for cutting - you need to practice using scissors from an early age. Students will only have to glue the necessary elements. For older children, “patterns” will be useful for tracing them on colored paper and then cutting them out yourself.
Ideas for autumn applications for kids: let’s use imagination
The smaller the child, the more demanding he is. It is always more difficult with the youngest part of humanity than with the rest. Here imagination and all sorts of little tricks come to the aid of parents. For example, you can make a fun autumn applique in just a few minutes. At the same time, the child will laugh with joy.
A simple option, which is already difficult to find simpler. Take just one yellow leaf from those that were blown onto the balcony by the wind (or, as a last resort, take yellow paper for applique).
The leaflet should look like in the picture:
Turn it over with the wide part facing down. Glue a sheet of cardboard. Draw legs and arms to it, one of which will have an umbrella. Glue a couple of larger buttons onto the leaf itself. And on them - a pair of smaller diameters. Draw drops of rain and a smile on the resulting cunning face. All. Cheerful yellow autumn man - the leaf is ready.
Time taken - 15 minutes. The child laughs with happiness. The parents breathe a sigh of relief.
Making the application “Autumn Kaleidoscope”
So, we will be interested in a multi-colored applique that would best symbolize a beautiful autumn tree. Pupils from the middle group can be offered a voluminous applique - with your help they will cope with this task perfectly. Such work will contribute to the development of fine motor skills, strengthening skills in working with scissors, and cultivating beauty and neatness.
To make the application we will need:
- sheets of blue cardboard;
- tree templates (ready-made colored or white for tracing);
- colored paper;
- pencil, glue, scissors, ruler.
Materials and tools
Before work begins, you should prepare tools and materials:
- Thick cardboard.
- Multi-colored paper.
- Scissors with rounded ends.
- PVA glue or stationery pencil.
- Wallpaper.
- Cotton wool.
- Felt pen.
- Cotton pads.
- Watercolor paints.
Stages of work
- At the first stage of work, we will prepare the silhouette of the tree. We give the kids cut-out blanks from brown paper; for the older ones, we give them stencils from cardboard or plastic, if available, to trace and cut out. Don't forget to offer children the safety scissors I mentioned above. When the tree is ready, put it aside for a while and work on the background.
- As you remember, we have blue cardboard as the background. You can cut out a semicircle from green construction paper and glue it in the middle of the bottom of the sheet. This will be the greenery on which we will place the tree. We also glue it on top. But there’s never enough greenery, right? Bright rich colors can decorate any application, so next you need to cut a thin green strip of paper and fold it across the entire width like an accordion. It will be weed. We glue it along the entire lower width of the sheet on top of the trunk.
- Next, perhaps, comes the most painstaking stage of work. We will make leaves. You can alternate the stages as you wish. You can first prepare all the elements of the image, and then all that remains is to glue them, or do everything in stages. I recommend that teachers make blanks for the leaves, since this will take a lot of time for children. For leaves you need multi-colored squares 3cmx3cm according to the color of the leaves: red, green, yellow, orange, light green, etc.
- Now we form the leaves directly, fold the squares like an accordion starting from any corner. When the accordion is ready, bend it in half and glue the middles together - these will be the original leaves. You need quite a lot of them to make the tree beautiful, so allocate more time for this work. One tree will require at least 30 leaves. Glue them onto the branches.
- The final stage of the applique will be clouds, which are formed from torn, crumpled blue paper and glued to the top of the background.
If you do the work at home with children, you can buy this interesting set of “Peppa Pig” applique, which can be planted under a tree.
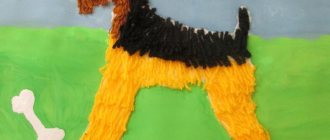
Family tree making technology
If you want to try something new in your work, then I suggest you do some applique work in the form of a family tree. In this case, it is advisable to make the crown of the tree whole; voluminous leaves are not suitable here. In this photo they look very sloppy.
What will happen on the crown depends on your imagination. You can stick apples on which children will write members of their family (suitable for a preparatory group) or flowers. You can also ask parents in advance to bring photographs of family members in the form of small circles. Such a craft can even take pride of place in the living room and become a family heirloom. There are a lot of options, choose depending on the age of your students.
Application options
Many people believe that such a craft can be made exclusively from colored paper, but there are other methods. You can stick it on cotton wool, cotton pads or any other elements. In this case, the result will be completely different. Therefore, we recommend experimenting, introducing your child to creativity and developing his original approach to creating things.
Flat paper applique
The standard way to create an autumn forest. To do this you need:
- Take a piece of paper of any color that seems most suitable - white, blue, green.
- Glue a strip of paper along the bottom to imitate the ground. More often they choose brown or green. Just choose this color that is contrasting with the background.
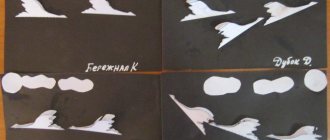
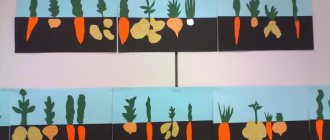
- Make several trees of different colors. It can be yellow, orange, dark green, brown, mustard. Here the child must draw the outline of the future tree on the back of the sheet, and then carefully cut it out.
- Don’t forget to cut additional trunks for each tree.
- Carefully, lubricating the back side of each blank, stick them onto the prepared sheet so that the trunks stand on the ground.
- Then suggest using a black or dark brown felt-tip pen to draw branches directly on top of the colored paper.
The technique is easy and accessible, even for small children. It is used in kindergartens.
Volumetric techniques
By working not only on a given theme, but also on texture, you can achieve a certain effect when creating an appliqué. There are several techniques for creating volumetric applications. Let's try to analyze the main and most effective of them.
Working with cotton wool
This method involves molding pieces of cotton wool into the required volumes. Fixing them to the main sheet. And then carefully painting the entire surface to create a specific color scheme for the entire composition.
This is done as follows in class:
- A piece of cotton comes off.
- It is necessary to prepare a small container of water to make it easier to mold the cotton wool.
- By dipping your fingers in water, give the cotton a certain look and shape.
- Lubricating or dipping one part of the cotton wool into glue, then fix it on the paper in the right place, while creating a tree crown.
- Take a brush with a fairly voluminous and thick bristle, dilute the paint of the appropriate color quite thinly, and with precise movements paint the cotton wool in the desired color. It is not necessary to achieve a continuous tone creation. It will be enough to apply it pointwise.
- Cut out trunks from paper and glue them under the cotton wool.
Application with cotton pads
It is necessary to invite the child to take cotton pads and color them in the desired color. Take into account and prompt the child that the final application will look most impressive if the cotton pads are painted with several shades of the same color at once.
Cut out a trunk from colored paper and glue it to the main sheet. Now start gluing cotton pads around the trunk and on top of it, forming the crown of the tree. Keep in mind that if they are placed one on top of the other, with a slight overlap, you can achieve greater volume of the composition and its effectiveness.
Make several of these trees, preferably painting cotton pads in different colors.
Composition of rolled strips of paper
In this case, a colored sheet of paper needs to be cut into thin strips of short length and glued into rings. Cut out the trunk and glue it to the base.
Drop a drop of glue onto the rings, preferably in the place where there is a seam on the paper. And fix it around the trunk in this way so that a crown is formed.
Please note that the rings can be glued both vertically and horizontally. This will result in completely different wood looks. Therefore, you can combine several methods on one application to get more texture.
Using methods for creating an autumn forest appliqué, you can arrange a real master class for your child, both at home and in classes in the garden or at school. Although, there are other ways that the teacher must also take into account when drawing up notes for the relevant classes.
Lesson: applique “Autumn”
The very first creative activity “Autumn Application”
awaits children in the junior group of kindergarten, where they are just getting acquainted with the simplest techniques of working with paper.
First, children need to be prepared for the creative process: while walking with children on the playground, it is necessary to draw their attention not to what changes in nature occur with the arrival of the first autumn months. The kids can talk about what the color of the leaves was in the summer and what it is now. Draw their attention to the fact that every day the leaves fall to the ground and soon the trees will remain completely bare, until, with the arrival of spring, small green leaves begin to appear on them again. The teacher must explain that such changes occur in nature every year, and each season has its own “unusualities”, which are reflected in fairy tales and stories of writers, in children's songs, riddles and paintings.
When you and the children return to the group, before the actual creative activity begins, you need to show them famous paintings that depict the autumn theme, turn on children's songs, and be sure to solve a few simple riddles together with the children.
In the younger group, creative activities should take place in a playful way, because kids don’t like to sit in one place for a long time, they want to be constantly on the move. And only after the educational game can the teacher invite the children to take their place at the table and start making applications on the theme of autumn for kindergarten
.
During the lesson, kids will acquire the first skills of composing a composition, because they will have to independently (and if necessary, with the teacher’s prompts) lay out leaves of different shapes on a paper base, and then carefully glue them. Perhaps this will be the child’s first experience working with glue, so first the teacher should show which side the paper form should be coated with glue, how to apply it to the base and how long to wait for it to stick.
During the lesson, the child will have an idea of what colors represent October - work will be done with yellow, red, orange.
Since the children of the younger group do the most, the teacher must independently prepare all the necessary material for them, make paper blanks, so that during the lesson the child only has to arrange and glue them correctly.
Cotton wool applications
One of the most popular and simplest ways to imitate snow for crafts is cotton wool. The work done in this way turns out to be voluminous and truly winter-like.
Snow covered trees
What you will need:
- blue or light blue cardboard;
- pencil;
- glue;
- cotton wool
Let's get started:
- Take cardboard and draw a tree trunk on it.
- We coat the branches with glue and put cotton wool on them.
- In the background we draw snowdrifts and a few more trees, make clouds and bushes.
- We glue the cotton wool to the snowy hills and along the contours of the plants. The picture is ready.
We use cotton balls
For the next craft we will prepare: cardboard, colored paper and several cotton balls.
- We cut out snowdrifts from a strip of white paper and glue them at the bottom.
- We make several trunks for future trees from brown paper and place them on cardboard. We put a snow cap made of cotton wool on each of the branches.
- We cut out patterned snowflakes or make small circles using a hole punch and paste them over the trees.
Forest of cotton pads
As an alternative to regular cotton wool, you can use cotton pads. Additionally you will need: colored cardboard, glue and scissors.
Let's start designing the application:
- To imitate snow-covered hills, take a cotton pad, cut it in half and glue it onto cardboard.
- Then we cut out several strips - these will be tree trunks. Glue them onto the snowdrifts.
- We make the crown of the tree from a whole disk.
- To add liveliness to our picture, we draw snowflakes. They can be cut out of paper, drawn with cotton swabs, or small circles of cotton pads made with a hole punch can be glued on.
Another craft option:
- We draw Christmas trees on several cotton pads: we got four, then we cut them out.
- From another disk we make a month and snowflakes.
- We take cardboard and glue a cotton swab in the middle at the bottom - this is the trunk of one of the trees.
- Cut several cotton pads in half. In our case - three. We glue them at the bottom with different sides - we get snowdrifts and snowy hills.
- Place a cotton pad on top of a cotton swab - this is the crown of the tree.
- We place the cut out Christmas trees on the snowdrifts. Glue the month and snowflakes.
House in the forest made of cotton swabs
Don't forget about cotton swabs. With their help, you get cute snow-covered trees and houses.
Let's take: cardboard, colored paper, scissors.
- Whole sticks are suitable for tree trunks, but to create branches you will need to cut them.
- To make it at home, place cotton swabs next to each other horizontally or vertically. Cut out a triangular roof from white paper and glue it on top. We make windows and doors from colored paper. You can do the opposite: cut out houses from paper, and lay out the roof from sticks.
- We also cut out clouds, snowflakes and snowdrifts from white paper.
Application on the theme “Golden Autumn” in the preparatory group: a master class for the delight of children
The main task of kindergarten teachers has always been the same - to keep the child busy so that he does not sit idle. There is no need to waste time. If it can be spent on educating the baby. Let the child make an applique with his own hands on the theme of golden autumn. Outside the window there are beautiful landscapes that are a natural visual aid for any kind of crafts.
What the preparatory group children will need to accomplish their plans:
- colored cardboard;
- colored paper;
- scissors;
- glue.
The first step is to prepare the base. Then the tree trunks (trees) and leaves are cut out. After all the planned blanks are made, the process of gluing them to the base begins.
- Tree trunks are first glued to a sheet of cardboard. It’s better to figure out what kind of trees these will be in advance.
- Then comes the turn of the leaves. They need to be glued so that the tree crowns are rich, thick and large. In the preparatory group, you can cut out, for example, maple, oak and birch leaves.
- Glue should not be applied to the entire surface of the cut piece. It is enough to coat only the edges. This is done so that the glued parts do not become deformed after drying.
- You should not make more than two trees on one sheet of cardboard: it will be difficult for the child, he will simply get confused in this forest of blanks. One or two is enough.
Tell your children what can be improved, how to make it more beautiful: they are looking for advice from their elders, although they may not ask for it.
Autumn forest made from rolled strips of paper
Prepare an autumn background for the application and determine the location of the trees on the sheet.
Three-dimensional trees can be made in three ways.
The first method: cut strips of 1x5 centimeters from colored paper in autumn shades. We glue each strip into a ring, the colored side out. Glue the resulting rings sideways onto the trunk in a chaotic manner. Try to glue so that the joint line is hidden at the bottom.
Second method: Cut a strip of paper 1.5x20 centimeters and wind it in a spiral around a pencil. Make 10 spirals in this way and glue them to the paper, placing them like rays from one point in the center of the trunk.
Glue smaller leaves on top of each spiral. Leaves can be cut out using a template or punched out with a hole punch.
Third method: willow or birch. Cut out many strips of 0.5 x 20 centimeters and screw them very tightly onto a toothpick so that you almost get a tube. Draw a willow or birch trunk with drooping branches. Glue the resulting spirals to the ends of the branches.
Application on the theme “Trees” for children of the preparatory group: instructions and useful tips
Children of the preparatory group can make an applique on the theme “Trees” not only from paper, but also from plasticine. But first things first.
First, let's see how to make an applique from colored paper:
- To do this, you need to take a sheet of brown paper. If it is not monochromatic, but with small third-party inclusions, it’s okay. A tree is drawn on the selected sheet. You can use ready-made templates if available. But still, if a child draws a tree on his own, it is much more useful.
- Next, carefully cut out the drawn tree with scissors.
- The approximate height of the tree will be 20 cm from an A4 sheet. Then we prepare the leaves: you need to cut squares of different colors about 3cm x 3 cm. After the leaves, you make a preparation for the grass - a green rectangle 2cm x 28 cm. The squares need to be folded like an accordion, starting from the corner. The grass blank should also be folded like an accordion, but in width.
- When the blanks for the tree itself are ready, you need to make a small mound on which the tree grows. To do this, fold a green rectangle 9cm x 4cm in half. Use scissors to cut along an arc. Unfold - you get a regular semicircle. Now you need to complete the formation of foliage. Bend the accordion, which is made from colored squares, in half and glue it in the middle. Glue a cut out mound to the center of the bottom edge of a sheet of blue cardboard. In the center of the mound, retreat 1.5 cm from the bottom of the cardboard sheet. Glue the wood blank. Stretch the accordion of grass along the entire length of the bottom edge of the cardboard. The grass should cover the “roots” of the tree.
- Now the formation of the tree crown begins. You need to glue the leaves, trying to ensure that the colors do not go in a row. More leaves mean a more luxuriant crown. You can stick a couple of leaves that are not attached to anything, creating the effect of leaves torn off by the wind and floating in the air. All that remains is to make the sky. In fact, the sky itself already exists - the cardboard is blue, there is no need to highlight the sky on it. But the clouds will need to be made. For this, take blue paper. You can cut out the clouds, or you can simply tear the paper into small pieces. All that remains is to glue them to the top of the cardboard without any order.
The tree against the background of the autumn sky is ready, mind you, without any effort. But, if you want to complicate the drawing, it all depends on who is doing the appliqué. There would be a desire. The pictures below show several options, which are also quite simple to do.
Autumn forest applique made from cotton pads
This technology is perfect for children aged three years and older. Since the disks are quite large, this method is more suitable for single trees. Prepare red, orange and yellow paints. For this craft, it is better to use gouache, as watercolor will give lighter colors.
Paint 10-15 discs and dry. You can paint with a brush or dilute the paints and drip from a pipette. If you use several colors on one disk, the colors will mix with each other and give new shades, which will allow you to more fully convey the color scheme of autumn.
Glue the barrel onto a sheet of paper and painted cotton pads on top.
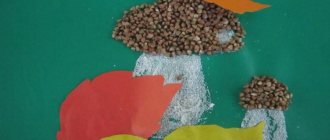
Application “Autumn tree” made from pumpkin seeds
In order to create this work, you will need:
- sheet of cardboard
- paints
- glue
- pumpkin seeds
- tree stencil
The first step is to create the autumn leaves. This application involves the use of pumpkin seeds, which are previously painted in different colors. It is advisable to use yellow, orange and red colors.
Coloring can be done with both paints and felt-tip pens. On a sheet of paper you need to draw a barrel with paint or use a stencil. Then the work will be more accurate. Now all that remains is to glue the leaves to the tree.
The work is ready.
Autumn tree in the younger group
For the activity, prepare a cardboard background sheet, strong glue, clean pumpkin seeds, a tree trunk template, and gouache paints.
Do the job like this:
- Place the seeds on oilcloth or newspapers, paint them with gouache in autumn colors: red, burgundy, red, yellow.
- On a sky-colored background cardboard, draw a tree trunk according to the template.
- Carefully glue the dried seeds to the branches.
Application “Autumn tree” made of autumn leaves
To work you will need:
- autumn leaves,
- cardboard with a silhouette of a tree,
- glue.
It is advisable to use bright colors of cardboard, so the tree will be more noticeable.
For work, you need to choose beautiful and undamaged dry leaves. They are cut into strips. To continue the task of appliquing autumn leaves, you need to prepare glue and a brush. The branches of the tree are coated with a brush. Dry leaves are placed on these branches. All that remains is to let the work dry.
Application “Autumn tree” made of colored paper
To prepare such a fun applique, you need the following materials:
- colored paper
- cardboard
- glue
- disposable cardboard plate
First you need to take colored paper and tear it into small pieces. If you perform a cutting appliqué on an autumn tree, this significantly improves fine motor skills. Next, a disposable cardboard plate is greased with glue. Colored paper should be glued randomly onto it. This will be the crown of the tree.
Now you need to cut a rectangular piece of colored paper. This will create a tree trunk.
To make the work more beautiful, you can draw dark stripes on the tree trunk with a marker. After this, the finished parts are glued onto cardboard. This kind of work turns out to be voluminous and quite interesting.
Sources
- https://metodbv.ru/applikatsiya-derevo-iz-tsvetnoj-bumagi/
- https://gidrukodeliya.ru/applikaciya-osenniy-les
- https://academy-of-curiosity.ru/tvorchestvo/podelka-zimnij-les/
- https://podelunchik.ru/applikacziya-osennij-les
- https://masterimrukami.ru/applikatsii-osennee-derevo/
[collapse]