Summary of a lesson in the middle group on the application “Spring. Signs of spring."
Lesson summary for the middle group on application
"Spring. Signs of Spring" .
Target:
Strengthen the skills of cutting and making collective appliqué.
Tasks:
consolidate the ability to identify signs of spring;
continue to develop children’s coherent speech, thinking, and memory;
consolidate the ability to cut corners of a square to obtain a rounded shape, cut a sheet of paper along a planned and imaginary line, carefully glue parts, work with different types of paper in different ways;
consolidate the ability to hold scissors correctly and operate safely with them.
cultivate interest in the world around us and the changes occurring in it.
Material:
blanks for collective application, glue, brushes for glue, oilcloths, napkins for glue, prepared background for crafts, object pictures, plot pictures for the game.
Educational areas:
Cognition.
Consolidate knowledge about the season: spring.
Ability to work with paper
ability to navigate on a sheet of paper.
Communication:
Exercise children in forming words by analogy. (diminutives)
Health:
develop basic mental processes: memory, attention;
correctional work: develop fine motor skills of the hands.
Socialization:
cultivate a culture of behavior and the ability to perform the assigned task.
Preliminary work:
Conversations about spring and viewing illustrations on the topic. Cutting out parts from colored paper for a collective applique: butterflies, birds.
PROGRESS OF THE CLASS:
Org. moment
:
Educator: Guys, do you want to know what I brought you today? Yes? I brought you a smile and I want to share it with you. Let's smile at each other.
Conversation:
Guys, what time of year is it now? Why? Name the signs of spring (children, looking out the window, name the signs of spring). Remember the name of the spring months.
(n/game “What did the artist mix up?”)
Now let's play. There are pictures on the table depicting the seasons, but the artist has mixed everything up and needs to find the mistakes.
(Children look at the pictures and name mistakes in a conversation).
Main part:
And now I will show you my picture. What time of year does it depict? Notice how sad and cheerless she is. Let's take a look and think about what is missing there?
(children look at the “Spring” background and offer to add the missing spring details).
Let's revive this picture and make it beautiful and colorful together.
I have prepared paper blanks, and we will depict the signs of spring that we have listed on paper using appliqué.
(Children choose what details of the picture they will create).
(repetition orally of ways to create selected parts of the picture)
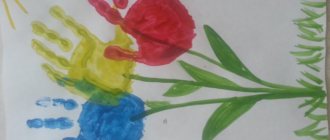
Application “Blossoming Apple Tree”
For the craft you will need:
- blue or light blue cardboard;
- colored and white paper;
- scissors;
- glue.
- The work itself is a twig of an apple tree.
- Having cut out a branch from brown paper, we begin to create flowers and leaves. 5-6 pieces are enough for one application.
- The leaves should be elongated oval in shape. Using a green pencil or pen, create a drawing of the “skeleton” of a leaf.
- To complete the spring composition, cut out silhouettes of dark-colored birds.
- After collecting all the parts, indicate to the children the contours of the finished work. The main thing is to give them a clear step-by-step description of each step.
- Let your artwork dry.
Video: Lesson on forming the application “Apple Flowers from Paper”
Spring crafts using origami technique
Flowers made using the origami technique look very beautiful. For them, it is better to use special double-sided paper, and manufacturing diagrams can be found on the Internet. It's better to start with simpler designs, such as a flat tulip. Such a flower can not only be placed in a vase, but also used to make a “Spring” applique.
Take a square of red paper and fold it in half diagonally, turn the resulting triangle with its base towards you and lift the left and right corners up at some distance from the central corner.
You should get a figure that resembles a crown. We bend the resulting corners on the left and right sides back, forming the silhouette of a bud. For the sheet, take a square of green paper and fold it like an airplane, then on the opposite side fold it like an airplane again.
You should get a narrow rhombus. Fold it in half along a long diagonal. You need to make two such sheets, which are folded with their lower parts one into the other. For the stem, take a green cocktail tube, attach it between the leaves, and attach a flower on top.
Crafts for May 9
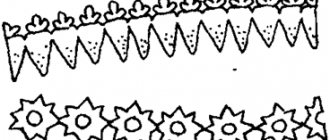
In the last month of spring, Victory Day in the Second World War is celebrated. In honor of this holiday, you can make a brooch from a bouquet of carnations with a St. George ribbon.
We cut out a strip of 30 cm and 3 cm wide from red corrugated paper. We make teeth along one edge. Apply glue 1 cm wide to the strip along the edge without teeth and wrap it around the tip of the skewer with a roll.
Then we cut out a 1x30 cm strip of green corrugated paper, grease it with glue and begin to wind it first like a sepal, gradually going down the stem. We tie a bouquet of three carnations with St. George's ribbon, and sew a pin at the back.
Crafts for Easter
The bright holiday of Easter falls in spring. The traditional symbols of Easter are Easter cakes and decorated eggs, but recently the Easter bunny has been added to them from the Western tradition of celebrating Easter. You can combine these two traditions and make a bunny with an Easter egg-shaped body, which would be a great spring craft for the garden.
Note!
- DIY crafts for March 8 step by step - a review of the most beautiful crafts for International Women's Day (120 photo ideas)
Diaper cake for a girl - 180 photos of ideas for original diaper cakes + DIY instructions with examples of finished products
- Craft letter: TOP-140 photos and simple diagrams for creating crafts with your own hands. Options for unusual letter ideas + step-by-step master class
Prepare two small balloons, one larger in the shape of an egg, the second round, half the size. Take paper towels or napkins, tear them into pieces 2x2 cm. Glue the first layer of pieces of napkins onto water without glue, the next layers onto PVA.
It is necessary to stick 8-10 layers, each layer must be uniform and without holes. There is no need to use a lot of glue, because the product will “float”. We completely dry our product and check that it holds its shape, then cut a hole and remove the burst ball. If the product does not hold its shape, then make 5 more layers and dry again.
We paint the egg-shaped ball with traditional Easter motifs. We paint the round ball white, glue on the ears and draw a muzzle. Cut off a circle from the top of a large ball and insert a small ball, so that you get a body with a head. Cut out the legs and glue them to the body. The head can be glued, or you can leave it like that, then it will be a box for Easter sweets.
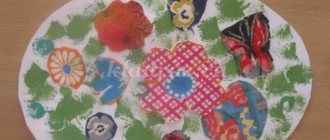
Spring bells made from napkins
For work you will need plain napkins, white and green paper, colored cardboard.
Cut out templates from white paper as outlines for future flowers. One job will require 5 elements of different sizes.
Also prepare the stem, leaves and bases for the bells in advance. After this, cut the napkins into 1.5 cm strips. Crumple each piece into a random lump. Apply glue to the white paper outline and begin gluing napkin balls to it.
The finished children's craft will look like in the photo.
Safety precautions
It is very important to follow safety precautions while working.
Note!
DIY military crafts step by step: 150 photos of the best craft ideas for children for school or kindergarten
- DIY crafts for May 9 step by step: 150 photos of the best crafts for Victory Day
DIY crafts for February 23rd step by step: master class with photos and descriptions of how to make crafts for Defender of the Fatherland Day
It is forbidden:
- Waving scissors and brushes, pointing them somewhere, pointing them in the face of oneself or others, sticking them in the ears
- Putting paper, materials or tools in your mouth
- Cluttering the workplace
- Spin around in your chair
Search for creative ideas
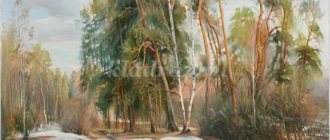
The world around us is an inexhaustible source of creative ideas. It is very important to be able to stop and see the unusual in ordinary things. Seasons change each other, nature falls asleep and wakes up, but people do not notice this in their everyday running.
Look around, feel the breath of life, calmness and love, then new creative ideas will immediately appear.
Workplace equipment
First of all, you need to take care of a comfortable workplace. It will be difficult to create a beautiful thing in uncomfortable conditions. The best workplace is a desk. It can be a small play table for two-year-old children or a desk for younger schoolchildren, the main thing is that it is suitable for the child’s height.
When working with glue or paints, it is better to cover the table with oilcloth. The workplace should not be littered with extraneous things. In front of the child there should be a free working surface measuring about 40x30 cm.
To the left of it, closer to the center of the table, place a trash box. The tool should be on the right, and the materials should be in front of the child, but not on the work surface. Don't forget to prepare a stand for the glue brush.
Choosing a color scheme for crafts
When looking for creative ideas for DIY spring-themed crafts, it's important to keep the spring color scheme in mind. The main colors are the color of fresh greenery and the first flowers.
The first leaves do not have a very rich color; as a rule, they are soft green. And the first flowers are either white, like snowdrops, or pastel, like primroses. As summer approaches, natural colors become more saturated, green becomes brighter, and flowers amaze with the variety and richness of their colors.