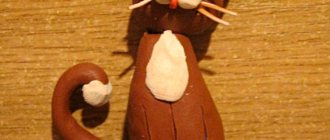
How to make animals from plasticine. Master Class
Modeling from plasticine for children 5-6 years old is no longer difficult, since most of the techniques have already been mastered. With the help of step-by-step instructions, a child of this age can easily sculpt a cute figurine of this tiger, consisting of simple parts.
The sequence for creating a tiger is as follows:
- 1/3 of a block of bright orange plasticine is cut off. Both resulting pieces are rolled into balls.
- The small ball will be the tiger's head. From the second ball, part of the plasticine is pulled out into an oblong body.
- Using a toothpick or match, connect the head and body together.
- From the second block of orange plasticine, 1/3 of the part from which the hind legs are made is also cut off. This part must be kneaded and divided into 2 equal pieces, which should be shaped like a cone. Form feet on the wide side of the cone.
- For the front paws, a piece of plasticine is rolled into a sausage, then cut into 2 parts. Paws with thickened feet are made from them.
- Stick the paws to the tiger's body.
- Roll up and stick to the body a long tail made of thin sausage.
- Make small round ears with indentations and attach them to the head.
- Use white cakes and a nose from pink plasticine to create an animal's face.
- The tiger's eyes are made from round cakes of white, green and black, stuck on top of each other. You can add highlights around the edges of the eye.
- Attach a white chest made from a strip of plasticine on which wool is drawn in a stack to the neck.
- White cakes are glued to the hind legs as pads and toes.
- Now you need to create black stripes. A very thin sausage is rolled out of black plasticine, short sections of which are stuck all over the tiger's body. Also, claws on the hind legs are made from them and glued into the indentations of the toe pads made by the stack.
- Using a stack, make cuts to mark the toes of the front paws. 15 Use a toothpick to make dots on the white part of the tiger cub’s face.
The plasticine tiger is ready.
How to mold a human head from plasticine. Master Class
Modeling a human head from plasticine tells children 5-6 years old the body proportions.
By taking your child through a step-by-step master class on sculpting a man’s head, you can develop the child’s ability to detail, since the head has many details. If something didn’t work out the first time, plasticine makes it possible to correct all the shortcomings.
Step by step sculpting:
- A ball is rolled out of beige or pale pink plasticine, which is given the shape of a human head and an oval face with a chin and forehead is formed. This is done using techniques of pressing and pulling with the fingers in the right places.
- From the side of the face, symmetrical recesses for the eyes are made with the flat side of a plastic knife.
- A small piece of plasticine is attached to the center of the face, from which the nose is formed. It should start from the bridge of the nose, gradually increasing the tubercle. The junctions between the nose and the face must be smoothed, then the nostrils should be made with a toothpick.
- Next, using a stack of pink plasticine, the lips are drawn.
- The oval whites of the eyes are attached to the eye sockets.
- Blue circles with black pupil dots are molded onto the eyeballs.
- Thin sausages are used to attach the upper and lower eyelids.
- Small oval ears are added to the head.
- Brown eyebrows are applied.
- A set of slightly flattened brown sausages is used to make a hairstyle that covers the crown, temples and back of the head.
- To sculpt an older person, you need to add wrinkles to the face using a stack, and make the hair gray with small strokes of white plasticine.
How to make a dragon from plasticine. Master Class
Modeling from plasticine for children 5-6 years old will be even more interesting if they are offered the creation of a fairy-tale character, for example, a dragon.
Step-by-step instruction:
- Creating a dragon begins with the head. To do this, roll a ball out of green plasticine.
- A large green square-shaped tubercle is attached to this ball, which is cut into a stack at the bottom to make a mouth. On the remaining part at the top, make 2 dents for the nostrils.
- 2 small orange rings are placed in the recesses for the nostrils.
- Oval eyes with black pupils are attached above the nostrils.
- Next, a green teardrop-shaped body of the dragon is made.
- A thin sausage is rolled out from orange plasticine and cut into short segments. They are attached next to each other on the dragon's chest and belly.
- Connect the head and body using a toothpick.
- The paws are made from 2 green triangles, the wide part of which is cut in the form of fingers.
- A ball of orange plasticine is added to the tip of each finger.
- The paws of the lower limbs consist of feet and legs bent at the knees. Toes are also made into a stack on the soles of the feet and orange balls are attached.
- The upper and lower legs are attached to the sides of the body. A long green tail is added at the back.
- From an orange sausage, wrapped in a wide yellow flatbread and then cut into rings, triangular two-color dragon scales are formed.
- These triangles are attached in the center of the back from the crown to the tip of the tail.
- Make 2 orange triangular ears and stick them to the head.
- Make a cake from red plasticine and cut it in zigzags into 2 equal parts. To make them look like dragon wings, you need to apply the corresponding lines on them in a stack. After this, the wings can be attached to the back.
Fairytale dragon is ready!
Modeling is one of the types of fine art. It plays an important role in the process of raising and educating preschool children. With its help, the child learns to give shape to an object, conveying its characteristic and most pronounced features. Modeling from plasticine or clay is one of the compulsory activities in kindergarten.
Creating even the simplest figure from clay or plasticine is a creative process that develops children's imagination.
So, for example, a small clay ball appears to a child as an apple, a ball or an orange, and a closed clay sausage can be a ring, a hoop or a donut.
During classes, the child learns to create an object, based on his existing ideas about shape and size. Trying to realize his plan, he often focuses on minor details, omitting the main thing.
One of the tasks of modeling is to teach the little man to set priorities correctly - to sort details according to their degree of importance.
Thus, sculpting:
- introduces the structure and proportions of all kinds of objects;
- promotes the development of fine motor skills, as it requires precise movements of the fingers;
- develops observation skills;
— teaches you how to implement a plan by setting priorities correctly.
In kindergarten, acquaintance with modeling occurs at the age of three, when children well understand the teacher’s instructions, are able to distinguish the shape of basic geometric shapes and find similarities and differences between them.
Both materials, both plasticine and clay, are flexible and plastic; with their help, you can create an endless variety of three-dimensional shapes.
There are 5 stages in mastering sculpting skills:
1. Getting to know the material - you need to tell the child about the properties of clay and plasticine and show what can be made from them. Some children at first refuse to pick up the material because of its unattractive appearance, but the majority show genuine interest - they begin to crush it or smear it on the table surface, while getting considerable pleasure.
2. Sculpting techniques . Making sticks or sausages. The teacher demonstrates the procedure, and the children, in turn, try to repeat. In this way, they learn the basic skill required for sculpting - rolling out material and shaping it into a specific shape. It can be a ball, cube, pancake, sausage. At this stage, the child learns to work with both hands at the same time and coordinate his movements.
3. Having mastered rolling out sausages, you need to learn how to make rings out of them. The child, repeating the movements of the teacher, closes the ends and receives a circle, donut or ring.
4. Basic modeling skills have been successfully acquired, which means it’s time to move on to more complex shapes - pyramids and cones. Children learn to roll out material at a certain angle, holding their hands in a vertical position, and master the skills of rolling and flattening.
5. The final stage of teaching preschoolers is the creation of figures of people and animals. You can begin this stage when the child learns to control the force of pressure on the material. Please note that the form in children's work is simplified: the head of a person or animal is made in the form of a small ball, and the limbs are cylinders.
Thus, modeling classes are an integral part of the comprehensive development of a child. Perseverance, precise work of the fingers, an understanding of the shape and size of different objects - these qualities and skills acquired in modeling classes will be useful at school. That is why in kindergarten a lot of time should be devoted to studying this discipline.
Modeling in kindergarten is divided into subject, plot and decorative.
Object modeling appears first in kindergarten classes. Children learn to sculpt simple objects and items: animals, people, furniture, dishes. Along with mastering the skill of modeling, the baby learns something new about living and inanimate nature.
For example, by depicting animals and people, the child understands for himself what parts of the body they have. In addition, the child enriches his vocabulary and also learns general concepts: furniture, dishes, animals.
The plot modeling appears a little later. This is a rather complex type of visual activity, as it requires serious intellectual effort from the child. Firstly, you need to think through the plot, draw up an action plan (what details and figures need to be sculpted), arrange all the elements in the desired composition, and also maintain the proportions of the objects. Children model the plots of fairy tales and short stories, then learn to talk coherently about their plot depiction. This develops smooth, detailed speech and creative abilities.
Decorative modeling is associated with completing tasks for the manufacture and decoration of various objects. It shapes the child’s aesthetic taste, creative abilities, and introduces folk crafts. Since there are many small details in decorative modeling (in ornaments, patterns), it actively develops subtle and precise movements of the baby’s fingers. This stimulates the speech centers of the brain and prepares the hand for writing. Children sculpt and decorate dishes, make souvenirs and decorations.
How to make a dinosaur from plasticine. Master Class
Dinosaurs are unusual animals that lived in ancient times. During the modeling process, the child can be told facts about their life and varieties.
Step-by-step diagram for sculpting a dinosaur:
- Cut off a third of the green block of plasticine and roll it into a ball-shaped dinosaur head. Next, a triangular shape with soft corners is created from the ball.
- For the body you will need a whole block of green plasticine. It must be kneaded thoroughly, then given an oval shape, which should be transformed by stretching into an oblong drop.
- Using a toothpick, both parts are connected together.
- To make massive dinosaur paws, you need 4 green balls of the same size.
- Sausages are rolled out from the balls, then the legs are formed.
- The paws need to be connected to the body; to do this, their edges should be slightly flattened.
- Making a large collar for the dinosaur. To do this, roll out a cake from a piece of green plasticine.
- An arc-shaped strip is cut out of it in a stack, then a zigzag pattern is created along the edge with a jagged stack.
- The collar is glued to the top of the dinosaur's head and the scalloped edge folds back nicely.
- On the head near the collar we attach a pair of beige horns.
- A green horn is glued to the nose.
- Triangular green plates are attached along the back and tail.
- Now you need to make a two-color plate. To do this, roll a piece of brown plasticine into a sausage, which is then wrapped in a thin black cake.
- From the resulting part you need to form a rectangle and cut it into 7-8 strips.
- Stick them on the back of the dinosaur and press it into the body.
- Attach white eyes with black pupils to the head.
- Along the entire surface of the back of the ballpoint pen, the dinosaur skin is given relief.
- In a stack, stripes are drawn along the collar, the line of the mouth and the tips of the paws.
The dinosaur is ready.