Have you noticed that even the most inept image of the sun makes you smile and evokes pleasant emotions? So, on a gloomy day, why not make a simple craft with your children that imitates the sun?
While working, kids, in addition to developing fine motor skills, will gain an understanding of the world around them and become familiar with geometric shapes, while older children will be interested in experimenting with various materials and will be able to realize their own creative ideas.
Moreover, a variety of materials are suitable for realizing fantasies: paper, sushi sticks, laces, balls, candies. In general, the sun is a craft that can be made from what is “at hand”.
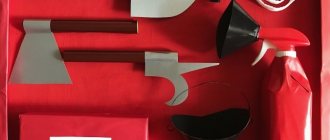
Tools and materials for work
The choice of tools depends on the source material. To make paper crafts you will need a pencil, office glue, paper clips, markers, scissors and a compass.
If you don’t have a compass, then it doesn’t matter - any round object, for example, a disk, a plate, or a lid, will serve as a template.
If you want to create a decoration for your personal plot, you will hardly need office supplies; you will have to look for tools and fasteners in a container with accessories for construction and repair.
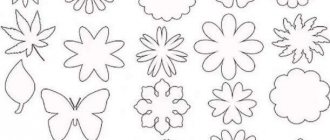
Templates
Before creating any crafts, you should think about templates. These blanks will make the job easier and also allow young children to make more complex crafts. This will inspire them to creativity and future success.
Options for templates or pictures:
- Circles for the face of the sun;
- Sun with direct rays;
- A figure in the form of a semicircle with straight rays;
- Sun with triangular rays;
- Sunflower with petals;
- Sun with stripes of different lengths;
- The sun with rays in the form of flames. This is a complex figure that is best cut out in advance and the children will decorate it.
Pre-prepared blanks in the form of circles can diversify any craft and simplify the work.
Original ideas
Look carefully at familiar objects: they themselves will tell you how to use them for other purposes.
The yellow foam sponges are just begging to be reshaped.
Why not cut out the sun? Even if all the sponges in the set are of a different color, they can be easily repainted with gouache, watercolors or acrylic paints.
From cardboard and clothespins
It is not at all necessary to turn new things into crafts. Do you have a few old wooden clothespins lying around your house? Let the child turn them into bright sunrays, and at the same time repeat the numbers and counting.
Adults need to cut out a cardboard circle and apply numerical marks along the edge at the same distance, for example, from 1 to 10. Write the same numbers on clothespins.
And the baby will be happy to combine the same numbers and will be surprised to discover that magic has happened: now he has the sun in his hands! Clothespins can be replaced with ice cream or sushi sticks.
From paper and threads with braids
Children associate the sun's rays with different objects, for example, hair. Since this is hair, then different hairstyles must be made from it. The sun with pigtails, ribbons and hairpins looks very perky, and if it also winks with its eyes, it will definitely make you smile.
For this craft you will need a hole punch, cardboard, knitting or floss threads, scissors, accessories for decorating hairstyles, paper for cutting out eyes, nose and mouth:
- First, a circle of arbitrary diameter is cut out of cardboard, and holes are made along the edge using a hole punch.
- The yarn is cut into pieces, the length of which is twice the length of the finished rays.
- One or more threads are folded in half, a loop is inserted into a hole on the cardboard, then a free tail is threaded into this loop. You should get a fringe.
- All that remains is to turn the fringe into braids and enliven the middle - attach or draw eyes, make lips.
Made from tires and plastic bottles
Giving a second life to unnecessary things is very simple: old car tires and empty plastic bottles are used to create an elegant park composition. True, children themselves will not be able to do it, since dangerous objects are used during assembly: screws, screwdrivers, knives.
You will also need paints that are not afraid of weather conditions:
- So, you need to cut out the future “face” of the craft from plywood, plastic panel or linoleum.
- Its radius should be greater than the radius of the inner part of the tire, so that it is convenient to glue or screw it with self-tapping screws.
- Bottles do not have to be selected according to size and shape: they can be different, but they must have caps.
- Screw the caps to the rubber, and then screw the bottles into them.
- If you plan to hang the sun, then the rays should be all over the circle; if you want to place it on the ground or a stump, then there is no need to place bottles along one of the segments of the circle.
- All that remains is to paint and decorate the resulting base as you wish.
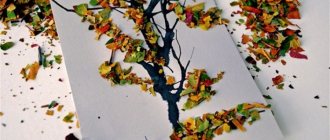
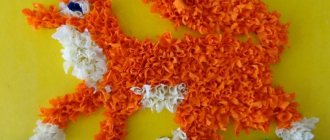
Applique of autumn leaves
It’s not for nothing that autumn is called “golden”. The leaves on the trees actually turn gold.
Not only yellow leaves are useful for crafts; red, brown, and ocher leaves are also suitable.
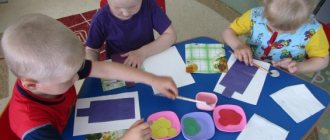
Even three-year-old children can handle a simple applique made from natural materials:
- You need to glue a circle onto the cardboard, and glue leaves around the perimeter.
- Leaves can only be collected or dry.
- Older children are able to implement more complex ideas: making rays multi-layered, or “planting” a craft on a barbecue skewer.
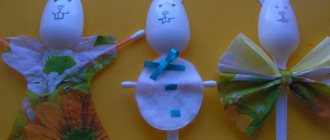
From disposable spoons
An exciting activity is making something unusual from non-standard materials. Non-standard materials for crafts include plastic cutlery.
If you lay out plastic spoons in a circle and attach the orange center on top with hot glue, you will get an unusual sun. For this option you will need two packs of identical spoons of 12 pieces.
Much more spoons will go into the sun, the rays of which will resemble pineapple scales. In this case, the spoons can be of different sizes. For example, the inner circle will be formed from teaspoons, and the outer circle from dessert spoons:
- First you need to separate the handle from the head of the spoon.
- On the prepared circle, the diameter of which is one centimeter less than the diameter of the finished product, draw a few more circles.
- The heads of the spoons will be placed along these circles.
- Glue each head using a glue gun; Moment glue is also suitable.
- When only the center remains empty, you can begin to design the face.
- It is important that the diameter of the face is slightly larger than the diameter of the empty circle in order to hide the uneven edges left by the removed plastic handles.
- The face can be made from cardboard, disposable plate, foamiran, foam rubber.
From palms and disposable plates
A disposable plate is the ideal middle ground for a future craft. Firstly, it is dense, and secondly, it is round. Paint the plate with suitable shades, revive it and start forming rays.
Children like to trace their own palms, and these palms will act as rays. Several palms must be attached to the edge of the plate either using PVA glue or a stapler. The more palms, the brighter and more unusual the product will be.
Any creativity is a way to develop imagination, and what is especially important these days is that it successfully competes with gadgets. Crafts in the shape of suns are a good way to spend time with your child and unobtrusively master basic mathematical and spatial concepts.
Bright sunshine is an excellent gift for a person who wants to cheer up; it can be used to decorate a child’s room, a group in a kindergarten, or a school classroom.
CD - discs for making the sun
Used computer disks are suitable for making sun crafts for kindergarten or junior school. It is advisable to choose two discs with a yellow tint, which are placed together with the sides with the inscriptions, so that the iridescent coatings are on the outside.
Thanks to the holes in the center, two discs can be tied together with a beautiful thick thread or braid. From the same threads you can continue the rays, braiding them into tight braids. At the end of the work, the center of the disk is sealed with a circle of colored paper with a face drawn on it with felt-tip pens.
From felt
The sun is easy to make from felt. This material can be used to create a real theater that will illustrate how the sun moves over the Earth throughout the year. Children will be able to clearly understand and even explain to their younger brothers and sisters why the seasons change.
To create a theater you will need cardboard, felt, scissors, thread and a needle and felt-tip pens.
The procedure for creating the Theater of the Sun:
- Stretch a piece of felt onto a cardboard base.
- Using felt blanks, cut out: different types of sun according to the seasons, grass, flowers, fruits, berries, autumn leaves and snowdrifts.
- Sew eyes and tongues on the suns, finish drawing the faces.
After this, you can create scenes with the sun and seasons.
From threads
A sun made from threads will lift everyone's spirits and become a cheerful decoration for any occasion. This craft can be used as a heating pad for a teapot or as a hot stand. To work you will need yellow and red yarn, cardboard, scissors, glue, and beads for the eyes.
Instructions for creating a sun from threads:
- Create a base from cardboard. This is a rectangle, slightly wider than the radius of the sun.
- Wrap the threads around the rectangle in a fairly dense layer.
- On one side, thread one thread under the threads. This can be done in advance. Pull the thread and tie.
- Cut the threads from the other end of the cardboard. Remove the cardboard and arrange the threads in a circle. Tie the ponytails in a circle.
- With the second tier, tie the ponytails of the sun from the adjacent ponytails of the first tier.
- Use red yarn to make a smile and a nose. Form eyes from beads.
Advice. You can weave wire into the sun - then you can hang it. You can also starch the threads after shaping the toy.