The importance of fine arts for children 4–5 years old
Many great philosophers and teachers of the past highly valued the importance of drawing in raising children. Thus, the ancient Greek philosopher Aristotle attached great importance to subjects of the aesthetic cycle (music, drawing) in the development of a child. He emphasized that drawing is studied because it develops the eye in determining physical beauty.
What is fine art
Fine arts are not only aimed at completing educational tasks. This term is associated with the all-round development of a child at the age of 4-5 years. The guys begin to draw interesting images, assemble designs, and make appliqués. All these actions contribute to the mental and moral education of the child. As a rule, the baby develops during the learning process. First of all, he must create an expressive image for himself, as well as master the techniques of depiction.
Preparing for a drawing lesson in the middle group
Children who attend kindergarten at the age of 4-5 years should have an idea of various non-traditional drawing techniques. This activity creates an atmosphere of ease, openness, and relaxedness in the classroom. Each new project is aimed at developing initiative, independence, creating an emotionally positive attitude towards art, as well as self-education.
How to prepare kids for classes
Preparing for a lesson is a rather important moment. Initially, the teacher must instill in children an aesthetic attitude towards the environment. Proper presentation of material contributes to the development of artistic taste and creative abilities. At this age, the child learns to admire the diversity of natural forms and admire the beautiful corners of nature.
Important! Vision plays a big role in drawing. When depicting a drawing on paper, the child must clearly imagine the color, shape, design of a certain image or object.
Types of drawing for preschoolers 4–5 years old
All types of artistic classes, when properly organized, have a positive effect on the physical development of the child. They help to raise overall vitality and create a cheerful, cheerful mood.
In practice, several types of drawing are considered for preschoolers aged 4-5 years. This includes monotopy, leaf printing, drawing with palms, fingers, cotton swabs, etc. Each of these techniques is a kind of game.
An unconventional drawing method is chosen individually. The teacher takes into account the physical and mental abilities of children. In addition, interest in certain subjects is taken into account. Based on these characteristics, the teacher creates a plan, that is, chooses a drawing method and a theme.
Handouts needed for the lesson (base, paints, brushes, etc.)
To create a unique design, special materials are required. Basically it can be a brush, gouache, pencil, watercolor, pictures with various images, paper of any color, napkins. While doing the work, it is necessary to periodically support the child and help with techniques.
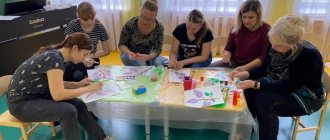
Individual approach and team work with children
An individual approach is the basis of education, as well as way of life. Individuality allows you to express yourself in certain conditions and show your talents. Therefore, the direct form of collective work affirms human social life. Each person is individual in his own way. It is very important to identify abilities in time, at an early age.
Note! The essence of this term defines the general tasks of education. The teacher who conducts individual work with children sets certain goals/tasks. When performing classes, children can use games aimed at their education.
Long-term planning for unconventional drawing
In order to distribute in advance the order of mastering non-traditional drawing techniques according to the topics of the educational process, the teacher draws up a long-term plan for this artistic and aesthetic direction. As a rule, two lessons per month are allocated to non-traditional techniques and two to traditional ones. Regardless of the technique, after the lesson there is an exhibition of children's work.
You can see an example of drawing up a long-term plan for non-traditional drawing as part of the educational process here. In addition, non-traditional drawing can be studied as part of a circle or organized as a project assignment.
Creative activities teach kids to be proud of the results of their work
Children are tireless seekers of new experiences and knowledge. The task of adults is to find the most suitable ways to make children believe in their strength and uniqueness. Fine arts, in particular unconventional drawing, provide invaluable assistance in this regard. After all, without the usual brushes and pencils, the child feels freer and can fully express his imagination.
Conducting an educational activity on drawing on a chosen topic (suitable topics for children 4–5 years old)
The availability of using non-traditional techniques is determined by the age characteristics of preschoolers. So, for example, you should start working in this direction with techniques such as drawing with your fingers, palm, tearing paper, etc., but in older preschool age these same techniques will complement the artistic image created using more complex ones: blotography, monotype. Here are several ways of drawing using non-traditional techniques.
How is GCD for drawing on a chosen topic carried out?
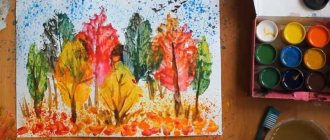
- Theme: “Autumn”
During the lesson you need to make prints of leaves and use gouache. This unconventional method teaches you to mix red and yellow gouache to create an orange color, and also to distinguish which tree is depicted on paper.
Interesting and fun children's performances
The following material is used for work: landscape sheet, fallen leaves from different trees (maple, birch, rowan, poplar, oak), gouache, wide brush, container with water, sheet of paper or oilcloth (place under the leaves to be painted).
During class, the teacher asks the children what leaves fall out. Then each child takes one leaf, places it with the smooth side on the oilcloth and paints the underside of the leaf with gouache of the same color. To get an orange leaf print, you need to teach children to mix red and yellow paints. While the gouache has not dried, the painted side of the leaf is applied to a clean sheet of paper and pressed tightly so that it is printed in its entirety. The leaf cannot be moved.
- The next topic of the week is “Dishes”
Drawing is done with cotton swabs. The teacher teaches children to draw a piece of utensils. A simple pencil is used for this. Children can independently select suitable colors and trace the outline with dots using a cotton swab with gouache.
For the lesson you need the following items: cup, plate, pan, ball, album sheets, simple pencils, cotton swabs, gouache, jars of water (for each child).
A selection of demonstration materials for the conversation (photos and drawings)
Before depicting a fictional character or object on paper, the teacher conducts a conversation with the children. The guys carefully look at the illustrations, study pictures with images that are interesting to them. The teacher places bright cardboard cards on the table on various topics, for example, “Spring”, “My City”, “New Year”, “Winter”, “Airplane”, “Where the birds fly for the winter”, “Snowman”, “Girl and Boy” ", "Winter Garden".
Music and poetry appropriate to the topic of the lesson
Drawing in the middle group is accompanied by cheerful melodies and poems. To begin with, the teacher prepares musical material:
- "Polyanka" - Russian folk music;
- “Lullaby” - A. Grechaninov;
- The play “Three Girlfriends” - D. Kabalevsky;
- Song “Winter” - M. Kartushina;
- Song “Two windows from the yard and a spreading maple”;
- Song “Sun through the leaves”;
- The game “It’s so cold, it’s frosty” is a Russian folk melody, arranged by I. Ponomareva.
Note! Before completing the work, the children begin to dance to the rhythm of the music. They must convey the mood of this composition in their movements.
Summary of a lesson on drawing in the chosen technique in the middle group (fragment in the form of a table)
| Topic of the week | Lesson notes | Material and method of conveying the idea |
| Body and face numbers | There are such boys | Drawing with a simple pencil |
| Vegetables | Cucumber tomato | Drawing with colored pencils |
| Fruits | Apple/pear | Brush, gouache |
| Berries | Cherry branch | Colour pencils |
| Birds | Dymkovo birds | Brush, gouache (team work) |
| Autumn | Autumn leaves | Fingerprints (gouache) |
| Pets | Kitty | Poking with a hard semi-dry brush (gouache) |
What is the essence of non-traditional drawing for children 4–5 years old?
Non-traditional drawing is a method of visual activity that is not based on the traditions of this type of creativity in terms of the choice of materials for applying paint, but uses cotton swabs, fingers, foam rubber, crumpled paper, etc.
In kindergarten, non-traditional drawing is notable for the fact that all (!) kids get different pictures. For children in the middle group, these techniques of visual creativity, first of all, stimulate the development of research abilities, as they open up wide scope for experiments: applying dyes to materials of natural origin, drawing through gauze, etc. In addition, non-traditional drawing:
- trains sensorimotor coordination and fine motor skills, which is a key factor in speech development;
- develops memory, attention;
- promotes the development of imaginative thinking;
- forms the prerequisites for harmonious social and communicative development - children in the process of work turn to each other and to adults, ask questions;
- develops aesthetic taste and ideas about harmony.
Non-traditional drawing in individual classes, as well as as a type of work in lessons of various educational areas in preschool educational institutions, helps solve the following problems:
- expand children's understanding of ways to depict objects;
- develop interest in teamwork;
- practice working with different materials - to realize a creative idea, children draw using cotton wool, palms, stamps, etc.;
- activate children's creative abilities and imagination;
- create an emotionally positive climate in the team (the children’s work looks like a game - to make the lawn more beautiful, they draw dandelions with a poke of a cotton swab, and using their fingers to depict raindrops, they say: “Rain, rain, drip-drip-drip”);
- develop self-confidence.
Non-traditional drawing classes create an atmosphere of goodwill in the team
Examples of finished works, photo gallery
Here are several finished works with topics interesting for kids:
- "Winter Fun"
Children learn to convey the features of the depicted object using an imprint with crumpled paper. The guys draw the desired image (Snow Maiden) using a brush. As a material, you can use blue cardboard, a container with white gouache, slightly diluted with water, medium-sized lumps of crumpled paper, gouache, brushes, jars of water.
Examples of work with photography
The teacher invites the children to draw a friend for the snow woman in an unusual way - with crumpled paper.
Next, the teacher shows how crumpled paper is lowered into a saucer with white paint and placed several times at the bottom of the cardboard, depicting a round ball. Then draw a small ball in the same way. When the paint dries, you need to finish painting the snow woman’s eyes, carrot nose, and twig hands.
- "Defender of the Fatherland Day»
The guys create a drawing for the holiday using a brush on a wet sheet of paper. Next comes an introduction to a new technique of drawing on a damp sheet of paper. They choose a beautiful paint color to create the desired look. The materials used are paper, watercolors, a brush, a container of water, and napkins.
The teacher invites the children to draw fireworks in honor of the holiday. First, you need to apply water to the landscape sheet with a wide brush. Then put watercolor paint on a thin brush and touch it to a sheet of paper in several places. The dots will begin to spread out. The empty spaces need to be filled with spreading dots of other colors.
Exercises for developing memory in children in kindergarten classes
Note! Make sure that children rinse the brush thoroughly in water.
Step-by-step instructions for drawing the selected plot
- The name of the topic and step-by-step instructions for drawing the selected plot - “Migratory and sedentary birds”
The lesson in the middle group is carried out using colored pencils. The child will learn how to draw a bird using an oval and a circle. Initially, children get acquainted with the distinctive features of an owl, which contributes to the development of imagination.
Instructions on how to correctly depict the selected plot
The material used is a subject picture depicting an owl; halves of album sheets, simple and colored pencils.
"It's dark in the forest,
Everyone has been sleeping for a long time.
One owl doesn't sleep
Sits on a branch
Looks in all directions
How it will fly!”
Note! You should look at and study the image of an owl with your children. The teacher should tell that an owl is a large bird with huge eyes. At night she hunts mice and during the day she sleeps.
Next, the guys will start doing the work. To do this, you need to draw a circle (head) with a simple pencil, and draw an oval at the bottom, narrowed downwards. On the head draw large eyes, a beak, and ears. At the bottom of the oval are the paws and the branch on which the owl is sitting. When the owl is ready, you need to paint it over with an orange, yellow or brown pencil.
Drawing technique in the middle group according to the Federal State Educational Standard
Through lightness, airiness or softness and smoothness, sharpness and aggressiveness, you can tell about the character of the hero, his attitude to the world around him. Pencil, sanguine, charcoal, pastel, ink are excellent means for expressing your vision of the beauty of the world around you.
Drawing in the middle group according to the Federal State Educational Standard helps the child relieve stress. Classes are organized as a game of transformation, where a child and an adult become either actors or spectators. To make artistic activities accessible to every child, it is necessary to use movements, music, sounds, and touch.
Important! High-quality lesson planning will lead to the establishment of emotional contacts between children, between adults and children.
Options for individual and collective drawings in different techniques (including non-traditional)
The development of the creative abilities of preschool children with the creation of individual or collective drawings is aimed at introducing non-traditional types of visual techniques (“finger painting”, “palm painting”, “poking with a hard semi-dry brush”, “printing”, “drawing on semolina or sand”, etc. .).
Middle group. Junior preschool age. Children 4 - 5 years old
Summary of a drawing lesson in the middle group “Illustration for the poem “Bear” by A. Barto”
Drawing in the middle group . Topic: Illustration for the poem “Bear”
A.Barto.
Goal: draw an illustration for the poem.
Objectives: Continue to introduce children to the works of Agnia Barto, develop an interest in books and book illustrations. To form children’s knowledge that... Summary of a drawing lesson in the middle group “Doll House”
Goal: Continue to teach children to depict objects consisting of geometric shapes - a triangle and a square, to consolidate the skills of painting with gouache in one direction. Preliminary work: Examination of a toy house, illustrations of houses,…
Games in a drawing class, a card index of games for art classes in the middle group
Card index of games for art classes in the middle group:
- Theme "Profession"
The lesson is taught using a brush. Ideas about the visual capabilities of paints expand, and the ability to name primary colors is strengthened.
Card index
To complete the work you will need an unpainted rooster drawn and cut out of paper, a landscape sheet with a drawn silhouette of a rooster, red, yellow, blue and green gouache, brushes, jars of water, rags.
The teacher should play up the situation as if an unpainted rooster came to class and said: “Everyone laughs at me, they say that I am unpainted and not real. They told me to go to the artists. They have some paints they can use to paint me.”
Then you need to give the children album sheets with silhouettes of roosters and offer to help them color them, using all four colors in their work.
- Theme "Space"
The teacher teaches children to tint a wet sheet of paper with watercolors, and also to draw dots with the tip of a brush with gouache, conveying the image of a starry sky.
The following materials are needed: sheets of paper for watercolors, gouache, watercolors, thin and wide brushes, jars of water, rags (for each child).
The guys must depict the starry night sky. To do this, use a wide brush to apply a lot of water to the landscape sheet. Then put blue watercolor paint on a brush and tint a sheet of paper. When the paint dries, put yellow or white gouache on the tip of a thin brush and draw stars in the form of dots, as well as a white cloud.
Lesson 81. Drawing “Festively decorated house”
Program content.
Teach children to convey impressions of the festive city in a drawing. Strengthen the ability to draw a house and decorate it with flags and colored lights. Practice drawing and painting by layering color on color. Develop imaginative perception. Learn to choose colorful, expressive drawings when analyzing finished works, and talk about them.
Methodology of conducting the lesson.
Ask the children how the city was decorated for the holiday (flags, banners, lights). Invite them to remember what kinds of houses there are (tall and narrow, long and low).
At the end of the lesson, display all the drawings on the board, examine them with the children, and select those that most colorfully convey the picture of the holiday.
Materials.
Gouache paints (felt-tip pens, wax crayons), white or any pale paper, brushes, jars of water, napkins (for each child).
Connections with other activities and activities.
Observations on walks and excursions. Looking at illustrations. Reading poems.
Lesson 82. Modeling “A bird pecks grains from a saucer”
Program content.
Strengthen children's ability to sculpt familiar objects using previously learned techniques (rolling, pulling, pinching; connecting parts, pressing and smoothing the fastening points).
Methodology of conducting the lesson.
Recall with your children the observations of birds on a walk, the movements and body position of a pecking bird. Clarify (by asking children) modeling techniques. In the process of work, direct them to use the learned techniques.
Upon completion of sculpting, review all the works and select the most expressive ones.
Materials.
Toy bird. Clay, modeling board (for each child).
Connections with other activities and activities.
Bird watching on a walk.
Lesson 83. Application “Little Red Riding Hood”
Program content.
Teach children to convey the image of a fairy tale in applications. Continue to learn how to depict a person (shape of dress, head, arms, legs), characteristic details (cap), observing the relationships in size. Strengthen the ability to carefully cut and paste.
Methodology of conducting the lesson.
Recall with your children the girl from C. Perrault’s fairy tale “Little Red Riding Hood.” Consider any girl from the group, clarify the shape of her dress (the dress should be simple), the shape and arrangement of body parts, and her hat. Ask children about cutting techniques and sequences. Say that a girl’s dress can be of any color, and her hat must be red. Draw children's attention to cutting and pasting techniques.
Consider all the finished works, offer to choose those that depict the most beautiful girls. Emphasize the variety of color solutions. Invite the children to find a cheerful Little Red Riding Hood, an elegant one, a sad one, etc.
Materials.
Colored paper, scissors, glue, glue brush, napkin, oilcloth (for each child).
Connections with other activities and activities.
On walks, in a group, when looking at illustrations, draw children's attention to the figures of girls in simple-shaped (widening downwards) dresses.
Option. Application “Make and stick whatever object you want”
Program content.
Continue to develop figurative perception, imaginative ideas, imagination, creativity. Strengthen your neat gluing skills.
Methodology of conducting the lesson.
Show children illustrations that depict different round-shaped objects and objects consisting of round-shaped parts. Offer to look at them carefully, name the objects, talk about their shape, location and shape of parts of the objects. Invite the children to make whatever objects they want from the paper circles lying on their tables and stick them on them. First, the child must lay out the circle so that the intended picture is obtained, and then carefully stick on the parts.
While working, approach each child and ask what he is planning to stick on and how he will act. Remind about careful gluing and correct placement of parts on the sheet.
Review all the finished applications with the children, note their diversity, rejoice at their brightness and beauty.
Materials.
Paper the size of 1/2 a landscape sheet, 5 paper circles of different sizes (each child has circles of the same color; you can give 6-7 colors per group), glue, a glue brush, a napkin, an oilcloth (for each child).
Connections with other activities and activities.
Didactic games for distinguishing the shape, size, color of objects. Classes on developing ideas about the shape and size of objects. Children playing with objects, observations, looking at illustrations.
Lesson 84. Drawing “Planes fly through the clouds”
Program content.
Teach children to draw airplanes flying through the clouds using different pressure on the pencil. Develop figurative perception, figurative ideas. Induce a positive emotional attitude towards the created drawings.
Methodology of conducting the lesson.
Examine a toy airplane with your children, clarify its parts (body, wings) and their shape. Include hand movement in the examination. Invite children to draw airplanes flying through the clouds. Say that clouds are light and planes are heavy. This can be conveyed in a drawing by pressing the pencils in different ways: lightly when drawing clouds, harder when drawing airplanes.
Post all completed drawings in the group.
Materials.
1/2 landscape paper, colored pencils (for each child).
Connections with other activities and activities.
Reading books, looking at illustrations, talking with children. Children's games.
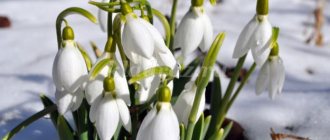
Lesson 85. Drawing “Draw a picture about spring”
Program content.
Teach children to convey impressions of spring in drawings. Develop the ability to successfully position an image on a sheet of paper. Practice painting with paints (rinse the brush well, dry it, add paint to the brush as needed).
Methodology of conducting the lesson.
Talk to the children about how it has become warm outside, the sun is shining brightly, the birds are singing merrily, green grass has appeared, flowers have bloomed. Remember poems about spring. Offer to draw a picture about spring.
Materials.
A sheet of A4 paper or a little larger, gouache paints 7-8 colors, brushes, a jar of water, a napkin (for each child).
Connections with other activities and activities.
Observations on walks, reading books, poems.
Lesson 86. Application “Magic Garden”
Program content.
Teach children to create a collective composition, independently determining the content of the image (magic trees, flowers). Learn to cut straight with scissors; round the corners of a square or rectangle. Develop figurative perception and imagination.
Methodology of conducting the lesson.
Talk with the children about what a magical garden could be like: magical trees with golden apples grow there, extraordinary flowers grow, fairy-tale birds fly. Invite each child to think about what he wants to cut out and paste on a common sheet. While working, guide children to create a variety of images. Help place the image on a common sheet.
Admire the picture created together by everyone, talk about it, hang it in the group.
The topic is completed in two classes with a break of 1-2 days (or on the same day with a break for rest).
Materials.
Colored paper, gold and silver, a large sheet of white or tinted paper, scissors, glue, glue brush, napkin, oilcloth (for each child).
Connections with other activities and activities.
Reading fairy tales, watching filmstrips. Conversations with children about miracles that are described in fairy tales.
Lesson 87. Drawing “Draw whatever picture you want”
Program content
. Teach children to think about the content of their drawings and bring their ideas to completion. Foster independence and creativity.
Methodology of conducting the lesson.
Invite the children to draw a beautiful picture - whoever wants which one. Encourage initiative and interesting ideas. Help those who find it difficult (taking into account the children’s visual abilities): remind them that the children saw interesting things that were read to them.
Materials.
Gouache paints, paper of any soft tone, brushes, a jar of water, a napkin (for each child).
Lesson 88. Modeling “How we played the outdoor game “The Arrival of Birds””
Program content.
Continue to teach children to create images of outdoor play in modeling. Develop imagination and creativity. Reinforce sculpting techniques.
Methodology of conducting the lesson.
Remember with the children how they played the outdoor game “The Arrival of Birds.” To say that today the guys will sculpt the birds they depicted in the game. Birds can be of different colors.
At the end of the work, examine the sculpted birds and rejoice at their diversity.
Materials.
Plasticine, modeling board, stack (for each child).
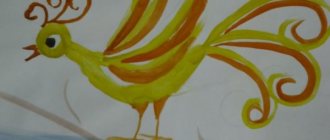
Lesson 89. Drawing “Painting feathers for the tail of a fairytale bird”
Program content.
Develop aesthetic perception, imaginative ideas, creativity. Continue to form a positive emotional attitude towards visual arts and the works created; a friendly attitude towards the work of peers. Reinforce drawing techniques with different materials (felt-tip pens, thick pastels, paints, colored wax crayons).
Methodology of conducting the lesson.
For this activity, it is advisable to arrange all the tables together, seating all the children at a common table so that they sit facing each other. Along the entire middle line, place a variety of drawing materials and feathers cut out of paper for the tail of a fairy-tale bird.
Show the children a fairy-tale bird (this can be an image of a bird in Konakovo, Gzhel, Dymkovo and any other sculpture, or a bird in bright plumage created by the teacher from clay, sewn from fabric, etc.) Tell the children that today a bird has flown to their group beautiful fairytale bird. Examine the bird, draw the children’s attention to its plumage, tail, and the tuft of feathers on its head. Invite children to paint fancy feathers for the tail of a fairytale bird. Each child independently chooses what he will use to paint feathers.
Approach each child during the work process, help if necessary with advice, reminders of decoration methods, and showing illustrations.
Place all the feathers painted by the children on the table and examine them; offer to select the most striking, interesting in design and implementation of the work, and tell about them.
Materials.
Feathers cut out of paper by the teacher (length 15 cm) with a center line marked with a pencil, felt-tip pens, greasy pastels, colored wax crayons, paints, brushes, a jar of water, a napkin (for each child).
Connections with other activities and activities.
Reading fairy tales, looking at illustrations. Conversations with children about fairy-tale characters. Introduction to decorative and applied arts.
Video on the topic of how to draw in different techniques
To create interesting drawings in different techniques, you need to look at several types. The technique is carefully displayed here to show you how to do the step by step steps correctly. Even the simplest and smallest element will allow you to master a non-standard way of drawing.
Note! To instill interest in artistic activity, the teacher must study all possible ways of teaching this art. The child must feel supported by the teacher, otherwise he may withdraw into himself and feel insecure.