Non-traditional drawing techniques for preschool children
Consultation for parents “Non-traditional drawing techniques in joint activities of children and parents”
Unconventional drawing techniques in the joint activities of children and parents
Author: Toporkova Natalya Yuryevna The artist wants to draw, Let them not give him a notebook... That’s why the artist and the artist - He draws wherever he can... He draws with a stick on the ground, In winter, with his finger on the glass, and writes charcoal on the fence, and on the wallpaper in the hallway. He draws with chalk on a board, writes on clay and sand, even if there is no paper at hand, and no money for canvases, he will draw on stone, and on a piece of birch bark. He will paint the air with fireworks, Taking a pitchfork, he writes on the water, An artist, because he is an artist, Because he can draw everywhere. And whoever interferes with the artist deprives the earth of its beauty! “The origins of children’s abilities and talents are at their fingertips.
From the fingers, figuratively speaking, come the finest threads - streams that feed the source of creative thought. In other words, the more skill in a child’s hand, the smarter the child.” V.A. Sukhomlinsky It is known that drawing is one of the most favorite children’s activities, which develops in a child many positive qualities, such as perseverance and patience, attentiveness, imagination, ability to think and much more.
All of them will be very useful to the baby in later life. Along with traditional methods of depicting an object or object on paper (drawing with pencils, brushes and paints, gouache), I also use non-traditional techniques in my work. I think that they attract the attention of little fidgets more. They are interesting to children of all ages and allow them to reach their full potential during the creative process. The work of creating drawings is not difficult, so kids do it with pleasure, acquiring skills in working with materials and becoming familiar with painting. To instill a love of fine art and arouse interest in drawing, starting from a young age, I advise parents to use unconventional methods of depiction. Such unconventional drawing gives children a lot of positive emotions, reveals the possibility of using objects well known to them as artistic materials, and surprises them with their unpredictability. Organize your workspace at home so that your child can comfortably not only sit, but also stand and sometimes move around a piece of paper. After all, you can draw any way, anywhere and with anything! Be friends with your child. Try to understand what makes him happy, what makes him sad, what he strives for. Ask him to tell you what he wanted to depict. And do not forget that the child expects praise from you. He really wants you, adults, to like his work. Rejoice at his successes and under no circumstances ridicule the young artist if he fails. No problem next time! Non-traditional drawing techniques are methods of drawing with various materials: foam rubber, crumpled paper, tubes, threads, paraffin candles, dry leaves; drawing with palms, fingers, blunt ends of pencils, cotton swabs, etc. They are different for each age group. With children of primary preschool age you can use: • finger painting • painting with cotton swabs • poking with a hard semi-dry brush • painting with palms Children of middle preschool age can be introduced to more complex techniques: • foam rubber imprinting • stencil printing • candle and watercolor • spraying • poking B In older preschool age, children can master even more difficult methods and techniques: • regular blotography • drawing with a toothpick • monotype • batik Each of these methods is a small game. Their use allows children to feel more relaxed, bolder, develops imagination and freedom for self-expression, and the work also contributes to the development of coordination of movements. Non-traditional artistic and graphic techniques: Stamping Since little children are always happy to stamp everything they can, they always like this drawing technique. Using a pre-made stamp (this could be the bottom of a plastic bottle, a lid, a cut from a potato, an apple, etc., covered with paint), prints are made on paper, creating a design that can later be supplemented. "Leaf Printing" - uses different leaves from different trees. They are covered with paint using a brush, leaving no empty spaces; this is done on a separate sheet of paper. Then the painted side is pressed tightly against the paper, trying not to move it out of place. The leaves can be reused by applying a different color to it; when mixing paints, an unusual shade can be obtained; the rest is painted on with a brush. The results are magnificent landscapes.
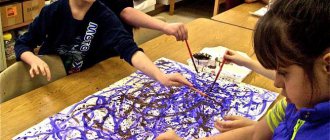
“Drawing with the palm or fingers” The child dips his palm (the entire brush) into gouache or paints it with a brush (from the age of five) and makes an imprint on paper. They draw with both the right and left hands, painted in different colors. After work, wipe your hands with a napkin, then the gouache is easily washed off.
“Imprint with crumpled paper” The child crumples the paper in his hands until it becomes soft. Then he rolls it into a ball. Its dimensions may vary. After this, the child presses the crumpled paper to a stamp pad with paint and makes an impression on the paper. “Paper rolling” - take paper and crumple it in your hands until it becomes soft. Then a ball is rolled out of it. The sizes can be different (small is a berry, large is a snowman). After this, the paper ball is dipped in glue and glued to the base.
“Drawing with cotton swabs” It’s very easy to draw with cotton swabs. We dip the stick in water, then in paint and put dots on the sheet. What to draw? Whatever! The sky and the sun, a house in the village, a river, cars, dolls. The main thing in this matter is desire!
"Drawing on wet paper." The sheet is moistened with water, and then the image is applied with a brush or finger. It will turn out to be blurry in the rain or fog. If you need to draw details, you need to wait until the drawing dries or put thick paint on the brush. “Drawing with a toothbrush and disposable forks” The brush and fork are dipped in paint and an imprint is made on paper. You can drag a brush over a sheet, you will get waves, wind, stream, etc.
“Blotography” Blot is an integral part of every child. Therefore, this technique is very close in spirit to children. To work you need paper, a brush and paints. Paint is drawn onto the brush and dripped from a height onto the paper. By turning the sheet or blowing on it, the blot blurs, forming an interesting image.
“Plasticineography” - plasticine must be heated (can be in a container with hot water). Cardboard is used, and plasticine is fixed to the surface with a pre-drawn background and outline using the technique of pressing and flattening.
“Drawing with Soap Bubbles” Soap bubbles are a well-known children's pastime. Fragile, transparent, they shimmer so beautifully with different colors of the rainbow and create a feeling of celebration. And you can also draw with them. Drawings using this unusual technique also turn out to be very unusual, and the activity brings joy to children. Plus, the prints turn out different every time, so it's very interesting to experiment with them and then imagine what they look like.
“Nitcography” There are two options for working with this technique. For each of them you will need paints with a brush, a container for them, threads and paper. In the first case, paint of any color you like is applied to the thread. The paper needs to be folded in half. The colored thread is laid out on one side, and the other is covered. The thread is then pulled out. When a child unfolds a piece of paper, there is some image there, which he can then complete at his own discretion. The second method also involves using glue. The drawing is created by gluing threads to paper in the form of a particular object.
“Batik” Batik is a very old drawing technique. At the same time, the fabric is painted. The design is applied to the fabric using special paints.
Drawing with an unconventional technique: • - helps relieve children's fears; • — develops self-confidence; • — develops spatial thinking; • — teaches children to freely express their ideas; • — encourages children to creative searches and solutions; • — teaches children to work with a variety of materials; • - develops a sense of composition, rhythm, color - perception; • — develops fine motor skills of the hands; • — develops creativity, imagination and flight of fancy; • — while working, children receive aesthetic pleasure. Non-traditional drawing allows you to reveal the creative potential of the child; gradually increase interest in artistic activity, develop mental processes. It allows children to feel more relaxed, bolder, develops imagination, and gives complete freedom for self-expression. Tips for parents: materials (pencils, paints, brushes, felt-tip pens, wax crayons, etc.) must be placed in the baby’s field of vision so that he has a desire to create; introduce him to the surrounding world of things, living and inanimate nature, objects of fine art, offer to draw everything that the child likes to talk about, and talk with him about everything that he likes to draw; do not criticize the child and do not rush; on the contrary, from time to time encourage the child to practice drawing; praise your child, help him, trust him, because your child is individual!
We recommend watching:
Unconventional drawing technique pointillism
Drawing lesson in the middle group of kindergarten Drawing with a candle in kindergarten
Drawing on sandpaper
Similar articles:
Fine arts lesson for the senior group
Monotype in kindergarten
Non-traditional drawing techniques in preschool educational institutions
Non-traditional drawing technique in kindergarten. Passepartout
Wax painting in kindergarten
Types of non-traditional drawing in kindergarten
What is especially valuable about non-traditional methods is that most of them can be done by young children, in contrast to the usual drawing with a brush or felt-tip pens and pencils. For middle-aged children (4-5 years old), more complex techniques are available, which are performed with the help of adults. Children aged 6-7 years can use all non-traditional methods independently.
The following describes various methods for practicing non-standard drawing, as well as recommended ages for children.
Fingergraphy
The simplest and most common method of non-traditional technique is drawing with fingertips. Special finger paints are well suited for this; you can also use gouache or watercolor, after wetting it with water.
All that is required of the child is to dip his finger in the paint and leave a print on the paper. It’s fun to decorate the templates this way (you can print them out or draw them by hand):
- Add leaves to the bare tree;
- On the stem and core - petals;
- For the ladybug, make spots on the back;
- For the New Year tree - toys;
- White spots on the fly agaric cap;
- Butterflies have spots on their wings.
Note! Any picture can be fully colored using fingerprinting or the missing elements can be added.
Drawing with palms
This method can be considered the next step after finger painting. The entire palm will be involved here. The same paints can be used as for fingerprinting. Here are some options for drawing with your palms:
- Chick. You should apply yellow paint to your palm and leave an imprint on the paper - you get a body. Then apply paint to the fist and thus make a head for the chicken. All that remains is to add the beak, legs and eyes.
- Fish. To do this, you can apply different colors to your palm, then leave an imprint on the paper and add eyes and fins to the image.
- Tree. To do this, use brown or black palm print paint. Then decorate the resulting tree with leaves using fingerprinting.
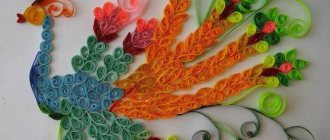
- Peacock. This beautiful bird will come from two or more handprints. Then you should draw the head, paws, eyes and decorate the tail.
- Flower. It is worth using bright paint to leave an imprint. Then add a stem with leaves to it.
Cockerel made from a palm print
Note! The open palm most closely resembles a bird. Therefore, using this technique you can make any bird of your child’s choice.
Drawing with cotton swabs (poking method)
This method is reminiscent of fingerprinting, but it uses an alternative tool for making a print - a cotton swab. The mark it makes is small and more round, so this method is good for drawing spots on animals. Another option is to completely paint the image with pokes, thus obtaining a mosaic effect. Using cotton swabs you can draw the following:
- Grains from a mouse or chicken;
- Rowan berries;
- Snowfall;
- Rain;
- Starry sky.
Training and simulators for reading by syllables for preschoolers
You can also use a few pokes to create an object of the required shape, for example, tree leaves or flowers.
Note! You can draw with several sticks at once; for convenience, they can be secured with a string.
Drawing with bulk substances
For this method, you can use salt, sand or any cereal. Drawing occurs in stages. First, you should put some design on the paper. Then drop PVA glue into certain places and sprinkle them with salt or cereal. After drying, shake off excess. The result will be an unusual three-dimensional drawing. You can experiment with this method of drawing on the following topics:
- Winter forest;
- Fireworks;
- Snowstorm;
- Pattern on butterfly wings;
- Flowers.
Snow-covered birch tree made with salt
Note! It is more interesting and colorful to use colored grains or sand. To do this, you can use food coloring or buy ready-made colored sand.
Drawing with crumpled paper
For this method it is more convenient to use gouache. You will need a small piece of paper that needs to be crumpled. Then dip this lump in paint (if necessary, add water to the gouache) and begin to apply it to the paper. The drawing turns out airy and light. Here are some ideas of what you can draw this way:
- Lilac branches;
- Dandelions;
- Clouds;
- Snowy spruce trees;
- Blooming meadow.
Lilac branches
Note! In this way you can color the image in an unconventional way. For example, make a shaggy cat or a fluffy owl.
Drawing with threads in kindergarten
Thread drawing can be a little challenging for preschoolers, so it is recommended to do it with older groups. This is a rather complicated technique and little ones cannot cope with it. To create such a pattern, you need to prepare threads (it is advisable to choose thicker ones, for example, wool). Next, you need to cut a thread about 30 cm long and dip it thoroughly in paint. Then you should place the thread on the paper, for example in a loop, and pull it down. For convenience, you can use two sheets of paper to properly press the thread on both sides. Another option is to fold the sheet in half and thread the thread inside. You can create a variety of patterns, for example:
- Abstraction;
- Flowers;
- Snail (the thread for this should be folded into a spiral);
- Butterfly.
Note! Nitography is the most complex drawing technique for children. But the result is very unusual, and the creation process is interesting and will appeal not only to children, but also to adults.
Monotype
This is a technique of creating an image using a print. A suitable method for kindergarten is when a sheet of paper is folded in half and an image is painted on one side. The design is then pressed onto the other half of the sheet, thus creating a symmetrical image. What can you depict using this technique by drawing only half of the image?
- Butterfly;
- Reflection in the water of the landscape;
- Ship with reflection;
- Vase with flowers;
- Sun;
- Tree.
Landscape with reflection using monotype technique
Note! Monotype is interesting because its result can be unpredictable. The resulting drawing always comes out unique.
Drawing with foam rubber in kindergarten
The execution process and the result are ultimately similar to drawing with crumpled paper. For this technique you will need a piece of foam rubber or a dishwashing sponge. Foam rubber does not need to be soaked in water; it should be immediately dipped in paint. Ideas for images using this technique:
- Snowman;
- Christmas trees;
- Tree crown;
- Winter in the forest.
Landscape painted with foam rubber
Using this technique, you can paint animals, then they will look fluffy.
Blotography
The essence of this method is to initially drop paint onto a piece of paper, forming a blot. Then you should supplement it with various details, obtaining some kind of drawing. This method perfectly develops children's imagination.
To get blots or splashes of paint on paper, you can use a cocktail straw. Using the same tube, you can inflate the blot, obtaining the desired image, for example, the following:
- Tree branches;
- The man's hairstyle;
- Any character.
Note! You can supplement the image with the same paints or felt-tip pens, or even plasticine.
Drawing with wax crayons
Wax crayon can be replaced with a paraffin candle. The essence of this technique is that with the help of a chalk you can draw any design, which will then not be painted over with watercolors and will appear on the surface. Examples of possible images:
- Fireworks in the night sky;
- Sea bottom;
- Cloudy sky;
- Stained glass.
How to develop fine motor skills in a child
Note! If you use white chalk, you can make a secret drawing or note, since the image on the paper will appear only after using paint.
"Secret" image
Spray
Creating an image using this technique involves splashing paint onto paper. To do this, you can use a toothbrush or a hard brush. In this case, the splashes are small and distributed chaotically. Therefore, it is better to use stencils to obtain a drawing of the desired shape. This could be a stencil:
- Christmas trees;
- Cat;
- Colors;
- Tree.
Note! In addition, with the help of spraying you can fill in the background of the future drawing. It could be grass, starry sky, snowfall.
Drawing on wet
In this method, paint is applied to a damp surface. As a result, you can get a blurred background for your future drawing. At the preparatory stage, it is better to mark the future drawing with a pencil on a sheet of paper. This should be done before you need to wet it with water. Do not wet it too much; excess water should be removed with a sponge. Watercolor on wet paper will spread evenly from the brush. This way you can let the different colors mix on their own, so the color transition will look even. What can you draw on the raw side, except for a plain background:
- Setting sun in the sky;
- Clouds and storm clouds;
- Flowers;
- Trees;
- Sea bottom.
Note! After the background has dried, you can add any details to the drawing: birds, fish or an outline.
Batik
This is a technique of painting on fabric. For this activity you will need a piece of white cotton material. For kindergarten, the simplest painting option is suitable - knotted. To do this, you need to tie several knots on the fabric, then dip them in paint. After drying, the knots should be untied - interesting patterns will remain on the fabric.
Drawing with traffic jams in kindergarten
Balsa wood stoppers are great for making circular impressions on paper. It is better to take several corks so that you can use each one for a different color of paint and do not mix them. Using this technique you can draw:
- Berries;
- Caterpillar;
- Chickens;
- Leaves;
- Flowers.
Note! If you cut the cork, you can give the prints a different shape.
Stamping
This technique is quite simple to implement and is suitable even for younger kindergarten groups. The idea is to dip a stamp in paint and leave an imprint on the paper. Moreover, you can choose anything as a stamp, for example, the following:
- Leaves;
- Vegetables;
- Fruits;
- Twigs.
Note! It is very convenient to cut stamps of various shapes from potatoes. You can also make stamps from foam sponge.
Ebru
The Ebru technique involves painting with liquid paints on water. Paint and water have different densities, so you can make some kind of pattern on the surface of the water. Then a sheet of paper or cloth is applied to the surface, and the design is transferred to the new surface. Water can be made more dense with a special solution, which is sold in an art store. Thanks to this, the paint does not dissolve in water, but remains on the surface in the form of a film. You can drip the paint onto the water and then use a stick to make patterns.
This technique is suitable for older groups of kindergarten or lower grades of school. Exercises with ebru can be turned into a fabulous game. Children of all ages really like this technique. Without any special skills, already in the first lesson you can feel like an ebru master.
Drawing on water using the ebru technique
Master class “Non-traditional materials and techniques in the visual activities of preschool children”
Master Class
"Non-traditional materials and techniques
in the visual activities of preschoolers"
The formation of a creative personality is one of the important tasks of pedagogical theory and practice at the present stage. Its development begins more effectively from preschool age. As V. A. Sukhomlinsky said:
“The origins of children’s abilities and talents are at their fingertips.
From the fingers, figuratively speaking, come the finest threads - streams that feed the source of creative thought. In other words, the more skill in a child’s hand, the smarter the child.”
Creation
- a constant companion of child development. Already in the very essence of a small person is the desire to create. The child receives pleasure and joy from the creative process itself, experiencing a whole range of positive emotions, both from the process of activity and from the result obtained.
As many teachers say, all children are talented. Therefore, it is necessary to notice and feel these talents in time and try to give children the opportunity to demonstrate them in practice, in real life, as early as possible. Developing artistic and creative abilities with the help of adults, the child creates new works (drawing, applique)
.
Every time he comes up with something unique, he experiments with ways to create an object. A preschooler in his aesthetic development goes from an elementary visual and sensory impression to the creation of an original image (composition)
using adequate visual and expressive means. Thus, it is necessary to create a basis for his creativity. The more a child sees, hears, experiences, the more significant and productive the activity of his imagination will become.
Great opportunities for the development of creativity lie in visual arts and, above all, drawing.
Modern psychological and pedagogical research shows that drawing is an important means of aesthetic education: it allows children to express their ideas about the world around them, develops fantasy and imagination, and makes it possible to consolidate knowledge about color and shape. In the process of drawing, the child improves his powers of observation, aesthetic perception, aesthetic emotions, artistic taste, creative abilities, and the ability to independently create something beautiful using accessible means.
Unconventional painting techniques demonstrate unusual combinations of materials and tools. Undoubtedly, the advantage of such techniques is the versatility of their use. The technology for their implementation is interesting and accessible to both adults and children. That is why non-traditional methods are very attractive for children, as they open up great opportunities for expressing their own fantasies, desires and self-expression in general.
From a very early age, children try to reflect their impressions of the world around them in their visual arts. Drawing in unconventional ways is a fun, mesmerizing activity that surprises and delights children. The developing environment plays an important role in the development of a child. Therefore, when organizing a subject-development environment, it is necessary to take into account that the content is developmental in nature and is aimed at developing the creativity of each child in accordance with his individual capabilities, accessible and appropriate to the age characteristics of children. There are so many unnecessary interesting things at home - a toothbrush, combs, foam rubber, corks, polystyrene foam, a spool of thread, candles, etc. If you go out for a walk, take a closer look and see how many interesting things there are: sticks, cones, leaves, pebbles, plant seeds, dandelion and poplar fluff. All these items can enrich the corner of productive activity. Unusual materials and original techniques attract children because the word “No” is not present here, you can draw with whatever you want and how you want, and you can even come up with your own unusual technique. Children feel unforgettable, positive emotions, and by emotions one can judge the child’s mood, what makes him happy, what makes him sad.
After analyzing the drawings of preschoolers, we can come to the conclusion that it is necessary to facilitate drawing skills, because not even every adult will be able to depict any object. This can greatly increase preschoolers’ interest in drawing. There are many non-traditional drawing techniques; their unusualness lies in the fact that they allow children to quickly achieve the desired result. The success of teaching non-traditional techniques largely depends on what methods and techniques the teacher uses to convey certain content to children and develop their knowledge, skills, and abilities.
Experience has shown that mastering non-traditional image techniques brings true joy to preschoolers if it is built taking into account the specifics of the children’s activity and age. They are happy to draw different patterns without experiencing any difficulties. Children boldly take on art materials; children are not afraid of their diversity and the prospect of independent choice. They take great pleasure in the process of doing it. Children are ready to repeat this or that action many times. And the better the movement turns out, the more pleasure they repeat it, as if demonstrating their success, and rejoice, attracting the attention of an adult to their achievements.
While working, I encountered a problem: children are afraid to draw, because, as it seems to them, they don’t know how, and they won’t succeed. This is especially noticeable in the middle group, where children’s visual arts skills are still poorly developed and form-building movements are not sufficiently formed. Children lack self-confidence, imagination, and independence. Unconventional drawing techniques help to stimulate children's interest in visual arts, to make them believe that they can very easily become little artists and create wonders on paper.
Having learned to express his feelings on paper, the child begins to better understand the feelings of others, learns to overcome shyness, fear of drawing, of the fact that nothing will work out. He is confident that it will work out, and it will turn out beautifully.
This topic is quite relevant and in demand. I repeat once again, the use of non-traditional techniques allows children to develop interest and creativity, while showing imagination, initiative, provoking a state of inspiration and creative impulse.
Non-traditional artistic creativity attracts with its simplicity and accessibility, revealing the possibility of using well-known objects as artistic materials.
The term “non-traditional” implies the use of materials, tools, and drawing methods that are not generally accepted, traditional, or widely known. In the process of unconventional drawing, the child develops comprehensively. Such activities do not tire preschoolers; children remain highly active and efficient throughout the entire time allotted for completing the task. Non-traditional techniques allow the teacher to take an individual approach to children, taking into account their desires and interests. Their use contributes to the intellectual development of the child, correction of mental processes and the personal sphere of preschoolers.
Drawing with unusual materials and original techniques allows children to experience unforgettable positive emotions. And by emotions you can judge what is going on in the child’s soul at the moment, what his mood is, what makes him happy and what makes him sad. As you know, children often copy the model offered to them.
Non-traditional drawing techniques allow you to avoid this, since the teacher, instead of a ready-made sample, only demonstrates a method of working with non-traditional materials and tools. This gives impetus to the manifestation of independence, initiative, and expression of individuality. By using and combining different methods of depiction in one drawing, preschoolers learn to think and independently decide which technique to use to make this or that image expressive. Working with non-traditional drawing techniques stimulates positive motivation in the child, evokes a joyful mood, and removes fear of the drawing process.
An unusual start to work, the use of gaming techniques - all this helps prevent monotony and boredom in children's visual activities, and ensures the liveliness and spontaneity of children's perception and activity.
Visual activities using non-traditional materials and techniques contribute to the child’s development of:
- fine motor skills and tactile perception;
- spatial orientation on a sheet of paper, eye and visual perception;
- attention and perseverance;
— fine arts and abilities, observation, aesthetic perception, emotional responsiveness;
— skills of control and self-control are formed.
— fantasy, creative imagination, thinking, curiosity, talent, productivity, potential and intuition develop.
- Helps relieve children's fears
- Develops self-confidence
- Develops spatial thinking;
- Teaches children to freely express their ideas;
- Encourages children to creative searches and solutions;
- Teaches children to work with a variety of materials;
- Develops a sense of composition, rhythm, color, color perception; a sense of texture and volume;
- Develops imagination and flights of fancy.
- While working, children receive aesthetic pleasure.
In preschool education, a special area of children's development is highlighted, “Artistic and Aesthetic Development,” which includes activities such as appliqué, drawing and modeling.
I suggest you get acquainted with unusual unconventional drawing techniques:
1.Drawing with crumpled paper or sponge.
Method of obtaining an image: a child presses crumpled paper onto a stamp pad with paint and makes an impression on the paper. To get a different color, change both the saucer and the crumpled paper.
In this way, for example, you can draw silhouettes of animals, grass, sky, snow, tree trunks.
Slide 12
2. Bitmap.
(the dotted drawing technique is one of the most favorite techniques in my group of students, this middle group)
Drawing with dots is one of the unusual, in this case, techniques. To implement, you can take an ordinary cotton swab or draw with your fingers. Dotted drawings with thick gouache paints work best. (poke-poke) You can also take a felt-tip pen, a pencil, place it perpendicular to a white sheet of paper and start drawing. But the best thing to do is dotted drawings with paints.
How to get the image: You will need a separate stick for each color. Using this technique, lilac or mimosa flowers, raindrops, and snowballs are beautifully produced.
3. "Blotography"
Blotography is drawing with blots, spots, drops, in which you need to discern a certain image using your imagination. This technique is ideal for children, as it does not require any special skills, inclinations or talents. It can be combined with other techniques, complement the paintings with paints, paper, plasticine, blow blots through a tube or allow them to flow freely. BLOCKGRAPHY TECHNIQUES
The main method of this technique is to create abstract spots, which are complemented by details according to the invented image. You can do this in any convenient way.
WITH STRAW
A large blot is placed on the paper, then a cocktail tube is lowered into it and the blot is blown in different directions. This should be done at an angle. Using this technique, you can create tree branches, hair in a portrait, rays of the sun, or octopus tentacles. You can set the task in advance: ask the child what result he wants to achieve, or invite him to create something easy and familiar. But it’s better not to think about it and come up with images as you work. When the blots and lines begin to resemble something familiar, you can complement the picture with the help of cotton swabs. To do this, they are dipped in paint and the necessary elements are painted on. For example, you can add leaves, flowers, berries, sun and clouds to a tree. You can bring blots to life with your eyes and a playful smile.
WITH SPREADING
For this method, it is better to use thick paper or cardboard. Blots are dripped onto the work surface, then tilted, allowing the blots to take on a variety of shapes. The procedure can be repeated until the little artist is satisfied with the result. The picture can be decorated using felt-tip pens, colored pencils or paints. It is also used as a background for cards and other crafts, or left as an abstraction.
WITH PLASTICINE
The use of this material allows you to make the picture three-dimensional and at the same time develops fine motor skills in the child. First you need to come up with a plot and mold the main characters of the story from plasticine. For example, it could be a butterfly fluttering through a flower meadow, or fish looking for a home. After this, using stains and auxiliary materials, the characters’ habitat is created. In this way you can create flowers, trees, algae, drops of water in a pond, bugs, birds, animals. You can invite your child to come up with a continuation of the story.
Blotography is an unusual technique that develops the imagination of children. It allows you to unleash the creative abilities of a preschooler, teach him to use his imagination and prepare him to perform more complex tasks.
4. Scratch
Materials
: White cardboard, black gouache + PVA glue, brush, wax pencils, toothpick.
Using wax crayons, paint the cardboard with different colors without white spaces.
Cover the entire sheet with gouache and a brush. Do not dip the brush into water. Apply a thick layer of gouache.
5. Technique of imprinting with dried leaves.
“Leaf Prints”
During your walk, collect leaves of a wide variety of shapes with your child. Cover the surface of the sheet with paint and press the painted side against the paper. Place another sheet of paper on top and smooth it out with your hand or a rolling pin. Peel off the top paper and see what happens. You may have to practice a little first, and then the child will be able to create a whole composition from leaf prints.
6.
Spray “Funny Splashes
”
Load up a full brush of paint, hold it over the paper, and hit the brush with your other hand. This way you can get an interesting background for your future drawing. Or you can even put templates on the paper before spraying - figures cut out of cardboard. For example, silhouettes of stars, crescents, flowers, leaves, animals. The resulting “white spots” can be left blank or painted. You can also use a toothbrush and comb to create fun splashes.
7.Poking with a hard semi-dry brush and brush.
Means of expression: texture of color, color. Materials: hard brush, gouache, paper of any color and format, or a cut out silhouette of a furry or prickly animal. Method of obtaining an image: the child dips a brush into the gouache and hits the paper with it, holding it vertically. When working, the brush does not fall into the water. In this way, the entire sheet, outline or template is filled. The result is an imitation of the texture of a fluffy or prickly surface.
8. Painting with water.
There are many different water painting techniques.
1. Apply water on top of the finished drawing (the blank must be made with colored pencils or felt-tip pens) with a wide soft brush to obtain a rain or blur effect. There are a number of objects, subjects, images that are best drawn on damp paper. Clarity and vagueness are needed, for example, if a child wants to depict the following themes: “City in the fog,” “I had dreams,” “It’s raining,” “City at night,” “Flowers behind the curtain,” etc.
2. I want to introduce you to the following water painting technique in the next video.
9. “Painting reliefs”
Take a sheet of paper, put a coin under it, and paint over it with a soft pencil or wax crayon. The relief appears on the paper. You can find any other hard surface with an interesting texture: leaves with thick veins, tree bark, a cross-stitched tablecloth, a metal badge - just look around. This will not only keep your child engaged, but will also help develop his fine manual skills.
10. "Monotype"
We fold a sheet of paper in half, draw on one side of the sheet with paints or simply apply spots, blots, then cover the drawing with the other half of the sheet, lightly draw on top with our hand. You can use several colors, you can add a little glitter. We reveal what happened: a butterfly, a strange flower. A great activity for developing imagination.
11.«Sponge painting»
You will need several sponges - a separate one for each color. Try it yourself first: dip a sponge into the paint, squeeze lightly to remove excess. Now you can work on the sheet with light touches. Master a new technique yourself - teach it to your child.
12. "Potato Stamps"
Cut a raw potato in half and cut out a simple relief at the cut site - a flower, a heart, a fish, a star. Saturate a stamp pad with paint and show your child how to make imprints. If you don’t have a special pad, you can take a piece of sponge or apply paint directly to the cut surface. If you prepare several different stamps, your child will be able to use them to even create story pictures or make beautiful wrapping paper for a gift. This activity is a good excuse to introduce your child to various geometric shapes: circle, square, etc.
Salt painting technique
The salt painting technique is a good way to develop artistic abilities in preschool children.
Kitchen salt is an excellent material for unconventional drawing and making interesting crafts with children.
Using the salt painting technique, the child develops artistic taste, imagination, the desire to experiment in his work, fine motor skills, and cultivate accuracy, hard work and determination.
You need to prepare a drawing template in advance, it could be: a butterfly, a mushroom, a sun, a tree, a house, a flower….
YOU'LL NEED:
- salt (regular white, colored);
- thick paper or cardboard (can be white, can be colored), on which already
- the prepared drawing is applied;
- watercolor or thin gouache or water colored with food coloring;
- brush or pipette;
- PVA glue;
- tray with sides (preferably).
There are many ways to paint with salt, we suggest you try any that you like!
1 METHOD - drawing on salt
1. Apply PVA glue to the prepared pattern, drawing, 2. Sprinkle everything with salt and let it dry a little. Then shake off the excess over a plate and leave until completely dry. 3. And finally, take watercolor paints or diluted gouache and apply it to the salt stains.
It is very interesting to watch how the paint spreads along the salt paths.
2 METHOD
1. Moisten the drawing with water using a brush. 2. Take watercolor paints, cover the surface, mixing colors to your liking. 3. While the paint is not dry, add drops of PVA glue, and then sprinkle the drawing with salt. Let dry.
While the drawing dries, the salt absorbs the pigment from the paint, and the salt sparkles very beautifully.
METHOD 3 - painting with colored salt
1. Cover the image with a thin layer of PVA. The glue must be applied in small areas. 2. Sprinkle salt on each section separately, using salt of different colors - you can use a spoon, or you can use your hands. 3. Shake excess salt into a plate. 4. And so we fill out our drawing, section by section.
1. Nitography
(handouts: thread, paints, A4 sheets, paint jars, wet wipes);
3. «Wax + watercolor»
Method of obtaining an image: a certain silhouette (stencils) is drawn on a sheet of paper with wax (candle), after which watercolor is applied and a drawing is obtained. This technique is especially interesting for children if the teacher first prepares a wax sheet, and the child creates magic with paints!
Each of these techniques is a little game. Their use allows children to feel more relaxed, bolder, more spontaneous, and gives complete freedom for self-expression.
Hands and fingers are a universal tool that is always with the child, and instead of paper and canvas, the whole world is at his disposal.
Unconventional drawing methods
can be used not only in art classes, but also in other classes and in free time.
Teachers working using this method note that children’s interest in visual arts increases. Having experience in drawing in various ways
, children themselves offer them, you just have to offer them a
drawing
.
I would also like to add on my own behalf - it is no secret that our kindergartens have a high number of groups and high attendance. And sometimes it is not possible to pay individual attention to each child in traditional drawing classes. And here non-traditional drawing techniques can come to the rescue. They will help you find time to pay attention to each child. Since non-traditional drawing techniques are very easy and varied to use.
Unconventional drawing is painstaking, exciting and very enjoyable work. There is always novelty, creative exploration, and the opportunity to achieve better results. And it is not necessary that your children become artists. Let them be artists in life - flexible, creative, able to quickly respond to changing situations, and have a rich imagination.
Happy creativity!
Japanese and English watercolor painting techniques
- The Japanese technique of watercolor painting, like the entire Eastern culture of drawing, differs from the European one that is familiar to us.
Firstly, in this technique they draw not on cotton paper, but on rice paper. It is thinner and more delicate.
Secondly, and this follows from the point above, watercolor paints differ from ours in their composition, since the watercolor we are used to is not suitable for rice paper.
As for color, in Japanese watercolor technique the primary colors are natural colors, green, blue, red, etc.
As a rule, such paints are not mixed with each other, which implies the absence of multi-layer techniques.
The execution of a drawing with watercolors using the Japanese technique is quite simple, but due to the unusual materials it looks very beautiful and interesting.
- The English technique of painting with watercolors is the same technique of painting on wet. To work with this technique, you need to moisten a sheet of paper with water, securing it to the tablet so that there are no waves.
Since this is a wet-on-wet technique, there will be no clarity in the work. Only after the drawing has dried can you add details and retouch what is missing in the drawing.
This technique is more complex than others, so it is better to start learning it by mastering a few simple techniques that I wrote about above.