Preview:
Summary of direct educational activities on design in the senior group on the topic “Magic transformation of a cylinder”
Prepared and conducted by: Irina Sergeevna Kolmakova, teacher of the First Moscow Gymnasium, 2013-2014 academic year.
- Strengthen the ability to transform flat material into three-dimensional forms: twisting a cylinder.
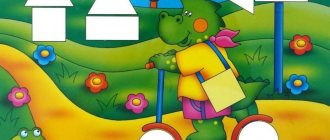
- Learn to construct a tiger cub toy from cylinders.
- Develop the ability to independently analyze finished crafts from the point of view of identifying the general method of their manufacture.
- Develop imagination and creative imagination.
- Instill interest in constructive activities.
Soft toy sparrow. Magic box and sample of the “Tiger Cub” craft.
Yellow or orange squares 8x8 cm for each child.
Scissors, glue, napkins, glue boards.
Colored paper for making small details - eyes, nose.
Preliminary work: examination of photo illustrations “Animals of Africa”; didactic games “Collect a picture”, “The third wheel”; reading: S. Marshak “Children in a Cage”, “Where did you have lunch, sparrow?”
- Creative artistic design. L. Paramonova / Preschool education, No. 2 - 2005.
- V. Kozhevnikov. Kids about kids. – M.: “Fine Art”, 1991.
- Lesson plans for the “Development” program for the senior group of kindergarten. – M.: UTs im. L.A. Wenger "Development", 2000.
Task: to attract children to the upcoming activity.
All the children gathered in a circle:
I am your friend and you are my friend!
Surprise moment. A sparrow flies to visit the children.
- Hello, sparrow! Where have you been? What did you see?
“I wanted to fly to distant countries, but I’m a sedentary bird, I don’t fly far from home.” But I really want to meet animals from distant countries.
— Guys, where can you see animals from different countries? - children's answers. - Yes, of course, at the zoo. Sparrow, stay with us, today the guys and I will make a kitten toy.
A noise is heard from a box on the teacher’s desk, and a toy appears, a sample of a tiger cub’s handicraft.
Hey, don't stand too close -
- Hello, tiger cub. Guys, look what an amazing beast was hiding in our magic box. Why, guys, did I call the tiger cub a kitten? - children's answers.
— Guys, look at a sample of the craft and tell me which parts can be identified in the toy? – head, body, paws, tail.
—What figure does the body of a tiger cub remind us of? Head? – cylinder.
- You and I have already learned how to twist a cylinder. Let's remember how to tighten the cylinder?
The teacher and the children read a poem and show step by step the transformation of a square into a rectangle, and then into a cylinder.
Card index of topics
When choosing a topic, the teacher takes into account the time of year, public holidays and other important events in people's lives.
A topic index might look like this:
- “Autumn Forest”: mushrooms, trees, animals, etc.;
- “Favorite fairy tale characters”: bun, hare, pig, bird;
- “My city”: houses, gates around them, streets, traffic lights;
- “My Home”: creation of one- and multi-story houses;
- “Winter”: Christmas tree, bullfinch, snowflake, snowman;
- “New Year”: New Year cards, Santa Claus sticks;
- “February 14”: valentines, paper hearts;
- “February 23”: gifts for dads;
- “Transport”: cars of different types;
- “Furniture”: sofa, bed, armchair, etc.;
- “March 8”: gifts for mothers;
- "Children's Day": paper toys.
Preview:
Abstract of GCD for design
“Making toys from cylinders for a puppet theater”
Subject. Making characters from cylinders for a tabletop theater based on familiar fairy tales (children's choice).
Artistic creativity. To promote the development in children of the ability to create artistic images. Form their aesthetic taste. To develop imagination, ingenuity, the desire for creativity, knowledge of the properties of materials, and the desire to experiment with them.
Cognition. Introduce them to making crafts based on a cylinder and learn how to perform them according to the teacher’s verbal instructions. Learn to manage your activities, organize your work independently, and perform a variety of intellectual actions.
Communication. Learn to reason, explaining your point of view. To develop intonation expressiveness of speech in children.
Socialization. Develop the ability to determine mood. Foster empathy and group cohesion.
Health. Develop expressiveness of movements (facial expressions, pantomime).
Safety. Strengthen the skills of safe use of scissors.
Material. Toilet paper rolls, paint, brushes, markers, colored paper, glue, scissors.
Preliminary work. Reading fairy tales, looking at illustrations, playing games in the theater corner.
Progress of direct educational activities.
Teacher. Guys, today Pinocchio came to visit us, he ran away from Karabas Barabas and decided to organize his own puppet theater. But he doesn’t have artists, he asks you to help make characters for a tabletop theater from cylinders.
The teacher shows the children how to make an owlet from a cardboard toilet paper cylinder.
- We paint the cylinder or cover it with colored paper.
- Cut out the wings, tail, eyes, beak.
- Glue the parts to the body.
- We draw feathers with a brush or felt-tip pens.
Children are offered templates for making various toys.
Children with a high level of training can invent and design their own characters for the theater.
Practical aspects
Papermaking classes are organized in accordance with the federal state educational standard for preschool education (FSES), Federal Law No. 273 of December 29, 2012 “On Education in the Russian Federation” and SanPiN 2.4.1.3049-13. Teachers draw up a work plan and technological maps for each lesson.
Technological maps and diagrams
The technological map should reflect the following points:
- topic of the lesson;
- the purpose of the activity and its objectives;
- preliminary work;
- didactic materials and equipment;
- description of the stages of the lesson (organizational moment, main and final parts) indicating their duration, words of the teacher, expected answers and actions of the children.
Lesson duration
The preparatory group conducts design classes lasting 15-25 minutes.
They include the following steps:
- organizational moment - 1-3 minutes;
- demonstration and explanation of working methods - 3-5 minutes;
- independent activity of pupils - 5-10 minutes;
- discussion of crafts - 2 minutes;
- final part - 1 minute.
Introductory materials
To familiarize children with the topic of the lesson and create motivation, game techniques are used.
Their choice depends on the imagination of the teacher:
- riddles (to introduce the hero);
- game “Hide and Seek” (children find a toy using sentences, for example “The doll is behind the closet”);
- exercise “Guess” (the teacher shows 4 pictures and asks to recognize the guest by naming his signs);
- game technique “Letter” (the wizard sends a letter in which he asks the children to help him do something);
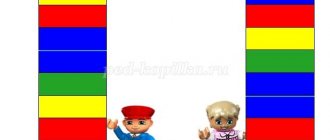
- “The fourth odd one” (out of 4 toys, students must choose the one that is different from the rest - it will be the heroine of the lesson).
Ship
- 1. To assemble the boat, you will need to bend a rectangular sheet in half.
- 2. After this, bend it in half again vertically, marking the middle.
- 3. The upper edges of the resulting sheet will need to be folded towards the middle, forming an angle at the top.
- 4. Fold the remaining part from the bottom to the top, folding the edges behind the triangle both in front and behind.
- 5. Slide your fingers under the edge and unfold the triangle to create a hollow cone.
- 6. Fold the paper so that those edges that are not touching, but opposite, touch.
- 7. Fold the corners up.
- 8. Turn the craft to the sides, and your boat will be head-mounted. After the child masters such a boat, you can offer him modular folding of the boats.
Origami crafts for boys and girls 9-10 years old
Making a dragon using origami technique is not easy. But nevertheless, it is a fascinating activity. The resulting figurine will be an excellent decoration for a child's room.
Dolls made from nylon tights for little girls and not only DIY crafts for the home, what to make from leftover fabric, sewing from old things How to make rosary beads with your own hands, how to weave correctly Do-it-yourself cold porcelain: recipe and cooking methods
Making a dragon using origami technique is not easy
Progress:
- The paper square needs to be folded diagonally.
- After this, bend the upper sides diagonally, but do not draw fold lines at the bottom.
- Fold the bottom sides in the same way.
- Now bend the square in half, aligning the lower and upper corners and passing from the corners to the intersection of the lines.
- Simultaneously bend the workpiece along all lines.
- Bend the left of the two halves back and turn the workpiece.
- Turn the central triangles on both sides to the left.
- Bend all paper layers, thereby dividing each corner into two equal parts.
- Bend the right side along the line inward.
- Throw a couple of triangles to the right side.
- Repeat the same steps now with the left side of the workpiece.
- The triangles are then returned to their original position.
- Make double folds on both sides, pushing the triangles onto the central part.
- Throw a couple of triangles to the left.
- Fold the bottom corners inward both front and back.
- Raise the top part up.
- Bend the future tail inward.
- Then press on the upper right edge of the figure and bend the right side along the lines.
- Fold the lower parts of the ponytail inward.
- Bend the blunt right corners inward.
- Turn the right corners back and bend your head inward.
- Now bend it outward.
- Pull the paper layers that are inside the head out.
- Bend the tip of the muzzle slightly.
- Curl the tail and form paws.
Tulips
Tulips that can be placed in a vase are beautiful. For a classic composition you will need more than 100 ready-made elements. The modules themselves are manufactured according to the above scheme.
- First, three elements are fastened together. The module on the left side will serve as the basis for the first row, and on the right - for the second. Next, four elements are installed in the second and third rows. Only after this does the assembly of the third row begin.
- The next stage is the formation of the height of the tulip bud. For the ring you will need about 15 elements. In this case, each circle closes into a ring, which is then carefully turned inside out.
Finally, it is necessary to attach the previously prepared petals evenly or in a chaotic manner. For convenience, the bud is designed to be attached to a drinking straw.
DIY album for a newborn - master class with ideas, samples and photos
Published Jul 27, 2017
The birth of a child is a key event in the life of parents. The young mother devotes all her time to the little one and tries to capture every moment in the baby’s life.
To do this, you can create a cute album for a newborn with your own hands. Often this work is done using the scrapbooking technique.
We invite our craftswomen to create a small album of 20 pages, make it in blue tones and decorate it with Teddy bears.
To work you need
- A4 drawing paper;
- office paper white and colored;
- scrap paper;
- scissors;
- glue;
- paints;
- corrugated cardboard;
- double-sided tape;
- decorative elements;
- sewing steamer;
- padding polyester;
- gabardine;
- thread and needle;
- stamps;
- Teddy bears on paper;
- helium pens.
Fairytale "golden fish"
A child of four years old can make his own paper craft in the shape of a goldfish. What do you need? Round plastic plate - once. Thick cardboard - two.
Then everything is on the list: scissors, multi-colored paper sheets, stationery glue, pencils, decorated elements for the fish. Subsequence:
- turn the plastic plate over onto cardboard and trace it with a simple pencil;
- the resulting circle is cut out;
- draw a triangle inside another circle;
- cut it out. This is the tail of the fish;
- glue the cardboard circle and triangle together;
- stick yellow paper and decorations on top;
- cut out a blue circle and a smaller black one for the eye and stick it on.
Simple and fast. You can play with it or just admire it as a decoration.
Simple diagrams on how to make origami:
Required materials for origami:
- Good paper, maybe even colored.
- Scissors.
- Ruler.
- Pencil.
Herringbone
Herringbone refers to simple paper folding patterns. All you need is paper, desire and skillful hands. The diagram below is simplified so that children can put together simple toys for themselves.
- Take a square sheet and bend it along the floors so that you get 4 outlined identical parts.
- Place the sheet in front of you so that it forms a diamond, and fold the right and left ends towards the middle.
- Make a fold from the bottom of the craft.
- Turn the craft over with the back side facing you.
- Fold the edges at the top of the fold.
- Fold the sides of the bottom to the middle, taking into account point 5.
- Lift the edges of the corners on the fold and lay them up.
- Bend the corner of the base up.
- Turn the craft over.
- Bend the craft forward slightly in the middle.
Your Christmas tree is ready, it can be decorated, dressed up or used for games or theater.
The best origami pattern for children - Herringbone
Birds
It will be easy to make a bird from a leaf. We suggest you make not a banal swan or a crane, but a real pelican. At the same time, it will be simple and fun, the main thing is to follow the instructions.
- Fold the square sheet in half.
- Turn it over and fold it in half again, dividing it into 4 parts.
- Fold the sheet in half and leave it there, folding the top half in half.
- Fold the right corner up.
- Lift the bent part and straighten it.
- Fold the top corner.
- Fold in the bottom left corner.
- Turn the craft over.
- Fold the corner at the bottom.
All that remains is to finish drawing the pelican’s wing, and you can play with it.
Origami paper bird
Tulip
A tulip is the simplest flower that can be made using origami patterns. A tulip will always work, the main thing is to choose a pattern so that a 6-year-old child can easily handle it. We offer you a tulip that folds in a short time and children like. So, instructions on how to fold a tulip.
- Place a square sheet of paper in front of you so that it forms a diamond and fold it in half.
- Fold each corner up towards the middle.
- Fold the right corner first.
- Fold the left corner.
- Here your tulip is ready.
Origami video diagram for children - Tulip
Frog
The frog is an interesting toy for children 6-7 years old, as it can jump. If a child tries and collects a frog, it will delight him with its jumps.
- Fold a square sheet of paper in half.
- Turn it over and bend it again.
- Bend the top part in half.
- Fold the top diagonally in both directions.
- Place the folded part so that a corner is formed at the top.
- Now fold the bottom part up in the middle.
- Fold the side parts to the middle.
- Fold the bottom.
- Fold the bottom corners.
- Bend the paws out from the bottom corners.
- Fold all visible corners up.
- Turn the craft over.
- Form a fold from the bottom.
- Turn the frog over and press it with your finger. She will jump like a real frog that lives in a pond.
How to make a jumping frog from origami paper with your own hands