Master class “Using non-traditional drawing techniques with preschool children.”
Master Class
Using unconventional drawing techniques
with children of early preschool age
Prepared by:
teacher of 1st junior group
Bokareva E. P.
Using non-traditional drawing techniques with early preschool children
The master class is designed for young children, educators and parents.
Purpose
: This drawing technique will help educators and parents master a very fun, exciting and useful activity - drawing with fingers and palms, as well as using cotton swabs.
Target:
Introducing educators and parents to non-traditional drawing techniques. Formation and development of artistic and creative abilities.
Tasks:
· Show children the possibility of obtaining an image using a print.
· Develop creative thinking, imagination and perception,
· Provoke an emotional response to a new way of drawing.
· Connect and combine simple elements
· Develop hand coordination.
· Promote an aesthetic perception of the world and enhance speech activity
Using non-traditional drawing techniques with early preschool children
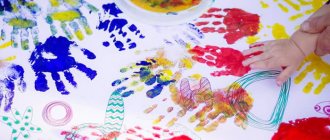
Dear educators, we all know that children aged 2-3 years learn about the world around them. The ability to draw appears in children at an early age, when they draw with their fingers on foggy glass or with their mother’s lipstick on the wallpaper. As many adults know, conscious movements of the fingers lead to the activation of speech activity. The more attention we pay to this, the faster the process of speech production will go. In the process of drawing, a child experiences various feelings: he is happy about the beautiful image that he himself creates, and he is upset if something doesn’t work out. By connecting and combining simple elements, our kids develop imagination, spatial and imaginative thinking. When using non-traditional drawing techniques, both hands work, and this allows for excellent coordination. I will show several ways to use non-traditional drawing techniques with young children. Drawing with palms, cotton swabs, fingers - all this looks like a fun game, children really like it, and the result is real masterpieces. I would like to give advice that a distinctive feature of children's perception is the desire for independence. Keep this in mind, dear adults! It will be better if you sit next to the child and draw, show how to perform this or that element on a separate sheet, the child will watch and repeat, drawing his own picture. And never say that it turned out badly, because our children need confidence in their abilities. For a child, creativity is a process, not a result.
1. Draw “Jolly Cockerels” with your palm
For work we will need:
1. Gouache yellow, red, green and blue. 2. Water. 3. Napkin. 4. Paper
First, let's prepare the base of the drawing. Dip four fingers in paint of different colors and draw four different colored lines. We have a path along which our cockerels will walk. When a child makes an imprint with his palm, be sure to remind him to put his thumb to the side and let the other fingers look up. The thumb is the head of the cockerel, and the remaining fingers are the wings. The teacher helps to finish drawing the cockerel's comb and beard. And now our cockerel proudly walks along the path, you can draw a chicken using two thumbprints. An adult helps decorate the drawing with flowers.
2. Draw with a fist “Bunny on the lawn”
For work we will need:
1. Gouache paint blue, red, yellow, green
For this drawing, we take blue office paper as a basis. Two fist prints with yellow paint, superimposed on one another, are the basis for the sun. Let's draw some rays with our finger, let our sun be cheerful and radiant. Next, two fist prints and you get the body of a bunny. The thumbprints are the paws, the index fingerprint is the tail. The ears will be made from the imprint of the entire index finger, just like the rays of the sun were made. So that the bunny doesn’t get bored on the lawn, let’s draw a clearing and flowers.
3. Draw with your finger “Fish” and “Butterfly”
For work we need
Printed pictures on a printer, you can draw them yourself.
1. Gouache yellow and red
2. Napkin
First of all, the child needs to be shown how to color these pictures. Take your baby's finger, dip it in paint and show how you can paint a picture with your finger. While working, make sure that the child’s finger does not bend and remains straight and tense, so that the child works with the pad of his finger and does not smear the paint all over the sheet, trying not to go beyond the contour. Dear adults, remember that a young child cannot mentally imagine the result of the process, so you need to draw a sample in advance, tell him that his work will turn out just as beautiful and even better.
4. Draw with cotton swabs “Herringbone” “Mushroom” “Bird”
For work we will need:
1. Gouache blue, red, green, yellow. 2. Napkin. 3. Cotton swabs
Children really like drawing with cotton swabs; it is, of course, no longer drawing, but coloring with dots. The process is very simple, the child dips a cotton swab in the paint and puts dots on the drawing, the outline is ready, the teacher must remind the child not to go beyond the outline.
The drawing is done very simply, but it turns out very beautifully and you can come up with anything. For example, you and I will draw dots on a Christmas tree, on a mushroom and on a bird. It is very good to use small verses; while playing we also reinforce the primary colors.
I wish you and your children success.
Summary of a master class for educators on the topic: “Non-traditional drawing techniques in preschool educational institutions”
Master class for educators “Non-traditional drawing techniques”
Bondareva Olga Ivanovna, teacher
Target:
expand the knowledge of educators through familiarity with non-traditional drawing techniques, as a means of developing preschoolers’ interest in visual creativity.
Tasks:
— introduce teachers to unconventional drawing techniques - milk, shaving foam, drawing on foil, 3D drawings.
— teach practical skills in the field of fine arts using several non-traditional methods in drawing;
— increase the level of skill of educators.
Methods and techniques:
reproductive, practical, verbal, visual.
Equipment:
didactic means - drawings made using non-traditional drawing techniques;
tables, chairs for teachers; material for practical activities - gouache, jars of water, brushes, landscape sheets of paper, shaving foam, PVA glue, high-fat milk, foil, cardboard blanks, transparent plates, toothpicks, skewers, cotton swabs, wet wipes for teachers; presentation “ Unconventional drawing techniques ”
, projector, laptop, flash drive.
Preliminary work:
studying Internet resources on this topic, preparing equipment.
Progress of the master class :
-Dear colleagues. Before we begin our master class “Unconventional Drawing Methods,” let me offer you a game to tune in to this topic. I ask everyone to form a circle. (the game “Associations” is played - name the association for the expression “non-traditional drawing methods”, passing each other a symbolic pencil).
“I think we are ready to work together.” Please take one colored pencil from the tray and sit down at the table on which the color of your pencil is indicated - so we will divide into groups so that it is convenient for us to work. (4 groups are formed)
— To begin with, I present to your attention an overview of widely used non-traditional drawing techniques for preschoolers, and then I will introduce new trends in this area and we will try to practically work with these techniques.
Presentation “Unconventional drawing methods” (review)
— To consolidate our knowledge, I suggest you play the game “Guess and Name” (tools and materials for non-traditional drawing techniques are named, the teacher’s task is to guess and name the non-traditional technique)
-Drawing using unconventional techniques fascinates and captivates children. This is a free creative process, when the word “forbidden” is not present, but there is an opportunity to violate the rules for using certain materials and tools.
We are all practitioners and know that visual activity influences the comprehensive development of a child’s personality: creative, aesthetic, cognitive, etc.
Humanity does not stand still, we are constantly developing and coming up with something new. Likewise, in the field of art, many new unconventional techniques
which I want to tell you about today.
Practical part.
1. Drawing on foil
.
Drawing on foil is very different from paper. Firstly, you can clearly see how the colors mix, and secondly, the paint glides well. Suitable for developing sensory sensations in babies. You can draw with your fingers, brushes, or cotton swabs. You can also use tape to divide the design into sectors, which we paint with different paints; after drying, remove the tape.
— Please take cardboard blanks on your tables with an image printed on them with PVA glue. Wrap the cardboard in foil and press down. We apply gouache to the front side of our work, and wipe the convex parts with a cotton swab, our work is ready.
2. Drawing on milk
.
Option 1. Drawing on milk follows the model of the EBRU technique, but instead of special water we use high-fat milk, gouache, a brush, a toothpick, and a skewer. Pour the milk into the tray, shake off droplets of gouache of different colors from the brush - form a background. Then, using a skewer or toothpick, we draw with gouache. When the drawing is ready, we place a thick sheet of paper on top of the milk, press it, carefully remove the sheet from the patch and the drawing is imprinted on the paper, surprising us with its unusualness.
Option 2. For bold creative experiments you will need very simple and safe ingredients:
- whole milk, it is important that it is not skimmed, it is better if it is homemade;
- gouache or food coloring diluted in water;
- a flat plate or shallow tray;
- liquid soap or dishwashing detergent.
To begin with, pour a little milk into a plate and give the child jars of paints, from which he must randomly add several drops of paints of different colors onto the milk. The resulting drawing will already be very interesting. But that is not all. You need to drop a little liquid soap or dishwashing detergent into our container.
And then just watch the wonderful transformation and movement happening in the plate.
Each drop, falling on the surface, starts a fantastic dance of flowers.
The child will absolutely love the process itself and its unexpected results.
Watching amazing transformations is very interesting and very instructive. In addition, this amazing series of transformations can be photographed and, by printing interesting abstract photographs, you can decorate the interior with the results of joint creativity with children. There can be a lot of photographs, because the movement and transformation in the plate will continue for a long time. Having carried out such an interesting experiment, next time you can invite the child to participate in the process himself and try to form a drawing.
For this, the preparatory stage will be the same, but we do not pour dishwashing liquid into milk, but dip ordinary cotton swabs into it and give it to the child. When he puts them in milk, the transformation process will begin, and the baby will be able to participate in creating patterns.
3. 3D drawings.
3D for children is a new trend in the development of children’s creative abilities, allowing them to develop spatial imagination, the ability to see the smallest details and convey them on paper. Three-dimensional drawings are real magic for a child, because the drawn object, although located on a plane, seems absolutely real. The simplest 3D image that even the smallest baby can do is a drawing of a palm.
For work we take a sheet of thick white paper, a simple pencil, an eraser, a black felt-tip pen and colored pencils
. First, we outline the baby’s open palm with a simple pencil so that we get only its outline. Under no circumstances should you outline it, otherwise you won’t get a volumetric effect!
Now we shade the entire space of the sheet, except that which is occupied by the palm, with horizontal lines at an equal distance from each other. As a result, we get a shaded sheet of paper with a palm.
We shade the palm with the same black felt-tip pen as the background, but not with horizontal lines, but with convex lines, connecting their edges with the edges of horizontal lines outside the contour of the palm.
We color the spaces between the lines, convex and horizontal, using colored pencils in an arbitrary color scheme. Our drawing is ready, all that remains is to hang it on the wall and move a short distance so that the volume effect becomes noticeable. As you can see, this technique for creating volume is quite simple, it can be used when depicting any other object, and when the child masters it, it will be easier for him to further advance in the exciting activity of 3D drawing.
4. Shaving foam drawing
.
Drawing with shaving foam is a fun and interesting process. The foam is pleasant to the touch, gives new tactile sensations and a pleasant smell. Easily washes off hands, clothes and any surface.
Creativity using such an unconventional drawing technique creates positive motivation for drawing, relaxes, awakens imagination and gives a lot of positive emotions!
Option 1 “Volume” paints
You will need: 2 parts shaving foam + 1 part PVA glue + paint.
First you need to mix glue and paint, then add shaving foam. Mix everything thoroughly. The paints are ready, you can apply them to the finished outline or show your imagination and come up with a design yourself.
Joint drawing with teachers with shaving foam using the “Volume”
paints on a free theme.
Option 2
“Tube”
“Volume”
Place the paints in a tight food bag
(or tube)
. Cut off the tip of the bag with scissors, you get a kind of pastry syringe. By pressing on the paint bag, we create a pattern.
I would like to say about two more non-traditional techniques - ZENTANGLE and DOODLING.
Combination (zendoodle)
- drawing techniques that have recently become very popular. Interest in them is due to the fact that they are a good way to relax, have fun, and express your creative abilities, even if you absolutely do not know how to draw in the classical sense of the word. These techniques are great for both adults and very young children who are just learning to hold drawing utensils.
DOODLING
(from English doodle - unconscious drawing)
is drawing using simple elements
(circles, squiggles, diamonds, dots, sticks, etc.)
.
This is what ease is all about. However, these simple elements can create complex compositions that amaze the imagination. But basically this is an unconscious drawing that allows you to “turn off your brain
,” which opens the way to pure creativity, not constrained by rules. Many of us indulged in this kind of drawing during boring school lessons. We don’t know and don’t think about what will happen in the end; the hand draws on its own. Whether these are various plants, non-existent worlds or just geometric shapes is not important. The main thing is to enjoy the drawing process
ZENTANGLE
(from zen - poise, calmness and rectangle - rectangle)
is a combination of meditation and drawing.
Traditionally, squares of 9x9 cm are used to draw zentangle. Any design is placed in the square, or it is arbitrarily divided into segments, which, in turn, are filled with various elements of the same type (dots, circles, diamonds, whatever your imagination allows)
.
Zentangle helps increase composure, concentration, promotes psychological relaxation, internal calm, improves visual coordination and fine motor skills, and also develops creativity and creativity. A mixture of these two techniques - Zendoodling -
is ideal for practicing with children. The simplest option is to use a coloring sheet or outline of an animal, flower, bird (anything, drawn on a stencil), and invite the child to fill it with simple elements, and then color them. You can complicate the task - break the drawing into parts and fill the resulting segments with different patterns. More An option is to invite the child to fill in the same images of animals, objects, etc. in different ways.
Conclusion
Children really like unconventional ways of drawing. This promotes the development of creative thinking, imagination, creativity, expanding ideas about the world around us and, like regular drawing, develops fine motor skills of the hand, trains the muscles of the hand, and prepares the hand for writing.
Reflection.
— Dear colleagues, if you were interested in our master class and found something new for yourself here, please send your colored pencil to the cheerful emoticon, and if you are bored and this information does not attract you, the pencil is sent to the sad emoticon.
Thank you for your attention. See you again!
Internet resources used:
ttp://tsvetyzhizni.ru/tvorcheskaya-minutka/kak-my-risovali-penoj.html
https://www.babyblog.ru/community/post/education/1711457
https://vk.com/wall-2756772_88621
https://www.supersadovnik.ru/masterclass.aspx?id=1113
https://mamamozhetvse.ru/igry-s-penoj-dlya-britya.html
https://moreidey.ru/tvorcheskie-igryi/risovanie-penoy-dlya-britya.htm
https://www.babyblog.ru/user/Liolik33/91943
https://magicaldecor.ru/puhlyie-kraski/