Purpose of the game:
1. Introduce children to national customs
2. Consolidate knowledge about the features of the national costume and its elements.
3. Teach children to find similarities and differences between the national costume and other national clothing.
Preparatory work: “Examination of illustrations in national costumes.”
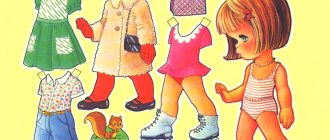
How to play: the child is invited to dress up a cardboard doll in different national costumes. We suggest finding similarities and differences between the costumes. Draw children's attention to the details of clothing.
Making a folk costume for a play doll with your own hands. Master Class
Master Class. Creating a simplified version of a folk (Russian) costume for a play doll with your own hands, 35-55 cm. Lots of letters and photographs. Good day to all readers! I often sew for dolls, especially for kindergartens. One of the latest “orders” puzzled me a little at first. – We need a doll in a red folk costume with a kokoshnik on the corner. Well, sew from several fragments.
Of course, I couldn’t resist and confused the bear with the balalaika))) The bear, they say, is not needed, but a red dress with a kokoshnik is needed.
it is clear that real costumes for a 45-50 cm folk doll are not “pieces” and only the kokoshnik can take months to embroider... Therefore, the task had to be simplified and made as cheap as possible. Budget – 0 rubles 00 kopecks.
They gave me the future “Russian beauty”. A strong Soviet doll, about 50-55 cm tall, with a playful hairstyle, without underwear. Linen is by no means held in high esteem in our garden; even if you put it on a doll, it disappears in the most mysterious way in exactly a week. I checked)))
To begin with, the doll was washed, scent was applied to her hair, and curlers were applied. The most ordinary person of a famous network company)) I love them (these curlers) selflessly, honestly.
I took a photo of the doll next to its Italian figure (45cm) just out of curiosity and as a souvenir.
Our folk costume will consist of an underdress (a white shirt with embroidery and frills) and a red top (on request). We make the kokoshnik last.
Let's start with the T-shirt. This will be a white dress with a cutout at the waist.
Most often I first draw patterns on paper. The most important detail is the top of the shirt (from neck to waist). First, draw separately 1/2 of the shelf (front) and 1/2 of the back. Then we fold the parts of the shelf and back together with shoulder seams and combine them into a common part. The result is half the top of the finished product.
What else to read: Children and the world around them: didactic game “What is made of what?”
Mdyams. I'm sorry, but I made a “disposable” model on paper that was not necessary)))
Then we put this detail on the fabric and draw it, creating a single element on the fabric.
The piece on the right is already circled, so the pattern is upside down, and the left side is outlined in a mirror image. My pencil disappears, so we don't pay attention to the extra lines (pictured left)).
Cut out the part. The clasp will be on the back. Trying on a doll. There is only one part, we will sew only the side seams. Not now!!!
Adjust the fit before sewing. We're not sewing anything yet! Now let's do the sleeves. In the lightweight version, these are just rectangles. We calculate the “doll” sizes. We need the length and width of the sleeve, taking into account the ruffles. It can be scored and scored.
To preliminary assess the result, we place sleeves on each part along the top using machine stitches to create gathers. We tighten the lines and apply the sleeve blanks to the dress blank.
If you are satisfied with everything, you can lay finishing lines on the sleeve parts at an arbitrary height and in an arbitrary quantity. The bottom of the sleeve is formed immediately - lace, elastic. anyway. The sleeves are sewn to the armholes, the cut is complex. Then we join and sand the side seam of the shirt and sleeves. We process the cut. The neck can be fixed. The easiest way is with a lace stand-up collar. We make the skirt in the same way as the sleeves: we measure, cut out a rectangle, decorate the bottom (ruffles, lace, flounces), and process the side slits. Apply to a doll.
Adjust the length. We need to do this now, because we have already processed the bottom of the skirt. We connect the bottom and top of our white dress (bottom.
Now let's process the clasp. She's behind. The options are different. You can make the top with buttons and half the skirt (starting from the bottom edge and sew as one piece).
The red part of the dress. Choose the color scheme of the decoration. In a simplified version, all skirt decorations can be reduced to jacquard braid and a couple of decorative stitches. We put ribbons and braids in stock (and more or less matching in color.
We make the final choice. Decorative stitches (if you sew infrequently and are not sure of the result) are best tried on pieces of fabric. In our case, the fabric is thin, so we sew on the paper. The training results look like this:
To make the task as simple as possible, I decided to abandon the traditional design of an outer dress in the form of a sundress, replacing it with a skirt. Sewing a skirt is easier and faster. On a doll of this size it will look quite “popular”. Trying on an almost finished skirt with a finished hem and side slits.
What else to read: Educational games for preschoolers with cards on the theme of patterns and ornaments
Adjust the length. “Scrub” again, because the bottom edge has already been processed. We make the folds/gatherings necessary for a good fit. Sew a belt to the top of the skirt. I took a ready-made slope of a suitable color. The skirt was made "with a wrap", i.e., it was wrapped around the waist (under the bust) and tied with a bow. To form “cords” the belt is made slightly longer than the fabric. For some reason I didn’t take a photo of the finished skirt. It will be lower on the doll.
Let's move on to the kokoshnik.
The figurine is drawn by hand on paper randomly, cut out, the doll's head is tried on, set aside, and a new one is drawn. and so on until the manufacturer likes the result))) I made about 5 options, deciding the least bulky and easy to implement. (I know that the girls’ headdress (and judging by the body, our model is a girl of about 7 years old) looked different in Russia))) but they made it clear to me that the kindergarten administration does not care about this historical fact even once. Therefore, we have a kokoshnik)))
Using the pattern approved by us, we cut out blanks from the main fabric (from which the dress was sewn). In quantity 2 pcs.
You can make this structure hold its shape in several ways. The simplest is a thick glue-based fabric (dublerin). The interlining is too thin, we won't take it. I simply duplicated the part of the kokoshnik that will be on the outside, the back part without spacers. Then draw a pattern on the “front” of our headdress. I kept it simple by folding the product under the embroidery machine. So I simply hand-drew the trick with disappearing chalk and used metallic thread to embroider one of the bold decorative stitches on a regular sewing machine.
We are not afraid of the abundance of plaster on the front side of the product. The plaster will disappear in 24 hours, this is special))) The most difficult thing is to connect the two parts of our kokoshnik. Ideally, the bottom should be slightly smaller than the top. One way to achieve this is to decorate the bottom after sewing. We sew, folding the right sides inward. Trim the edges to a reasonable height, trim the excess at the seams. Turn it off and iron it with steam (yes, this is decollation at home, you can also sprinkle a little water)) The unfinished bottom of the kokoshnik tapers and we get the same bend that we need. Of course, this will only work with new all-natural fine cotton fabric. Synthetics hardly shrink. We process the bottom cut with the same bias tape that finished the red skirt. The kokoshnik is almost ready. Can be embroidered with beads. But the fastest way is to glue rhinestones)))
What else to read: Interactive game “His Majesty Electricity” 2nd grade
We dress the doll.
“Red folk costume with kokoshnik” is ready. Let's pat ourselves on the head))) We completed the main task - we sewed a simple inexpensive dress according to the stated order. Looking into the future, I will say: the administration was very happy, promised a monument and asked the “leftovers” to sew the same one for another group. Feeling that everything was being done exclusively with personal funds, she lowered her eyes in disappointment...
Our kindergarten is municipal, not pretentious, without fees “for repairs and furniture in euros”, we and our children sincerely like it and therefore let’s pretend that the next photo did not shock you)))
I hope this agreement will inspire you to take on more ambitious projects and give you some ideas for implementation in completely different products.
Many thanks to everyone who studied to the end or at least looked at the photo)))
You can find patterns for doll dresses in our section on Babies
Card index of didactic games “National Costumes”
"Let's dress the doll in a suit"Objectives: Improve knowledge about folk costumes. To develop coherent speech in children through comparison and generalization. Game task: Dress the doll. Rules of the game: From 1 to 5 people can participate in the game. The players choose silhouettes of cut-out dolls, find a paper costume they like, “dress” the doll, and tell why this particular costume was chosen, describe the parts of the costume, embroidery, and color.
"Fold the picture"
Goal: To form ideas about folk costumes. Develop visual perception, attention, logical thinking, memory. Game task: Option 1: Make a picture exactly according to the model. Option 2: Compose the picture exactly from memory. Rules of the game: Option 1: From 1 to 5 people can participate in the game. Children are offered images of young ladies with kokoshniks. The child must look at the picture carefully and, based on the model, compose a complete image from the parts (like a “puzzle”). The one who finishes the collection first wins. Option 2. The game can be played by 1 to 5 people. Children are offered images of young ladies with kokoshniks. The child must examine the picture carefully; after viewing, the image is removed, and the child independently, from memory, reproduces the image from its parts.
"Russian folk costume"
Purpose of the game: to introduce children to the past of national culture. To consolidate knowledge about the features of Russian costume: hats, elements of clothing. Develop aesthetic taste, cultivate a sense of pride in the Russian people. Activation of children's vocabulary: “kokoshnik”, “caftan”, “bast shoes”, “dushegreika”.
“Match a headdress to a sundress” Purpose: to teach to distinguish between each other and name the items of women’s costumes; bring up
"Find the error"
Goal: To form ideas about folk costumes. Develop visual perception, attention, logical thinking, memory. Game task: Correct the mistake.
"Call me kindly"
Goal: to train children in the formation of nouns with diminutive suffixes –chik-, -echk-,- ochk-, -enk-, -onk-. Progress of the game: The adult names the item of the costume, and the child calls it affectionately, for example, sarafan-sarafan.
“Which of which?”
Purpose: to practice the formation of relative adjectives. Progress of the game: What and what types of clothing are made from. - Dress made of silk (what kind?) - silk. - Wool jacket (what kind?) - wool. — Boots made of leather (what kind?) – leather. Fur coat (what kind?) – fur.
"Choose your words"
Goal: developing the ability to select adjectives for a noun (synonyms) What kind of fur coat? -...warm, fluffy, soft, new, long, beautiful, winter...; What kind of boots? - ... black, comfortable, new, beautiful, leather... What kind of sundress? ... beautiful, long, elegant.
“What’s extra?”
Goal: to develop the ability to find an extra item and explain why it is extra in this suit. Progress of the game. The adult shows the child pictures (or verbally), asks to name them, indicate the extra picture in each row and explain why it is extra.
On the topic: methodological developments, presentations and notes
Didactic games “Dress up a doll for a while”, “Draw a man”, “Dishes”, “Harmful and healthy foods.
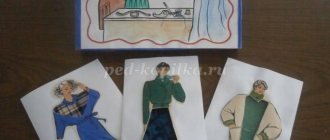
Looking through the old ancient books of our methodological research, I came across a booklet, which I took for myself) Goal: to know the customs of different nationalities; reveal the human attitude towards.
With this game you can introduce children to the national clothes of Transbaikalia. Invite the children to dress her in traditional clothes. The benefit is intended both for individuals and for them.