The bunny applique will be made with pleasure by a child of any age, because the hare is one of the main characters of children’s favorite fairy tales. This article provides step-by-step instructions for making applications with bunnies using various techniques and photos of examples of finished works that can inspire beginners to come up with their own original creative ideas.
To make an applique of a bunny, you can use a variety of materials: paper, cardboard, fabric, cotton pads and even autumn leaves for a herbarium. It will be interesting to do the craft both with children during educational handicraft classes, and for the purpose of decorating the design of something with your own hands.
Hare made of geometric shapes
In the younger group of kindergarten, the teacher needs to prepare in advance details in the form of various triangles, circles, squares and rectangles for the lesson. It is more interesting for children to experiment with patterns made from colored paper. If you carefully print out a diagram for gluing geometric elements and show examples of finished work, then children's creative work will be more focused.
The hare applique can be made not only on the basis of the standard contour of a hare figurine or a muzzle with ears. You can use your imagination and figure out how to make an abstract bunny applique from geometric shapes.
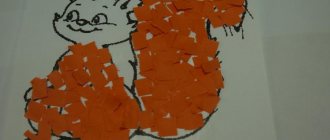
Hare made from natural materials
We will combine autumn herbarium and cereals. Take semolina or rice, a couple of sunflower seeds, a few buckwheat pieces and the herbarium you collected:
- Draw a stencil of the animal. The herbarium sticks well with regular PVA glue.
- Decorate the body with rice, the eyes and nose with black seeds, and the claws will be in the shape of buckwheat.
- Decorate the background with autumn leaves. Additionally, you can paint the rice with gouache and trim the carrots for the hare.
Even a preschooler can do it with a little help. Senior assistants work with very young children to avoid injury: small children can swallow small parts or be injured by scissors.
Creating a bunny using the appliqué technique is possible from everything you have at hand. The technology differs by age; in some moments of creating a children's masterpiece, supervision and help are needed. They are available to anyone who has cereals or cotton wool with colored paper in their house. The bunny will also serve as a creative project for a child in kindergarten or school.
Bunny made of hearts
An original way to design a children's gift card is a bunny applique made from hearts. In the senior group and in the preparatory group of kindergarten, children can already make elements for appliqué on their own, cutting them out of colored paper with scissors according to templates of the required size or at random.
What you will need to make the hare applique from hearts and a description of the process:
- background from a sheet of colored paper of any color;
- two hearts made of colored, pink paper, one of white paper (the same size);
- a slightly smaller pink heart, divided in two vertically (to decorate the bunny’s ears);
- two small white hearts (for the bunny’s tail and collar);
- two even smaller black hearts (bunny eyes) and the same red heart (bunny nose);
- The hare's antennae can be thinly cut from small, black rectangles.
The bunny applique made from hearts looks unusual and is an interesting alternative to standard valentines.
Panel applique with a fabric bunny
This master class is suitable for children in the senior group or primary school. The hare on the panel will be made using the following tools and materials:
- thick cardboard for the base of the panel, as well as for parts of the hare;
- foam rubber or thin sheet of polystyrene foam (insulation);
- textile;
- scissors, glue, double-sided adhesive tape or tape;
- drawn or printed outlines of a bunny and a sakura flower;
- beads, laces or ribbons.
Below are step-by-step instructions with a detailed description of each step to create this panel:
- First of all, you need to decide on the picture.
- Then foam rubber or any other volumetric backing is glued to the cardboard, and the desired image is first transferred to the sheet - each detail separately. In this case, materials from a ready-made kit were used, but it is very easy to make such a blank yourself.
- All parts are cut exactly along the contour.
- All parts of the image are cut out from fabric in the same way, but with sufficient allowance for further gluing.
- In some cases, when the contour of the part is complex, additional cuts must be made on the fabric. On the pink petal the fabric is glued without cuts or darts, on the leaves it already has them.
- Next, all the parts are connected together, the back of the bunny is strengthened with glue and paper.
- We decorate the petals with laces and beads.
- We glue the inside of the ears with double-sided tape or film.
- Now we assemble the base step by step. A large sheet of cardboard is covered with fabric, then a smaller sheet is glued to the back, with a loop between them.
- The last step is to glue the hare, flower and other parts of the applique to the base. If desired, you can replace the sakura with a Christmas tree, and give the hare a carrot in its paws. Then you get a completely different story, connected to a different culture.
In the same way, you can make voluminous applications from fabric with other animals; this technique is perfect not only for creating panels, but also for postcards or decorating bags, caps, etc.
Fabric hare
If, when looking at children's books about bunnies, you especially like one of the pictures, then you can, with patience and creative enthusiasm, make a fabric hare applique similar to the picture yourself.
To complete the work you will need the following materials:
- starch;
- fabric of various colors;
- A3 paper sheets, in the same quantity as the number of layers the applique will have;
- glue, preferably PVA;
- hard brush and watercolor paints;
- felt-tip pens or markers;
- ribbons for creating additional hare accessories or threads with a hook to tie them;
- container with water.
Instructions for making a fabric hare applique based on an illustration from the book, step by step:
- To starch scraps of fabric, you need to dissolve 3 tbsp in a glass of cold water. l. starch, then pour the resulting mixture into a liter of boiling water. Then bring the liquid to a boil and leave to cool. Dip fabric flaps into the cooled solution for a few minutes, wring them out and hang them to dry. When the fabric is dry, sprinkle it with water and iron it;
- print out the illustration with the hare you like on a sheet of A3 paper and photocopy it several times;
- On the reverse side of the pattern printed on paper sheets, glue starched fabric flaps with PVA glue in one layer. Press the sheets with a press for several hours;
- onto a blank A3 sheet, spray watercolor paints of different colors with a brush, one at a time, and let the surface dry;
- cut out the outline of the hare, the largest in area, from a sheet (covered with fabric and dried under a press), then stick it on as the first layer of applique;
- one by one, in accordance with the selected image, cut out and paste the remaining parts of the bunny applique from fabric;
- Depending on the book drawing, finish drawing the hare’s face and add accessories from ready-made ribbons or knitted with air loops.
Fabric bunny appliqués are interesting in themselves, but they are also an expressive way to decorate ordinary things. In this way, you can make the design of a T-shirt, another item of clothing or, for example, an interior pillow more interesting and memorable.
Bunny made of napkins and cotton wool
A bunny made from napkins is an interesting and simple option for teaching preschoolers on the theme of appliqué, in kindergarten or at home.
Materials for making three-dimensional applique from napkins:
- colored cardboard for the main background;
- one-piece stencil of a hare made of white paper;
- snow-white napkins;
- cotton wool;
- PVA glue;
- black velvet paper (small rectangle, for thin hare whiskers).
Detailed description of making a bunny from napkins:
- Carefully tear the napkins into small shreds and roll each into a small round ball;
- the figure of the hare is tightly pasted over with paper balls on PVA (glue is applied to the entire area of the stencil, and then napkins are applied);
- the bunny is glued to the background;
- fluffy cotton wool is glued in the area of the ears, muzzle and tail;
- The applique is completed by gluing the mustache (the muzzle can be drawn on a stencil in advance).
Necessary materials
products using this technique may consist of:
- herbarium
- fabrics
- cardboard and A4
- improvised means
They use cotton wool, cereals, eggshells, washcloths, shells, and seeds. They also use plastic utensils, paints, and paints for decoration. You will need scissors and PVA glue.
Simplicity and accessibility make the application popular among parents who want to spend creative time with their child. Today we invite you to create a bunny using various available tools. Technologies vary in complexity for different ages.
Bunny made from palms
Bunnies made using the palm appliqué technique look incredibly beautiful. Such crafts will wonderfully decorate the everyday interior of a children's room or a festive hall of a kindergarten.
To make a high-quality template of a child’s palm, you need him to press a sheet of cardboard with his hand to the surface of the table. Then the palm is outlined. You can trace your hand all the way to the elbow, but the version of the template up to the wrist will be an excellent material for joint creativity.
Then, using the blank cut out of cardboard, the details of the palms are made from colored paper. In the middle group, preschoolers can already trace patterns of their palms on their own, and when they get older, they can cut out blanks for appliqué under the guidance of a teacher.
You can applique the entire hare, or just its face. In any case, an excellent result is guaranteed. All children, without exception, really enjoy making appliqués from their palms.
A handmade bunny applique made from palms, left as a keepsake, will give rise in the future to pleasant memories of childhood. You can make a bunny applique not only from colored paper, but also on a fabric basis.
Bunny made of paper strips
We will need a lot of material, perseverance and patience. The product is designed for school-age children. Prepare in advance:
- thin office sheets (one color on both sides) of the selected color
- colored paper
- glue
- scissors (including manicure scissors)
First, for the body of the hare, cut strips up to 1 cm wide and up to 4-5 cm long. Now let's get to work:
- We fold them in half (in the form of an arc) and glue them in a circle for the head and on the contours of the body.
- We form the breast, paws and ears according to the same pattern. We cut out the geometric shape we need and make many short cuts along the contour (it is better to use nail scissors).
- We design the animal’s face – cheeks, mustache, eyes.
- The background of the work can be decorated with wildflowers or Christmas trees and snowflakes - to your taste.
The process is simple, but requires considerable perseverance and accuracy. Young children will need help.
Carrot for the bunny
A carrot applique can be made to complement any applique with a story about hares, because this is their favorite food, an irreplaceable accessory and their best dream.
How to make a carrot-pocket applique step by step:
- a circle of orange or red paper is divided in half with scissors and folded in three, then the two touching extreme sides are glued together;
- On the resulting carrot, it is necessary to clarify the black horizontal strokes inherent in a real vegetable. This can be done with a black pencil or glued dark threads;
- the next stage is the green tops. The green paper circle is folded in half and folded several times in a zigzag pattern. The corners of the semicircle are slightly shifted to create an interesting beam shape;
- carrot - pocket and greens are glued together.
The resulting carrot applique for a bunny is multifunctional in itself, thanks to its convenient pocket. And it will look great on any applique with hares, especially in sufficient quantities.
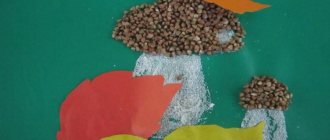
Hare in the forest
It is especially pleasant to do appliqué, especially with children, when you have the opportunity to use natural materials for the activity. For the hare applique in the forest, autumn or summer leaves of various shapes will be useful. This craft will brighten up a weekday and become a unique highlight of your home interior.
When making a forest bunny, you will need slightly ironed or book-dried leaves, glue, scissors, cardboard or paper for the background of the applique, and a pencil. In addition to the bunny itself, you can depict the entire forest landscape with leaves: Christmas trees, birds, bushes.
Bunny under the Christmas tree
The original technique for making this application - corrugating colored paper - may seem difficult for beginners. But this is not so, especially if you carefully approach the process of creating the bunny directly under the Christmas tree. The finished applique turns out to be so airy that it looks wonderful not only against a background of colored paper or cardboard, but even on a mesh of intertwined and glued threads, fixed in a thin frame.
For a Christmas tree you will need a certain number of green leaves - twigs. Each such element is made from a triangle of colored green paper, folded into a thin corrugated accordion, folded in half and glued into a sheet-like shape. The elements made in the required quantity are fixed with glue on the background and connected to each other in the shape of a Christmas tree.
For the head of the corrugated bunny you will need two snow-white rectangles, which, after being assembled into a small fold, form two semicircles. Then the resulting parts are glued into a circle. The bunny's eyes and nose are decorated with a marker or beads, if desired. The hare's body is made from a larger rectangle, folded and glued into a semicircle.
Bunny ears and paws can be made from white triangles of the desired size, assembled and glued together like Christmas tree branches. The fluffy round ponytail is made from rectangles gathered into semicircles and glued together.
Bunny made of cotton pads
We will master a simple method for the little ones. Prepare plasticine green and pink (red), thin sticks (or spaghetti), sponges 6 pcs. Glue a full circle of cotton wool into the center of the cardboard - this is the body of the hare. Take one half and fold it in half. This is how the ear turned out. Repeat one more time. The paws will be created using halves of circles bent in half. All that remains is to glue on the eyes and nose from plasticine, the spaghetti mustache and the bunny is ready. This type of work is suitable even for children 3-4 years old.
For older children we create three-dimensional figures. To do this, the sponges are glued together and figuratively glued onto cardboard. Here's an idea for a voluminous product.
“Bunny - Runner” cut out and glue
By following the pattern of creating templates and making appliqué step by step, even a beginner will be able to create a real forest clearing filled with little bunnies. To do this, you need to complete every detail in the number of bunnies planned. You can diversify the landscape with an evergreen Christmas tree or just flowers.
For the body of each bunny, you will need to cut a larger circle from a rectangle folded in half. A circle for the head is made from the smaller rectangle. Two elongated ovals will be needed for the ears. A circle is cut out for the tail and four oval shapes for the paws.