How to make a hedgehog from plasticine
If your child likes to create animal figures from plasticine, invite him to make a hedgehog. This cute, prickly animal will add to your baby's collection of products. To make a little animal, we suggest you choose one of the instructions below. You will learn how to make a hedgehog from plasticine in different ways.
If you have already sculpted a cat from plasticine, which we talked about in the previous article, then making a charming hedgehog will not be difficult. We have selected several options for making a hedgehog for you. The first two will be based only on the use of plasticine.
The first method of sculpting
Before making a cute hedgehog from plasticine, prepare:
- soft, children's plasticine;
- scissors with pointed edges;
- knife for working with plasticine;
- board;
- skewer.
Get ready to learn how to make a hedgehog from plasticine:
Hedgehog according to the first method (Step 1)
- The first thing we will do is make a face for the future hedgehog. For it, it is better to use plasticine with a very light shade and hints of brown. If you don't have this in your set, don't worry. Take a brown shade and white. Connect these two pieces and crumple until the streaks disappear. The resulting mass must be rolled into a ball. Give the ball a cone shape. The muzzle can be considered almost ready. Set the workpiece aside.
- Let's start sculpting the body. It should be dark. Take the color you want, knead the material and roll into a ball. Gently press the resulting ball on the sides to form an oval.
(Step 2) - Take the muzzle and body blank and connect them. In the joint area, add teardrop-shaped pieces in a brown shade (they should resemble spines) to hide the joint.
- We return to the light brown color again, we need to make the ears. Roll small balls, flatten them and connect at the bottom. Using a skewer, carefully secure the ears to the hedgehog's head. In the space between the ears, place the same drop-shaped parts as in the previous paragraph.
- The time has come for the formation of spines on the future hedgehog. For this purpose we will use scissors. Using the tip of the scissors, make small cuts in the plasticine. Use a skewer to press down the middle of the created needles. You can make a couple of additional cuts on the needles that we made on the hedgehog’s head.
(Step 3) - All that remains is to design the face. To do this, use a stack to make indentations in the place of the eyes. Roll out small black balls and insert into the recesses. We attach the spout in the same way. Finally, we decorate the hedgehog’s mouth.
You learned how to make a hedgehog from plasticine step by step. To make the hedgehog look even brighter, add a couple of elements to it. These could be apples, pears or mushrooms. They can be attached to spines. And one of the ears can be decorated with a small flower.
Having such a hedgehog and a few other plasticine animals, all you have to do is make a car out of plasticine, put the whole company in it and go on a trip. You will learn how to make a car from this article.
Summary of educational activities for speech development and modeling in the 2nd junior group of the kindergarten “Visiting the Hedgehog.”
Right! For the winter he stores a lot of mushrooms and apples. Look at the picture “Hedgehog in the forest.” You see, children, he carries a lot of mushrooms and leaves on his back. (Children look at it).
Why do you think a hedgehog needs leaves? (He puts them in his hole)
.
Well done boys. Indeed, to keep the hedgehog’s burrow soft and warm, it stores a lot of dry leaves.
Do you know where the hedgehog lives? (In the forest)
.
That's right, a forest hedgehog.
Guys, the hedgehog invites us to visit, do you want to go to the forest? ( Yes, we want
).
Then go ahead, stand on the mat and let's go.
2. Outdoor game “Train”.
“Here our train is moving, the wheels are knocking, and the guys are sitting on this train . Chu-chu-chu, chu-chu-chu. The locomotive is running far, far away, He took the guys far, far away. But here's the stop, who wants to get off? Get up guys, let’s go for a walk!”
Guys, we arrived in the forest, look how beautiful it is around. Look at the beautiful colorful leaves lying under our feet. (Children look at the leaves).
And here is our hedgehog. Kids, let's say hello with a hedgehog, say "Hello." ( Children speak).
Look, guys, how sad the hedgehog is. What do you think happened?
The hedgehog is just very tired of collecting leaves, kids, can we help the hedgehog? ( Yes
).
Children collect leaves and bring them to the hedgehog.
Well done guys, look how happy the hedgehog is, he brought you a basket of apples as a gift. Let's say thank you to the hedgehog and say goodbye to him.
Children, sit down on the chairs, now we will listen to a poem about a hedgehog.
3. Reading a poem by S. Antonyuk
Snorting funny and loud, And puffing like a steam locomotive, All strewn with needles, The hedgehog carried mushrooms for the children. He also wanted to grab some apples, so that the hedgehog children could have a healthy breakfast for future use. Not enough space, that's a shame! And I couldn’t take it all! The hedgehog needs to go back to the forest for apples!
Children, did you like the poem? ( Yes ).
Look at the hedgehog I made. ( Children look) .
What do you think it is made of? ( From plasticine, seeds ).
That's right, do you want to make a hedgehog out of plasticine? ( Yes ).
4. Modeling a hedgehog.
What color plasticine will we take? ( Brown ).
Children, which part of the body will we start sculpting with? (From the body).
That's right, carefully, using a stick, cut off a piece of plasticine and roll a large ball out of it. ( children perform ).
Well done, now let's make a muzzle, stretch it out a little, and pinch the ears. (the teacher shows who is not succeeding and helps).
Now let’s roll two small white balls - these will be the eyes, and a black ball for the nose.
Guys, you're probably a little tired, let's warm up a little.
5.Physical education minute. Hedgehog
The hedgehog stomped along the path (Walking in place.) And carried a mushroom on his back. The hedgehog stomped slowly, quietly rustling the leaves. And a bunny is jumping towards me, (Jumping in place.) A long-eared jumper. In someone's garden, I cleverly got hold of a slanted carrot.
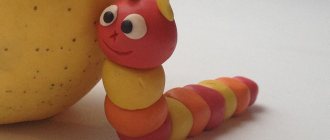
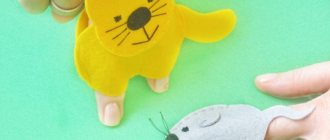
The second method of sculpting
The following modeling from plasticine is especially relevant for children. Unlike the previous option, the spines of this hedgehog will not be cut out, but will be made from the same basic material. This means that work will be done with small details, which will successfully affect the child’s fine motor skills. What you need for work:
- plasticine (take several colors, one for the spines, the other for the face);
- napkins;
- board;
- plastic knife.
How to make a prickly hedgehog from plasticine step by step:
Hedgehog according to the second method (Step 1)
- The first thing to do is to prepare the material for work. Plasticine should be pliable for modeling, so warm it up well in your hands and knead it. Prepare a light color for the body, a dark color for the needles.
- Let's start with a light color. You need to make a long cone out of it. The sharp end needs to be highlighted so that the hedgehog’s curious nose is always visible. As you understand, the sharp part will be the muzzle, and the wide part will become the body; you do not need to make the head and body separately.
- Attach a small black ball to the spout. This nose definitely loves to look for treats. Glue on the eyes.
(Step 2) - We continue working with the light color. You need to roll four balls. Gently press them so that they acquire an elongated shape (if possible, use a special spatula). Using a knife, cut out the fingers on the resulting paws. We attach the paws to the previously made cone. Make sure they look the same.
- It's time to add some needles to our hedgehog. We take a dark color, tear off small pieces from it, stretch them out and sharpen them. We attach the spines to the body. We make a lot of needles to cover the hedgehog completely. Try not to allow voids to appear.
The hedgehog is ready. This type of plasticine modeling will be very interesting for children. And with a little effort, the finished hedgehog turns out very beautiful.
Plasticine crafts for children may include foreign components, such as pine cones, seeds, real pine thorns, leaves and acorns. When looking at plasticine hedgehogs, study crafts using seeds, because these are natural spines.
MAGAZINE Preschooler.RF
Summary of a modeling lesson in the junior group “Hedgehog” (Junior group)RUSSIAN FEDERATION DEPARTMENT OF EDUCATION OF THE COMMITTEE ON SOCIAL POLICY AND CULTURE OF THE ADMINISTRATION OF IRKUTSK MUNICIPAL BUDGET PRESCHOOL EDUCATIONAL INSTITUTION OF IRKUTSK KINDERGARTEN No. 173 (MBDOU Irkutsk kindergarten No. 17 3)
Compiled and conducted by Educator: Lebedeva Ekaterina Konstantinovna
Fine arts classes help the child master basic modeling techniques, and also have a beneficial effect on the overall development of the child: they cultivate a sense of beauty, develop thinking, imagination, attention, memory, and develop hard work.
Goal: To teach children to make a large ball of plasticine by rolling it in a circular motion on a modeling board. Learn how to design a craft. Develop fine motor skills and finger coordination. Cultivate compassion and kindness.
Tasks:
1. Artistic and aesthetic development:
- instill in children an interest in creative activities
- develop perseverance, composure, diligence, accuracy and attentiveness
- develop fine motor skills of hands
2. Speech development:
- activation of the dictionary on the topic
3. Cognitive development:
- consolidate knowledge about the habitat of hedgehogs.
Demo material:
- toy hedgehog (rubber), pictures of a hedgehog.
Handout:
- plasticine, matches, cardboard stand for the finished product, board for modeling.
Progress of the lesson:
Educator: - Look, guys, who came to visit us from the forest - a little hedgehog. But for some reason he’s the only one who’s sad. Let’s make him laugh and we’ll turn into hedgehogs ourselves. To do this we need to clasp our fingers together. Straight fingers - “spines” stick up. Fingers bent - the hedgehog has curled up into a ball (we repeat several times).
Educator: - Guys, the hedgehog is still very sad. Why is he so upset? (the teacher is responsible for the hedgehog): - I’m bored in the forest, I have no friends at all and I have no one to play with. Help me please guys!
Educator: - Well, guys, let's help the hedgehog? Let's make him friends.
We show the children how to roll a large ball of plasticine between their palms in a circular motion. If a child doesn’t succeed, we help. Let the children do the labor-intensive work of sticking matches into the back of the hedgehog, and also rolling small balls for the eyes, legs and nose.
Educator: Look, guys, what wonderful hedgehogs we have turned out to be. Our hedgehog has so many new friends! Now our hedgehog will not be bored in the forest.
Do you guys like the resulting hedgehogs? Which hedgehogs did you like? Why did you like them? What new did you learn today? Did you like it?
| Next > |
Hedgehog with sunflower seeds
As you have seen from the previous instructions, sculpting a hedgehog is not that difficult. There is a slight problem with small parts, because children under five years old often cannot make them. But using seeds instead of thorns is an original solution.
As in previous master classes, we will need plasticine and a board. Sunflower seeds complement this list.
Let's look at how to make a hedgehog from plasticine and seeds:
- Knead the brown plasticine until it is completely pliable for modeling. Form a ball. We pull back the material to make the nose. The rest of the body can be left unchanged, because the hedgehog often rolls into a ball to protect itself from the enemy. Attach a small brown drop to the sharp end. Add eyes.
- Now you can do what little children love so much - attaching seeds. They need to be carefully inserted with the wide part into the body. You don't need to press hard. Start laying out the first row at the muzzle. The second row must be placed between the gaps of the first so that all the empty space is filled.
This simple plasticine modeling for children will interest your child. Offer to decorate the craft with additional elements, for example, gifts of autumn, which the child already knows how to sculpt.
Hedgehog with watermelon seeds
The next creative craft option will tell you how to make a beautiful hedgehog from plasticine and watermelon seeds.
Who said that you need to sculpt a hedgehog from plasticine? We offer you a different approach to creating crafts. Prepare for creativity:
- large leaf;
- paints (you can use gouache paint);
- dry leaves;
- dried watermelon seeds;
- brown cardboard;
- plasticine;
- scissors.
We will make a hedgehog figurine step by step:
- The first thing you need to do is a background for the future hedgehog. You need to draw a forest or a clearing on a sheet so that the composition is natural; you can glue dry leaves, grass and even flowers onto the finished drawing.
- Cut out a hedgehog figurine from cardboard. You can use the template we offer or find your own. Invite your child to apply a thin layer of brown plasticine to the template. They need to treat the area where the thorns will be.
Hedgehog body template - Place a container of watermelon seeds in front of your child. Show your child how to work with them. The seeds need to be inserted into the plasticine with the sharp tip facing up. The seeds need to be placed tightly so that there are no empty spaces left.
- When the spines are ready, all that remains is to mold the nose, eyes and mouth from plasticine. Additionally, decorate the hedgehog with mushrooms and leaves.
Take glue or double-sided adhesive tape and stick it to the previously prepared meadow. Using this principle, you can make a whole clearing of hedgehogs. You learned how to make a hedgehog from plasticine. But this is not the last option.
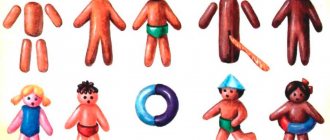
Many other animals can be molded from plasticine
Step-by-step instructions on how to make a hedgehog from plasticine
Let's take a step-by-step look at how to make a hedgehog from plasticine using the classic method:
- Select plasticine similar to the natural color of the animal. For the face it is pink or white, for the body with needles it is brown.
- A head with a pointed muzzle is formed from a pink plasticine ball. Ears are made in the form of circles from the same color and connected to the head.
- Roll a smooth ball out of a brown piece and stretch it out slightly - this is the body.
- Two blanks are connected.
- They decorate the muzzle - attach the nose and eyes from black plasticine in the form of balls. The small mouth at the bottom is highlighted in a stack. You can add a “shine” to your eyes by placing small white circles in the corners.
- They begin to create a prickly fur coat. Using small (safe) scissors, carefully make small cuts on the brown body, starting from the head. This is an imitation of needles.
You can add short legs (pink) to the craft. It is appropriate to “plant” a small fungus or berries (plasticine) on the needles.
Needles can be created in a more labor-intensive way - first roll out many thin and short flagella from plasticine. To make them look impressive on the hedgehog, small indentations are made in the body with a toothpick, into which the “needles” are placed.
Step-by-step photo instructions on how to make a hedgehog from plasticine with children or beginners
The younger kindergarten group can easily cope with the simplest assembly option:
- a ball is rolled out of a piece of plasticine;
- give an oval shape;
- extend a sharp muzzle;
- form small plasticine beads-eyes and place them on the muzzle, add the same nose;
- use a stack or toothpick to imitate needles in the form of frequent and even indentations.
You can also add sharp needles, sticking them on the surface of the body in the form of toothpicks, matches or vermicelli.
If you select sunflower seeds of a special white variety for work (they have a striped white-black color), then the hedgehog will be as similar as possible to the original, since its needles are colored exactly like that.
Hedgehog made from plasticine and seeds
The work is carried out in stages:
- the body is sculpted as in the classic version;
- decorate the face;
- the needles are created from sunflower seeds - they are firmly and carefully stuck into the body, starting from the back or front (as desired).
You can also use white pumpkin seeds, the hedgehog turns out creative.
Sunflower seeds can be inserted with blunt ends into plasticine, then the hedgehog will be as prickly as possible. But if you do the opposite, then the character’s silhouette turns out softer, the hedgehog becomes “kinder.”
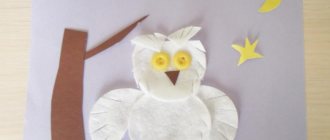
Hedgehog applications made from plasticine on cardboard
In the middle group of the garden, children can be asked to make a charming applique of a hedgehog from the cult cartoon “Hedgehog in the Fog”:
- first take a hedgehog template and transfer its contours onto cardboard;
- choose beige or pink plasticine and use smearing strokes to create the character’s body and head along the contours;
- strokes of brown plasticine are applied to the muzzle;
- decorate the black nose and eyes (ready-made “running” eyes can be purchased at the “Skillful Hands” store);
- make a mouth in a stack - in the form of an O-shaped depression (surprise);
- a circle is molded from white plasticine, two “ears” are added to it on top - this is a knot, red small balls are added “polka dot colors”;
- legs are molded from brown plasticine;
- these elements are placed on the figure, a knot is added;
- Needles are created from brown or gray plasticine - many thin and short flagella;
- the needles are fixed on the hedgehog.
The applique is ready, it can be placed in a frame and decorated with the interior.
A simplified version for kids made from plasticine and watermelon seeds:
- take a ready-made template of a hedgehog figurine from brown or beige colored paper or cardboard;
- in place of the future head, eyes, a nose, a mouth and eyebrows are formed from plasticine, and small ears are added;
- the body area is completely covered with brown plasticine (with a thick layer of up to 5-6 mm);
- create an imitation of needles from watermelon seeds, sticking them in dense layers from top to bottom.
You can “add” plasticine fungi, apples or leaves to the needles.
Video lessons/master classes on how to make plasticine hedgehogs
The video material will help you understand the order and sequence of assembling the craft:
Volumetric figures of plasticine hedgehogs
During the creative process, it is advisable to invite children from the older group to fantasize and make a hedgehog from pine cones and plasticine:
- choose a smooth, dry and as large cone as possible;
- a hedgehog muzzle is sculpted from light plasticine and fixed to the lower base of the cone (in a horizontal position);
- add mouth, eyes, nose;
- Needles are separated from pine branches and attached to the inner parts of the cone using glue - filling with needles begins from the back of the body.
You can add legs and attributes to the figurine in the form of a yellowed leaf or rowan berries, carefully “planting” it on the needles.
You can create a large hedgehog from small cones that will “imitate” needles.
Video master classes on how to do it
It is more convenient to create crafts, guided by visual material from “advanced” masters: