Mushrooms on a stump. Modeling in the younger group
Modeling
(collective composition)
“Mushrooms on a stump”
Program objectives
. Teach children to sculpt mushrooms in a constructive way from two parts (leg, cap). Show techniques for modeling a mushroom cap: rolling out a ball and flattening it into a flat cake or disk. Pay attention to the need for a strong and neat connection of the parts. Arouse interest in creating a collective composition “Mushrooms on a Stump”. Develop abilities for shaping and composition. Cultivate curiosity and accuracy.
Equipment
.
Plasticine brown, red, orange, white, yellow; planks; napkins; containers for plasticine; two - three mushrooms, sculpted in advance; compositional basis; little animals - toys; treat - sweet mushrooms; basket. Progress of the lesson.
Children , I will tell you a riddle,
and you try to guess it.
In the forest under the Christmas tree there is a baby - only a hat and a leg. (Fungus.) Well done! I invite you to the forest school for a lesson. Aunt Owl will tell the tale “About Mushrooms”.
So, attention.
(Show video) You saw how the animals completed their homework. And now
we will go with you to the forest
along a flat path Along a level path, along a level path, Our feet walk along a level path. One, two, one, two, one, two, our feet walk. Over the pebbles, over the pebbles, over the pebbles, Over the pebbles, into the hole - bang! (Children stand up) Here we are. And here is the clearing.
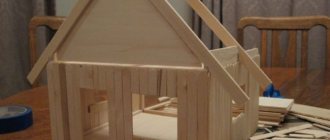
Shadow - shadow, shadow, There is a stump in the middle of the clearing.
And the guys growing on the stump are thin-legged honey mushrooms. They are guarding the stump, standing. They look at everyone from above. Children, look how beautiful these mushrooms are - honey mushrooms
grew on a stump.
And you want to sculpt a lot, a lot of mushrooms. After all, honey mushrooms grow as a whole family. But first, let's look at the fungus. What does a mushroom have? (Stem and cap).
Right!
The fungus has a long and light stalk
.
It can be sculpted from white or yellow plasticine. To do this, we take a piece of plasticine and roll out a column in our palms - like this (forward - back). The leg is ready! The cap
of the fungus is
large, round and bright.
It can be molded from red, orange, brown plasticine.
For the hat, we take a piece of bright plasticine and roll out the ball in a circular motion. Then we flatten it, like this, to make a flat cake. The hat is ready! The cap of the fungus rests on the stem. Carefully fasten the cap and stem together like this. The mushroom is ready! Now carefully attach it to the stump. Children, let's please the forest animals. Let's stick some mushrooms and plant them on a stump. Before we get started, let's play with our fingers. Finger game “A fox ran through the forest with a box”
A fox ran through the forest with a box.
- What's in the box? - Forest mushrooms, Mushrooms - milk mushrooms For a son, for a daughter. Let's get to work. (Children are working.) What color is the cap and stem of your fungus? Well done boys!
What beautiful mushrooms you have created!
Look how many mushrooms there are on our stump! Forest animals immediately came running to our stump. What animals came running to the clearing? (Bear, fox, squirrel...) They really liked your mushrooms. For this they prepared a sweet treat for you
.
Here it is - these are mushrooms
. Let's thank the animals for the treat. (Thank you!)
Summary of a modeling lesson in the junior group “Mushrooms on a Stump”
Summary of a modeling lesson in the younger group
"Mushrooms on a Stump"
Target:
Introduce children to the constructive method of sculpting mushrooms. Show techniques for modeling a mushroom cap: rolling out the ball and flattening it. Pay attention to the need for a strong and neat connection of the parts. Arouse interest in creating a collective composition. Cultivate accuracy when working with plasticine.
Tasks:
- educational
: expand children’s understanding of forest mushrooms (fly agaric, porcini mushroom.
— developing:
- introduce the features of their appearance and places of growth; - edible, inedible, form ideas about the sequence of sculpting objects from several parts and methods of connecting them, develop thinking, attention, speech, hand motor skills, develop a sense of shape and color, develop an improvement in the ability to use napkins.
educational
: - to cultivate a caring attitude towards nature, curiosity, accuracy.
Material
: plasticine for modeling (red, brown, yellow, white); pictures with images of mushrooms; modeling board, napkins for wiping hands, sample.
Progress of the lesson:
Guys, let's remember what time of year it is outside (Autumn) Guys, please tell me at this time of year what grows in the forest (mushrooms, berries) - Yes, mushrooms really grow in the forest, but where? please tell me (in clearings, under trees, in the grass, and on old stumps) What should we take with us to the forest? (basket). Let's go guys to the forest.
Low mobility game
"We are going to the autumn forest"
We are going into the autumn forest (Children walk in a circle) And the forest is full of miracles! We will look for mushrooms (Place palm to forehead) And collect them in a basket. (Squat down and collect mushrooms).
So we ended up in the forest, now we are mushroom pickers (clarify who we are?) Guys, you can get lost in the forest (Yes) you can get lost in the forest and to prevent this from happening, mushroom pickers shout to each other AU!!! Well done!!! (We sit down on the chairs). There are a lot of mushrooms in the forest, but not all mushrooms can be collected. Some mushrooms are called edible, they can be eaten, while others are inedible, they cannot be eaten by humans (dangerous for people). Guys, please tell me how mushrooms are similar. All mushrooms have a cap, a stem, a root (mycelium) - in the ground. And how do they differ (Children's answers) Mushrooms differ in color, shape, size. Let's remember together what mushrooms grow in our forests? (boletus, boletus, boletus, chanterelle, russula, fly agaric)
Practical part.
The teacher invites the children to make many, many mushrooms and place them on a stump. Clarifies children's ideas about the appearance (structure) of a mushroom and shows how to sculpt it.
Mastering the technique of sculpting legs and caps:
• The mushroom has one leg – long and light; Take a piece of white or yellow plasticine and roll out a column in your palms (direct movements of your palms “back and forth”).
• The mushroom has a large cap – round and bright; Take a piece of red, orange or brown plasticine and roll out a ball in your palms (circular movements of your palms) and flatten it to make a gingerbread.
• The hat is held on a stem and lies on top; Carefully connect the stem and cap.
• Place the mushroom on the stump, attach it, press firmly but gently.
Independent work of children.
Children choose the color of plasticine and sculpt mushrooms.
Bottom line.
Playing off finished products. Organization of the exhibition “Mushrooms on a Stump”.
Modeling lesson “Mushrooms in a clearing” in the second junior group
Natalya Mamon
Modeling lesson “Mushrooms in a clearing” in the second junior group
Artistic and aesthetic development
modeling in the second junior group.
Topic: “Mushrooms in the clearing.”
Tasks:
Teach children to sculpt mushrooms in a constructive way from two parts (leg, cap).
Show techniques for modeling a mushroom cap: rolling out a ball and flattening it into a flat cake or disk.
Arouse interest in creating a collective composition.
Develop fine motor skills.
Cultivate curiosity and accuracy.
Materials and equipment:
plasticine brown, orange, yellow; planks; stacks, containers for plasticine; two - three mushrooms, sculpted in advance; compositional basis - a model of an autumn forest with a stump; musical accompaniment during the practical part with the sounds of the forest and the song “Bus” by E. Zheleznova, etc.
Preliminary work:
conversation about mushrooms, looking at illustrations, making in advance a model of the basis of a clearing in the autumn forest with mushrooms and stumps.
Progress of the lesson:
1. Org. moment
Educator: - Guys, guess the riddle!
In the forest under the Christmas tree there is a baby -
Just a hat and a leg. (Fungus.)
Educator: - Well done! I invite you to go on a trip to the autumn forest today!
2. Main part
- Guys, what can you go on a trip with? (children’s options: by bus, by friendship train, etc.)
To the music “We are sitting on the bus” by E. Zheleznova or “Locomotive” (depending on the wishes of the children), the teacher and the children go into the autumn forest. The teacher shows the children a model of a clearing with mushrooms near a tree stump in the autumn forest.
Educator: - Children, look what beautiful mushrooms the stump has grown in a forest clearing. Let's take a closer look at the fungus. What does a mushroom have? (Stem and cap).
Examining a model of a mushroom. Teacher's story.
Show progress.
Educator: - Do you want to sculpt a lot - a lot of mushrooms? (children's answers).
Let's please the forest animals. Let's stick some mushrooms and plant them in the clearing near the stump.
The teacher shows the method of sculpting:
-The fungus has a long and light stalk. It can be sculpted from white or yellow plasticine. To do this, we take a piece of plasticine and roll out a column in our palms - like this (forward - back). The leg is ready!
The cap of the fungus is large and round. It can be molded from red, orange, brown plasticine. For the hat, we take a piece of red, orange or brown plasticine and roll out the ball in a circular motion.
Then flatten it to form a flat cake. The hat is ready!
Carefully attach the cap to the stem of the mushroom. The mushroom is ready! Now we carefully attach it to the clearing.
Educator: - Before we start work, let's stretch our fingers.
Finger game “A fox with a box ran through the forest”
She ran in a forest (we walk along the table with our middle and index fingers)
Fox with a box. (cup-shaped palms)
- What's in the box?
— Forest mushrooms, (put your palm on your fist)
Mushrooms - milk mushrooms
For my son, for my daughter. (Press both hands to your chest)
Practical part. Individual work as the task progresses.
Educator:
- Let's get to work guys.
As the lesson progresses, the teacher helps the children with advice, guiding questions, and individual demonstrations of modeling techniques.
At the end of the lesson, the children place their mushrooms in the clearing near the stump.
3. Reflection. Summarizing. Exhibition of works
The teacher praises the children:
- Well done boys! What beautiful mushrooms you got, and so many! How the forest animals will rejoice! Did you enjoy our trip to the autumn forest! (children's answers)