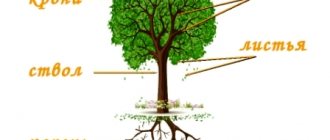
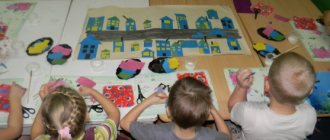
Creating applications contributes to the development of fine motor skills and coordination of movements in a preschooler - skills that are later indispensable during school years. Children develop accuracy, perseverance, and taste. The application of mushrooms and berries will help the teacher solve another problem: to instill in children of different ages love and respect for nature.
- What you need for an applique on the theme of mushrooms and berries made from paper
- Application options for children and sample scenarios for conducting classes
- Junior group
- Middle group
- Senior group
- Video master class on creating the application “Mushrooms in a basket”
- Ready-made templates
- Tips and tricks
Notes on non-traditional drawing "On a mushroom meadow" in the junior group
Lyudmila Pasikova
Notes on non-traditional drawing "On a mushroom meadow" in the junior group
Drawing foam rubber printing using a stencil
"In the mushroom meadow "
Program content: Teach children to depict mushrooms using a stencil using the “printing”
foam stick.
Practice drawing vertical short straight lines with your finger from top to bottom to depict grass. Develop a sense of color and rhythm. Cultivate curiosity and interest in drawing .
Materials, tools, equipment: illustration depicting mushrooms , stencils of mushrooms , sample teacher, foam sticks, sheets of A-4 paper, gouache, napkins.
The teacher shows an illustration of mushrooms and reads a poem:
We'll go into the woods, we 'll find a fungus ,
Small, okay, in a smart hat. (O. Vysotskaya)
Don't hide, mushroom in the grass ,
I'll rip you off anyway!
Examines parts of the mushroom , specifies color and size.
Then he turns his attention to the sheets of stencils. “You have mushrooms living in your clearing . But where are they? They hide behind the windows. Let's find them together? I dip the stick into the white paint and tap it on the “window”
.
Like this. Knock-Knock! Try it yourself.” Children accompany their movements with the words: “Knock-knock-knock
.
The teacher helps fill out the entire lower part of the window. mushrooms lack ? Now let’s fill the upper part of the “window”
. At the end of the work, the stencils are removed. The teacher reads a poem:
Look, mushrooms have appeared !
Brown cap, solid belly
You see, this is dad, it’s easy to recognize him.
We tried our best and found mushrooms in a green meadow .
Summary of a lesson in the junior group of kindergarten on the topic: Mushrooms hide in the grass
ABSTRACT
CLASSES IN THE JUNIOR GROUP
ON THE TOPIC: “MUSHROOMS HIDDEN IN THE GRASS.”
KIND OF ACTIVITY:
painting with gouache paints.
Subject:
"Mushrooms are hiding in the grass."
Program content:
1. Teach children to depict mushrooms in two parts: the stem is vertical stripes, the cap is half a circle.2. Strengthen the ability to paint over a hat, repeating the outline of the drawn figure.3. Arouse interest in creating the composition “Mushrooms in a clearing.”4. To foster in children a love and interest in nature.
Preliminary work:
Reading poems and guessing riddles about mushrooms, looking at illustrations depicting mushrooms and studying their dummies, drawing up an image of a mushroom on a plane from parts (leg and cap), showing analogies (umbrella, children's sandbox, table lamp). Modeling mushrooms from plasticine and salt dough. Game exercises for drawing elongated ovals and halves of a circle.
Dictionary:
cap, stem, circle, oval, half circle.
Individual work with children:
___________________________________
__________________________________________________________________
Teaching methods and techniques:
visual: sample, display, analysis of children's work; verbal: examination, explanation, artistic expression; gaming: game moment, surprise; practical: drawing exercises.
Materials and equipment:
watercolor paints, sheets of blue paper, equipment for painting with paints.
Visual range:
Computer presentation on a given topic. Mushroom dummies, basket. Toys - squirrels. The teacher has a sheet of paper to show drawing methods, figures of two or three squirrels, a picture depicting edible and inedible mushrooms. Variants of compositions “Mushrooms”, cardboard oval and circle. A set of technology cards for drawing mushrooms.
Sound series:
children's songs “About Mushrooms”, “For Mushrooms”.
Duration:
15 minutes.
KIND OF ACTIVITY:
painting with gouache paints.
Subject:
"Mushrooms are hiding in the grass."
Program content:
1. Teach children to depict mushrooms in two parts: the stem is vertical stripes, the cap is half a circle.2. Strengthen the ability to paint over a hat, repeating the outline of the drawn figure.3. Arouse interest in creating the composition “Mushrooms in a clearing.”4. To foster in children a love and interest in nature.
Progress of the lesson:
You guys and I will go to the autumn forest. Let's close our eyes tightly, tightly, our eyes opened, we circled around ourselves and found ourselves on a forest path.
We are walking along paths
We are walking paths
We are going with baskets
We are going with baskets
The squirrels come running, greet the guys, and offer to guess a riddle about what they love most:
“Under the pine tree by the path, Who stands among the grass, There is a leg, but no boot, There is a hat, but no head.”
They say that many mushrooms grew in their forest. And winter will soon come, and if they do not stock up on good mushrooms for the winter, they will starve. But they don’t know which mushrooms are good and which are poisonous and ask the guys to help them figure it out. Children help the squirrels sort the mushrooms into two piles: edible and inedible, and at the same time repeat the names of the mushrooms. The best mushrooms are porcini mushrooms. They have brown caps and white legs.
Physical exercise “For mushrooms”
All the little animals at the edge of the forest are looking for milk mushrooms and milk mushrooms. The squirrels were jumping, the squirrels were plucking. The fox ran, the foxes collected. The little bunnies were jumping around, looking for honey mushrooms. The bear passed by and crushed the fly agaric.
Children walk in a round dance. They jump up and down and pick imaginary mushrooms. They run in a circle, collecting imaginary mushrooms. They jump while standing, picking imaginary mushrooms. They waddle, then stamp their right foot.
V. Nishcheva
The teacher puts the picture in front of the children and turns to the squirrels: don’t worry, squirrels, the children and I were just about to draw a lot of porcini mushrooms in the forest. I will now show you how to draw porcini mushrooms.
Sequence of work:
Drawing small white mushrooms:
— using white paint, we apply vertical strokes, applying the entire bristles of the brush to the paper, the legs are straight; - rinse the brush well, dip its bristles in brown paint; - using a horizontal stroke on top of the legs, draw caps to the legs. The legs stand, and the hats lie on them.
Drawing large mushrooms:
- the stem of the mushroom is oval, draw it using your palm, first outline your hand with a simple pencil, and then paint it with a brush.
- hat - a semicircle, half a circle, draw a horizontal line above the leg and draw half a circle, color it according to the shape.
— the cap can be brown or red.
— we finish painting the grass with a brush and strokes.
Finger gymnastics “Mushrooms”
This finger went into the forest, This finger found a mushroom, This finger began to clean, This finger began to fry, This finger sat down and ate, That’s why it got fat.
During the lesson, the teacher, on behalf of the game characters, encourages the children to draw mushrooms carefully. Squirrels praise those mushrooms in the drawings that have straight legs and caps (the strokes are laid vertically and horizontally).
At the end of the lesson, the drawings are placed on the stand close to each other. The squirrels admire the large forest, which is full of porcini mushrooms.
Then the squirrels call several children to help them find strong porcini mushrooms that can be stored for the winter.
It's time for us to go back to kindergarten. We walk along the paths
We follow paths.
We close our eyes, open them,
Turned around themselves
And they returned to kindergarten.
On the topic: methodological developments, presentations and notes
Target. Teach the technique of smearing, i.e. pressing on the rolled ball with your index finger and pulling it up to obtain an image of grass; continue to teach yourself how to pinch off small ones.
Educational areas: cognition, communication, physical development. Goal: to consolidate and expand children’s ideas about spring, to cultivate a caring attitude towards nature; development of fine motor skills of the hands, development of...
Summary of a finger painting lesson in the first junior group Topic: “Let's decorate the Christmas tree” Types of children's activities: playful, communicative, cognitive-research, productive.
Summary of a finger painting lesson in the first junior group “Beautiful cup with polka dots” Irina Shishkina Summary of a finger painting lesson in the first junior group “Beautiful cup.
a lesson on sensory development on the topic “magic meadow”.
Learn to draw in unconventional ways - with your fingers.
Source
Application with drawing elements “Mushroom clearing” in the second junior group
Liliya Nasretdinova (Fatiykhova)
Application with drawing elements “Mushroom clearing” in the second junior group
Author : Liliya Nasikhovna Fatykhova, teacher of the first qualification category of MADOU No. 100 “Firebird”
city of Naberezhnye Chelny.
Goal: to develop imagination and interest in artistic creativity.
-learn to depict mushrooms using the appliqué technique : create images of contrasting sizes from ready-made elements;
— enrich children’s vocabulary and develop their speech;
— practice the technique of painting with gouache paints .
- cultivate curiosity and interest in nature;
- stimulate children's creative activity;
- cultivate independence, confidence, initiative.
— Develop communication skills, cognitive processes (mental operations, arbitrariness and concentration, memory capacity and others).
— Maintain children’s interest in the discipline being studied.
— Develop a sense of color, shape, size and composition.
Materials, tools, equipment.
Sheets of white paper for composing the composition, ready-made forms for gluing mushrooms - rectangular or oval legs and round or semicircular caps (2 sets of elements each, contrasting in size, glue, 2 brushes, gouache paints, cups (jars)
with water, paper and cloth napkins, oilcloths.
Application options for children and sample scenarios for conducting classes
Different ages of children involved in creative work imply different levels of complexity of crafts:
- younger age - a simple application from two or three ready-made templates;
- middle age - children learn to cut elements from blanks;
- older age (preparatory group) - application from composite elements.
Junior group
A simple application is made: a pair of mushrooms (large and small) are located in the middle of the sheet, a currant branch on the side, and grass at the bottom.
Materials for a lesson on appliqué on the theme of mushrooms and berries in the younger group (blanks cut out of paper):
- sheet of cardboard;
- cap and stem of large and small mushrooms;
- twig with berries;
- grass;
- glue in the form of a pencil.
The teacher prepares in advance a finished application, a nursery rhyme.
Procedure for conducting the lesson:
- Show the finished work.
- They read out a poem.
- They look at mushrooms and berries together with the children (questions like: “What is this growing in our clearing?”).
- Explain the structure of a mushroom (questions like: “What does our mushroom consist of?”).
- Explain what materials are prepared for creativity;
- They ask the children to show one by one the cap and stem of a large mushroom (they call it a mushroom - dad or big brother), then - a small one (son or little brother).
- The children are asked to place the blanks on a piece of paper. Note! Some of the group may place the appliqué elements inaccurately (for example, place the mushrooms too close to the edge of the sheet), so they need to explain that there is grass, mushrooms, and berries in the clearing, which means that all the blanks must fit on the sheet.
- They show how to apply glue to the workpiece and how to perform gluing.
- They start gluing (phrases like: “first we will glue the leg”, “then the hat”, “here are the berries”, “now there is grass in the clearing”).
- They examine the resulting applications and praise the children.
Middle group
An application is made of several mushrooms in a clearing. Mushrooms of different sizes, currant branch, grass.
Materials for the lesson for everyone in the group:
- sheet of cardboard;
- blanks made of colored paper: circles (for hats) and rectangles with drawn rounded edges (for legs);
- a branch with berries drawn on colored paper;
- glue;
- glue brush;
- napkins.
The teacher prepares a version of the finished application, rhymes, riddles on the topic, and music for the game.
Procedure for conducting the lesson:
1. They offer the game “Mushroom picker”. While the music is playing, they can frolic, and as soon as the music stops, squat down so that the mushroom picker does not find them and take them into the basket.
2. They say about mushrooms that they come in different shapes and sizes.
3. They explain that the shape of the cap depends on how you look at it: if from above, then a circle, if from the side, then a semicircle.
4. Explain how to use scissors to cut blanks.
Working with scissors requires care. During this part of the lesson, the teacher should not allow children to be distracted, spin, walk or run around the group.
5. They show how to get two mushroom caps from a circle: fold the circle in half, smooth the fold line with your fingers, unfold it and cut along the fold line.
6. Cut out the legs from the blanks. They show the children how to make a rounded cut: smoothly turning the left hand with the workpiece towards the right hand with scissors.
7. They show how to cut grass from a strip of green paper: make a series of cuts diagonally along the upper edge of the strip.
8. Children are taught to spread glue on the workpiece with a brush: a little glue is spread in a thin layer from the center to the edges of the part.
9. Glue the mushrooms (first the stem, then the cap), then the grass so that the mushrooms “peek out” from it. The last one to glue is the currant branch.
10. They examine the resulting clearings and praise them for their efforts.
Children are not always able to immediately apply the correct dose of glue to the workpiece. When gluing, excess glue protrudes beyond the edges of the part. It must be explained that in this case, its remains are carefully wiped off with a napkin.
Senior group
For classes in the senior group you will need the following set of materials:
- a sheet of thick paper (or cardboard) as a base;
- sheets of colored paper with drawn squares and circles;
- a sheet of paper with drawn outlines of whole mushrooms;
- a sheet of red paper (future berries), a sheet of green paper (for a branch of berries), a sheet of white paper (for dots of fly agaric);
- colour pencils;
- glue;
- glue brush;
- napkins.
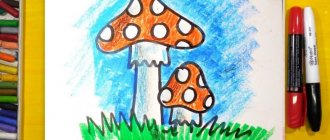
The teacher prepares in advance a version of crafts, rhymes and jokes on the topic, colorful pictures of forests, forest edges, and different types of mushrooms (edible and poisonous).
The procedure for conducting the lesson.
- Children are given a “tour” through the forest using pictures.
- Explain the difference between edible, inedible and poisonous mushrooms. They explain that although poisonous mushrooms are not eaten, when walking in the forest they should not be kicked or knocked down with a stick, since they serve as medicine for animals and decorate the forest.
- They suggest choosing the color of paper for the caps (for example, for fly agaric - red, for edible ones - gray, brown).
- Cut out circles from selected sheets of paper - blanks for hats.
- They show how to make two hats from one circle: fold the circle in half, smooth the fold line well with your fingers, straighten it, cut the workpiece along the fold line.
- They show how you can get two legs from one square: fold the square in half corner to corner, iron the fold line with your fingers, use scissors to round all four edges of the rectangle, bend it and cut along the fold line. They say that this method of cutting is called paired, so you can get two identical appliqué parts.
- Cut out the currant berries. You need a lot of them, so they show you how to cut two or four berries at once: fold a sheet of red paper in half or four, draw a circle - a currant berry, cut this circle with scissors, getting two or four berries in one cut.
- Just like the berries, cut out white circles - fly agaric specks.
- They tell you how to cut out a whole mushroom using a ready-made template. They explain that this template is easier to color first and then cut out. Color the cap and stem with different colored pencils and cut out along the outline.
- Cut out a currant branch from a green sheet of paper according to a pre-drawn template.
- They show how to cut grass from a strip of green paper: make paired cuts diagonally along the upper edge of the sheet.
- Place the applique details on the base sheet. They say that complex parts (a currant branch with berries and a fly agaric cap with specks) can be glued in different orders: first prepare the entire part by gluing specks on the cap and berries on the branch, and then glue the part to the base, or in the reverse order.
- Glue all the prepared parts onto the base.
- They show a little secret: the currant branch can be slightly under-glued and bent a little. Then the application turns out to be voluminous and the currant branches sway like real ones.
Children often make the mistake of cutting off the cap from the stem of the mushroom. In this case, it is best to explain that what happened is easy to fix. To do this, glue the cap and stem of the cut mushroom separately.