Progress of the lesson:
Feed me gasoline
Give me rubber for my hooves,
And then, raising dust,
— That's right, it's a car. Have you seen how many cars are on the streets of our city? And they are all different. What cars did you see on the way to kindergarten? (Children's answers)
-What color are they?
There are different cars -
The tires rustle loudly,
They are in a hurry to go to kindergarten.
— One of the cars came to us for a lesson (showing a toy)
. Let's look at it.
What parts does it consist of?
Let's try to draw a car. But every driver wants his car to be special. He chooses a car of the color he likes. (Ask the children what color they want to paint their car).
You have sheets of paper with a drawing of a car on your tables. You will carefully paint them with your favorite color and draw wheels. And then our car will be able to drive along the city street.
See how to carefully paint a car.
Mine will be red.
I take the brush by the iron skirt, wet it in water, then pick up paint, and remove excess paint on the edge of the can.
I move the brush along the drawn line without lifting it from the sheet. I carefully paint the car.
I rinse the brush in the jar and dry it on a napkin. I take black paint on a brush, trace the outline of the wheels and paint over them.
Let's take brushes and try to outline the car without paint.
- Now choose the paint that you need for your car.
Independent work of children (the teacher provides individual assistance.
Well done guys, your “Cars of Our City”
, now our city will be replenished with colorful cars. Lesson summary
Children's work is hung on the board.
March
Lesson 61. Application “Flags” Program content.
Strengthen the ability to create in an application an image of a rectangular object consisting of two parts; correctly position an object on a sheet of paper, distinguish and correctly name colors; Use the glue carefully and spread it all over the mold. Develop the ability to enjoy the overall result of the lesson.
Lesson 62. Drawing “Beautiful flags on a string”
(Option “Spatulas for dolls”) Program content.
Teach children to draw rectangular objects using separate vertical and horizontal lines. Introduce the rectangular shape. Continue to practice drawing and coloring techniques with colored pencils.
63. Modeling “Tumbler” Program content.
Teach children to sculpt an object consisting of several parts of the same shape, but of different sizes, pressing the parts tightly against each other. Create a desire to decorate an object with small details (a pompom on a hat, buttons on a dress). Clarify children's ideas about the size of objects. Strengthen the ability to sculpt accurately. Create a feeling of joy from what you have created.
Lesson 64. Modeling “Little Masha”
(Based on a nursery rhyme) Program content.
Teach children to sculpt a small doll: the fur coat is a thick column, the head is a ball, the hands are sticks. Strengthen the ability to roll out clay with straight movements (column - coat, sticks - sleeves) and circular movements (head). Learn to compose an image from parts. Invoke a feeling of joy from the resulting image.
Lesson 65. Drawing “Draw someone who wants something beautiful” Program content.
Develop aesthetic perception. Learn to see and highlight beautiful objects and phenomena. Strengthen children's ability to draw with different materials, choosing them as they wish.
Lesson 66. Modeling “Treats for dolls, bears, bunnies” Program content.
To develop children’s ability to choose the content of their modeling from the named objects. Foster independence. Reinforce sculpting techniques. Create a desire to sculpt something needed for the game. Develop imagination.
Lesson 67. Drawing “Baby Books” Program content.
Teach form-building movements of drawing quadrangular shapes with a continuous movement of the hand from left to right, from top to bottom, etc. (you can start the movement from any side). Clarify the technique of painting by moving your hand from top to bottom or from left to right. Develop imagination.
Lesson 68. Application “Napkin” Program content.
Learn to make a pattern of circles and squares on a square-shaped paper napkin, placing the circles in the corners of the square and in the middle, and the squares
between
them. Develop a sense of rhythm. Strengthen the ability to glue parts carefully.
Lesson 69. Drawing “Draw something rectangular in shape” Program content.
Teach children to independently think about the content of the drawing, to apply the acquired skills in depicting various rectangular objects. Learn to select pencils of the right colors for drawing. Practice drawing and painting rectangular objects. Develop a sense of color and imagination.
Lesson 70. Modeling “Tumbler Bear” Program content.
Exercise children in depicting objects consisting of round parts of different sizes. Practice the ability to fasten parts of an object, pressing them tightly against each other.
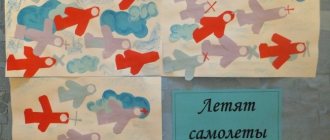
flying plane
Having drawn such an airplane surrounded by clouds, the picture can be presented to dad on February 23rd. This image is more shaped like a whale. Let's look at it step by step:
- Draw the silhouette of a whale - an oval at an angle of 45 degrees, slightly narrowed on the right.
- On the right, add a vertical semi-oval - a tail. Make two thin perpendicular wings in different directions from it.
- Add wings to the right and left of the body.
- Draw the pilot's cockpit in front, and along the body - circles-portholes. There should be caps of clouds around the flying plane.
Now start coloring your creation.
How to draw an airplane for a child
Once upon a time, when I was a child, my father showed me how to draw airplanes and tanks. And it was with this skill that I went through the whole school. It was always funny how people around me tried to guess what I was drawing or how an airplane could come out of it.
With age, drawing became more complicated with light, shadow, and small details. However, the scheme remained unchanged.
This is exactly the diagram for drawing a fighter from World War II:
How to draw an airplane for a child
However, a modern airliner fits perfectly into this scheme:
How to draw an airplane for a child
Since there is a need to depict symbolism, do not forget to show the sequence of drawing an asterisk:
How to draw an airplane for a child symbolism
Tail and propeller
Step-by-step drawing does not end with the wings; you need to depict the figure as full. Drawing a tail is not difficult; it is usually directed upwards. When teaching children how to draw, tell them why an airplane needs a tail and what function it performs in flight. This will help you remember the names of the parts and reproduce them more easily in the future.
Difficulties may arise in drawing a propeller; it is a slightly more complex geometric figure. It can be depicted as two elongated drops.
Some airplane models do not have a propeller on the front, so if drawing one is difficult, you can do without it.
We make sure to draw the cockpit and viewing windows so that the plane takes on its final appearance.
Passenger plane
And for those who want peace, not war, we suggest drawing a Boeing passenger plane.
Step by step lesson:
- Draw an oblong oval at a slight angle. Closer to the top, draw a long parallel line, visually dividing the body into two parts. Draw two small ovals on the bottom. The right oval should be inscribed inside the body, and the left one should be pushed out.
- At the top right, add two lines converging at an angle of 60 degrees. Trace the contours of the drawing so that these lines turn into the tail of the airplane.
- Make engines from the outlined ovals by drawing two semicircles in front and one in the back.
- Above the right engine, draw the wing, adding all the necessary details, as in the original.
- Now start selecting the front window, portholes and doors.
Your Boeing is ready to fly, or rather, ready to paint.
We looked at several options for step-by-step drawing of sketches of aircraft of varying complexity. Which one to start first depends on the age of the child and his creative inclinations.