How can you teach children what a volcano is in an accessible and interesting way? ScienceLife.ru team has prepared an excellent solution for this issue for you!
Of course, you can take books with photographs of volcanoes and try to explain the eruptions and magma. Or, you can make a volcano with your own hands at home. Sounds tempting, doesn't it?
You will not only satisfy the curiosity of young researchers, but also inspire them to take an interest in various sciences: geography, chemistry and geology.
It is worth saying that making a volcano at home is not difficult!
We recommend doing these experiments with children aged six to eight years, who will have a better understanding of what is happening. Although this fascinating spectacle will also interest both kids and adults.
The purpose of the experiment is to give children a basic understanding of a natural phenomenon - a volcano, and to show the interaction of alkali with acid (neutralization reaction).
Necessary materials:
- flask or bottle;
- plasticine to give the shape of a volcano;
- water;
- soda;
- lemon acid;
- food coloring (orange or red gouache);
- dishwashing liquid;
- container for mixing ingredients and spoon;
Lake with boiling water
To conduct the experiment you need:
- Take a pan filled with water. She will be an imaginary lake.
- Fill two containers: one with sodium bicarbonate, the other with citric acid.
- Show your child that if you add soda and acid to a lake, the water will boil.
This activity will keep your child occupied for a while. If you take a stick and then stir the water with it, the water will bubble more.
This is due to the fact that the molecules of soda and acid will interact faster when stirred.
Making a fairytale island
You can build an island in a large plastic container. Pour real water and line the bottom with round pebbles. Make a container for the volcano from a baby food jar or an old glass. For the mountain inside which the container will stand, you need to make a cardboard model; your child will be happy to cover it with plasticine.
The sequence of making a volcanic mountain:
- cut out a circle of the required diameter from thick cardboard;
- make a cut from the edge to the center of the circle;
- roll up a cone;
- the edges of the cone are fastened with a stapler or tape;
- cut off the upper part of the cone at a height equal to the container chosen for the volcano;
- place the container inside the cone.
I coat the top of the mountain with plasticine. To do this, roll out small brown plasticine cakes and stick them to a paper cone, completely covering the cardboard. The top of the volcano can be made of red plasticine, which will imitate hot lava.
They place a volcanic mountain on a dry island of pebbles. They are seated around small rubber animals that are among children's toys. Multi-colored amazing dinosaurs or wolves, foxes, bunnies, bears and other inhabitants of the forest and jungle. Depending on what animals were planted, vegetation for the island is selected. Large tree ferns and horsetails for dinosaurs, and ordinary fir trees and birches for bunnies and foxes.
Plastic plants are also often sold in sets for children's games. You can use a leaf of a living fern and twigs of plants if it is summer outside.
Plants can also be molded from plasticine, made from threads and beads or ordinary cardboard.
You can make small houses out of cardboard for plastic Indians and soldiers. It is better to use cardboard to make plants and houses when the island is in a container with blue-dyed sand instead of water or on a blue plasticine sea.
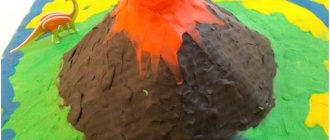
Experience . "Real" volcano
The children's delight will know no bounds if they jointly build a model of the volcano and try to give it the appearance of the original. In this matter, the experience and enterprise of parents will come in handy. What to do:
- Cover the container with plasticine, making it look like the neck of a volcano.
- Place the dishes on a tray and fill them almost halfway with baking soda.
- Pour in a few tablespoons of vinegar.
- Lastly, pour sequins or sparkles into the mouth. If they end up at the very bottom, stir them with a wooden stick. The flowing foam will entail sequins, simulating a real eruption, which in natural conditions occurs with the extraction of fragments of stones and magma from the depths of the earth.
The base of the “volcano” can be molded yourself from new or used plasticine, or from salt dough.
Papier-mâché volcano model
Papier-mâché is an ancient technique for creating a variety of objects from paper or cardboard. It originally originated in China and was used to make armor. In Europe, they began to make dolls, toys, and theatrical props from glued paper.
An erupting volcano can also be made using the papier-mâché technique. For this you will need old newspapers, white paper, a plastic bottle, paints, glue. Manufacturing stages:
- The first stage is creating the foundation for the mountain. A plastic bottle is placed in the center of the cardboard sheet that will serve as the base. The bottom is covered with crumpled pieces of paper to form a wide base.
- Whatman paper is cut into long strips. They are glued vertically from the foot of the hill to the neck of the bottle, forming a cone-shaped mountain. Then the paper strips are glued horizontally, holding the frame together.
- Newspapers and white sheets are torn into small pieces of 3-4 cm. First, newspaper scraps are moistened with water and placed on the frame, then coated with glue and a layer of white pieces is placed on top, then a newspaper layer again (water is no longer used, each layer is coated with glue). There should be at least 10 such layers in total for the layout to be dense. The last 2-3 should be white.
- When the frame of the volcano is formed, you can start painting it. First you need to wait for the craft to dry completely.
Volcano made using papier-mâché technique
This technique is more difficult, but children enjoy using it. They are fascinated by the opportunity to tinker with wet paper and create crafts of any size and shape with their own hands.
Preparing materials and tools:
- plastic bottle with a volume of 0.5 l;
- cardboard or plywood for the base;
- white paper, newspapers - a lot;
- PVA glue and water, mixing container;
- scissors and the desire to create.
Let's get started - cut off the top of the bottle so that a fairly narrow neck remains. We tear newspapers into pieces in any shape, cut white paper into thin strips - about 1 cm wide.
We attach the cut bottle to the base with PVA glue and let it dry. Now it's the turn of the slopes - we make them from strips of paper.
We reinforce the vertical strips with horizontal ones. The “window” step between them cannot be more than 1.5 cm.
The main work begins using the papier-mâché technique. In a container, dilute PVA glue with water in a ratio of 1*1, place newspaper scraps into the solution. Then we take them out one at a time and place them on a piece of paper strips.
The last layer will be pieces of white paper, glued according to the same principle.
The last stage is coloring. You can start working on it only after the workpiece has completely dried. This may take up to 2 days.
You can deviate from the described technology and go a slightly different way. More details in the video tutorial:
rushing river
To create a river that will boil you will need:
- Plastic pipe.
- Sodium bicarbonate.
- Vinegar.
- Water.
- Food coloring
Do the following:
- Take a plastic pipe and cut it lengthwise.
- Place a makeshift river bed in the bathtub.
- Mix soda and citric acid in a 2:1 ratio.
- Prepare a vessel with water.
- For added color, you can add food coloring to the water or soda mixture.
- Pour baking soda and vinegar into the channel.
- Gradually add water.
From the actions taken, the water will run and foam. If you close the drain, the bath will be a kind of colored lake.
Model made of paper and plasticine
A volcano can be created from paper and plasticine. To make it, you will need a thick sheet (from 220 g/sq. m) and plasticine of different colors: brown, green, red, yellow.
To begin with, make a paper base. A large circle is drawn on the sheet, and inside it is another one of small diameter. These circles are cut along the contour, cut from the edge to the central hole and glued together in the shape of a truncated cone. This cone will imitate the body of a volcano, and the hole on top will be its mouth.
Next, plasticine of different colors is molded onto the base of the volcano. Brown and green colors are used below - they depict earth and grass. For the base of the mountain they take brown and yellow plasticine, for the vent - red, orange, black. From plasticine you can make lava flowing down a slope, fire splashing out of a crater, and stones flying down. Such a volcano can be placed on a wooden, plastic, or cardboard stand.
What is necessary
In order to carry out the experiment, the following components are required:
- acetic or citric acid;
- baking soda;
- water.
It is better to experiment using citric acid, because it does not have such a strong odor and is also safer than vinegar.
The ingredients are taken in the following proportions:
- for 100 ml of water 1 tsp. vinegar, 1 tsp. soda;
- per glass of water 2 tsp. soda, 1 tsp. citric acid.
There are several tricks that will allow you to carry out the reaction more violently and effectively:
- For a more vigorous reaction, regular water can be replaced with carbonated water.
- To add color to the components, you should add gouache or food coloring.
- To make the foam thick, you need to add a drop of detergent to the ingredients.
- You can also add sparkles or sequins for added effect.