Aircraft options
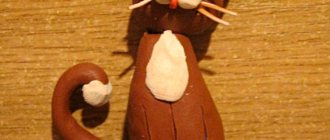
The craft can be made from cardboard and paper, or it can be cut out of wood or molded from plastic. The easiest way to make an airplane is from plasticine, because this is the material that is easy to model, and if you don’t like something in the design, you can redo it without throwing away the material.
Cardboard and paper are not expensive materials and you can also take another sheet if there is an error in the calculations. But an airplane made of wood, plywood, or plastic requires precise calculations, because it is difficult and sometimes impossible to redo mistakes, and you have to take a new blank and start the work all over again.
DIY airplane craft ideas
There are many options for crafting an airplane. But some people just want to make a beautiful design, while others care about the flight qualities of a homemade aircraft. Therefore, we decided to bring to your attention various aircraft models that are made from different materials.
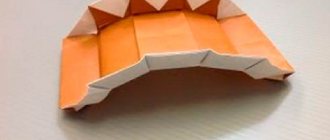
From the box
This aircraft design will not fly, but it fits very nicely into the interior of a boy’s room and you can put school supplies, books and notebooks in it:
- You need to take a rectangular box and cut off the top part. We will need it to make the propeller, tail and wings.
- We cut the box without a top on two opposite sides in a semicircle.
- From the top trimmed part of the box, cut out a screw and glue it to the front of the box.
- We make wings from cardboard and insert them into the slots in the sides of the box.
- We cut out the tail for the plane and also insert it into the slot in the box at the back.
- If the cardboard box is gray, and you want a bright or shiny airplane, then the box can be covered with colored paper or foil.
Paper
To make a paper airplane you need a sheet from a school notebook or an office sheet. It is impossible for the paper to have errors in the form of crumpling. Otherwise the plane will not fly well:
- We bend the sheet lengthwise in the middle.
- We bend the sheet on both sides so that corners are formed like an envelope.
- Bend the envelope down. There should be some space between the nose and the edge of the sheet.
- Bend the two corners from the top inward. They should fit tightly together, and the nose of the plane should be visible from underneath them.
- Bend the nose upward.
- We bend the structure in half outward. Along with this bend, the nose of the aircraft also bends.
- Bend the wings on each side.
Now you can test the plane for flight performance.
Cardboard airplane
This model can be made in the likeness of an airplane out of the box. Or you can come up with your own design, because that’s why the craft is called that way, because you need to make an effort and imagine on a given topic.
If a child wants to play outside with a cardboard airplane, then you can make a large structure from thick cardboard that will be put on over the legs, and the boy will feel like a real pilot at the controls of the plane.
If such a structure is painted green, it will be a military aircraft. Boys love to play war games, and this design will make the boy happy.
You can make a small airplane out of cardboard that will decorate your room or be useful for an exhibition at school or in a circle.
To do this, cut out all the parts of the aircraft from cardboard and glue them together. And the craft itself is painted or made from colored cardboard.
The chassis can be made from drinking straws and glued drink bottle caps or large buttons onto it.
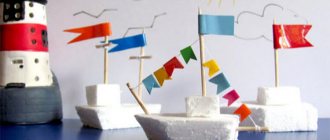
From a plastic bottle
To make an airplane from a plastic bottle, you need to prepare:
- the bottle itself with a capacity of your choice;
- straw for drinks;
- bottle caps;
- cardboard;
- acrylic paints;
- PVA glue.
Progress:
- Cut out the airplane parts from cardboard: propeller, tail and wings. We cover them with colored paper.
- We cut slots in the plastic bottle where the parts will be inserted. There should be two slots for the wings: one at the top and one at the bottom. For the tail we make three slits: one in the center and two on the sides of the tail of the bottle.
- We insert the screw under the cap onto the neck and tighten the cap.
- We make a landing gear from drinking straws and lids and attach them to the bottom of the plane.
- The bottle can be left transparent, or you can cover it with colored paper and glue the windows in the cabin.
Wood
It is quite difficult for a child to make a structure made of wood. Therefore, he will need adult help:
- First you need to find a template on the Internet and print it on paper.
- Then cut out all the parts for the airplane from plywood, pressed sawdust or wood. Be sure to go over them with sandpaper to remove all the thorns.
- The parts are glued together using wood glue.
- When the structure is dry, it can be painted or varnished.
- Such a plane, especially if it was made with the help of dad, will delight the boy for a long time.
From toilet paper rolls
We will need two toilet paper rolls and one paper towel roll. If such a long one is not available, then you can glue two small ones:
- We cover the bushings with multi-colored paper so that the plane turns out bright or with foil, then it will be silver.
- The long sleeve is placed in the middle, and the small ones are glued to the sides. Glue wings cut out of cardboard to them. Glue a circle of cardboard onto the front of the sleeve and attach a screw to it.
- The tail is glued to the back of the sleeve.
- You can cut out a place for the pilot to sit in the middle of the sleeve. You can put toy people there.
- Glue the chassis, which is made from cardboard or plastic bottle caps, to the bottom of the sleeve.
From popsicle sticks and clothespins
A very simple and original airplane is made from a clothespin and ice cream sticks:
- We will need two large sticks for the wings, one small one for the tail and a clothespin.
- We glue the wings onto it from the bottom and top, and at the end of the trailer we glue a small stick perpendicular to the clothespin.
- Now you can decorate the plane with acrylic paints and write something on the wings or tail.
Modeling Rules for Beginners
Getting acquainted with the origami technique should begin with the rules that will need to be followed in the future. Of course, many adults believe that modeling paper airplanes is just a way to kill time and fool around with children, who will then fly them.
But the Japanese treat this process with great trepidation. Especially when it comes to paper airplane modeling. They even identified a separate direction for this, which was called arogami.
In Japan, they even hold competitions between masters who model such figures. The championship is held annually, and only real masters who have managed to come up with a technology that allows them to create a unique model can take part in it. Of course, it must stay in the air for a long time.
Only in this case can one count on victory. But to achieve this, you should remember a few basic rules:
- It is better to use thick paper for design. This will allow you to make a figurine that will float in the air longer;
- in order to make an airplane figurine, you should use standard paper size - A4;
- the use of tape and glue is unacceptable;
- all details of the figurine must be symmetrical. This is necessary so that the plane stays well in the air;
- The shape of the toy should be selected carefully, as this will affect the flight range.
Pay attention to one important detail. There are a large number of schemes that will help you make a wide craft. It will look very interesting and presentable, so it will be suitable for decoration.
But at the same time, the range and duration of its flight will be minimal. Therefore, if you want to compete with others on which plane will stay in the air longer and cover a greater distance, you need to give preference to long and narrow models. Moreover, folding an origami flying airplane using this technology is not much more difficult.
Scope of application of crafts aircraft
Boys love to play with airplanes, and when their hangar is filled with different models of aircraft, it becomes a kind of pride among their peers.
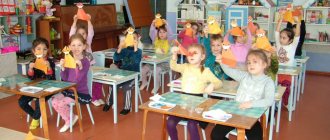
If a boy is involved in a creative circle, then the airplane craft will also be useful to him as an exhibition piece.
Labor lessons at school may also require skills in making flying machines. In addition to all this, the boy’s room will be transformed if there are airplane structures standing on a shelf or hanging from the ceiling.
Gliding airplane
Another criterion by which paper airplanes are evaluated is the ability to stay in the air for a long time.
The maximum recorded record is 29 seconds. But maybe you can overcome it. To do this, you can use a model developed by engineer Can Blackburn.
Let's now look at the assembly step by step:
- Take a sheet of A4 format. We fold the edges of the sheet towards the middle, and the distance between the corners should be about 3 cm.
- Bend the top edge 2 cm.
- Unfold the workpiece and repeat the procedure again. At the same time, we increase the distance between the corners slightly.
- Unfolds the workpiece and bends it 8 more times. It should look like a kind of accordion.
- Bend 3 cm of the top edge and fold the workpiece in half.
- We bend the wings, wrap the tips up.
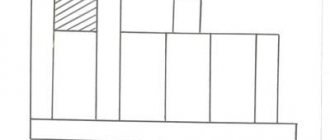
- To make it more clear, you can use the step-by-step diagram below.
How to make a flying plane
Did you know that the longest distance a paper airplane has flown is 69 meters. This distance is recorded as a Guinness record. Of course, achieving such results is difficult, but making a craft that flies 10-20 meters is quite simple.
So, I’m posting step-by-step instructions on how to make a plane that flies for a long time:
1. Take a sheet of A4 paper. We bend the right side of the sheet towards the left edge, forming a corner. Try to avoid distortions, remember symmetry.
2. Proceed in the same way with the left side of the sheet. Having unfolded the workpiece, we get two folds along which we will assemble our aircraft.
3. Next, bend the right side towards the left fold, as shown in photo (3) above.
4. We do the same with the left side. The result should be something like this - photo (4).
5. Next we bend the upper part, as shown in photo (5). Don't forget about symmetry.
6. Make the corners again (photo 6).
7. Now fold the craft in half, first making sure that the corners match.
Carefully bend the wings.
Pay attention to how the nose of the plane should look correctly.
If everything is done as it should, you should end up with a plane like the one in the photo below.
Now we can safely let it fly. And know this: The softer the plane is launched, the farther it will fly.
Origami fighter
A three-dimensional military fighter is also being created using the origami technique. For this craft you will need a regular sheet of office paper.
Execution order:
1. Bend the sheets from both sides up and down. Intersecting diagonal lines are formed.
2. Roll the sheet horizontally. Fold part of the sheet to the left along the vertical axis. Place the right corners inside the workpiece.
3. Turn the sheet over along the horizontal line and fold a vertical strip towards the middle.
4. Bend the corners along a horizontal line. Place them inside the part. Bend the workpiece so that there is a triangle.
5. Bend the lower part of the outer layer to a horizontal line. Flip the folded portion up and split it in half. And straighten the bottom part up.
6. Straighten the folded corners and fold the workpiece along the drawn lines like this: the blue lines are a “mountain”, and the red lines are a “valley”. The top and bottom parts should move towards the horizontal line.
7. A blank similar to an arrow has formed. Flip it horizontally and you get a tail unit.
8. Fold the top corner down along a horizontal line. Bend the wing upward through the horizontal axis. Do the same with the second wing.
9. Sharpen the nose of the plane by bending the corners horizontally. Bend the entire piece to make an airplane. Raise the tail vertically and tuck the corners of the wings inside.
The origami fighter is ready to fly.
Airplane diagrams
We present to your attention the 12 best origami patterns. Choose the best option for you and use the step-by-step diagram to make an airplane. We wish you success and creative mood!