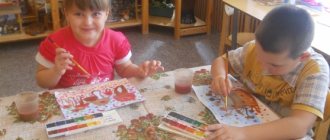
Summary of a drawing lesson for older children. Autumn
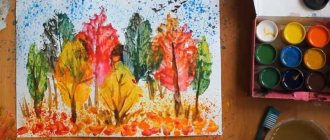
Summary of the drawing lesson “Golden Autumn” in the senior group.
Compiled by: Educator Tatyana Valerievna Strokova Program objectives: 1. To cultivate interest in autumn natural phenomena, emotional responsiveness to the beauty of autumn. 2. Develop a sense of composition and color perception. 3. Continue to teach children to reflect autumn impressions in drawings, draw various shapes of trees, large, small, tall, slender, continue to depict leaves. 4. Fix the working techniques with a brush (with the end of the brush with all the bristles). 5. Correctly place the plot on paper. 6.Develop children's aesthetic perception and love of nature. Materials and equipment: watercolor paper A 4 format, watercolor paints, brushes No. 1, No. 4, napkin, sippy cup. Preliminary work of the teacher: reading poetry, a story about autumn, selecting illustrations for the lesson, paintings about autumn, conversation, observation on a walk, writing notes, preparing material for the lesson.
Progress of the lesson:
Today we have an unusual activity; we are going with you on an unusual journey to an art gallery where we will look at the works of Russian artists on the theme “Golden Autumn”.
Display of paintings by Russian artists on the theme “Golden Autumn” Teacher: Guys! Please tell me what time of year is depicted in the paintings? Children: Autumn Teacher: That's right, autumn. Educator : Guys! What is autumn like? Children: Cold, rainy, gloomy, golden, sunny. Educator: Who knows why autumn is called golden? Golden leaves, golden trees. Children: because in the fall all the leaves on the trees and bushes turn yellow and therefore everything seems golden. Yellow and orange leaves lie everywhere on the ground - like a golden carpet. Educator: guys, when it rains, there are drops on the leaves and when they shine, the leaves seem golden. - Guys, do you know what the autumn phenomenon is called when leaves fall from the trees? Children: - This is leaf fall. Educator: - That's right. Why do trees shed their leaves in the fall? (it becomes cold, in winter it will be difficult for the branches to hold leaves and snow, in winter the tree sleeps and rests). No one tells a tree when to shed its leaves. But then autumn is approaching - and the leaves on the trees change their green color to yellow or red and fall off. This happens because water freezes and stops flowing into the twigs and leaves. The tree falls asleep for the winter. Leaves fall from all trees in autumn. The wind carries them through the streets and parks. The next year, new leaves appear on the trees. Listen to the poem called "Falling Leaves." The conversation is barely audible among the fallen leaves: - We are from maples... - We are from apple trees... - We are from elms... - We are from cherries... - From aspen... - From bird cherry... - From oak... - From birch... Leaves are falling everywhere: Frost is on the doorstep! Y. Kapotov Educator: - In autumn, the leaves on the trees become not only yellow, but also red, orange, brown and even purple. The color of the leaves depends on what the weather is like: the sunnier the autumn days, the brighter the color. Many artists love to paint autumn nature precisely because of this variety of colors. Today I want to bring to your attention reproductions by Russian artists. The very name of the paintings indicates what time of year the artists depicted on it. Looking at these pictures and observing nature on a walk, you and I can be convinced that autumn itself comes up with outfits for trees, bushes, and all of nature, as if organizing a competition to see who has the brightest and most beautiful leaves. I want to admire them every day. What a shame. Autumn uses a long thin brush to repaint the leaves. Red, yellow, gold - How beautiful you are, colored leaf!.. And the wind puffed up your thick cheeks, puffed up, puffed up. And I blew, blew, blew on the colorful trees! Red, yellow, gold... The entire colored sheet flew around!.. I. Mikhailova Educator: Now let’s take our brushes in our hands and let’s practice. We draw the tree trunk from top to bottom, the tree thickens towards the bottom. We draw it until the end of the grass so that the tree does not hang in the air, we draw the branches on the tree with the end of the brush, they reach towards the sun. Educator: what kind of paint do we take to paint a tree? Children: brown. Educator: when we paint the leaves, apply the entire bristle of the brush. Educator: What kind of paint do we take to paint leaves? Children: green, yellow, orange, red. Educator: let's get to work. During the lesson, the teacher pays attention to those children who are not doing well. Encourages. Helps.
1 . Draw the sky. Use brush number 4. We apply blue paint in large strokes from left to right, without changing the direction of the stroke.
2. The second color is yellow. We remind children the direction of the stroke is from left to right.
3. At the next stage of our work, we need to add two more colors: orange and brown. We remind children not to change the direction of the stroke from left to right. We wait a few minutes for the paint to dry.
4. At the next stage of work, draw the trees with brush number 1.
5. Draw leaves of different colors, yellow, green, orange, red. (Leaf fall).
The teacher collects all the works and arranges a vernissage of children's works. You guys see what wonderful pictures you turned out, you were real artists.
Educator : What did you and I draw? Children : Golden autumn. Educator: Do you like your work? Children: yes. Let's give ourselves a clap. Well done!
We recommend watching:
Drawing on the theme Autumn for kindergarten Monotopia in elementary school on the theme: Autumn Drawing with heated wax crayons on the theme: Autumn Batik in kindergarten. Master Class
Similar articles:
Drawing lesson for primary schoolchildren on the theme Autumn
Drawing lesson for schoolchildren on the topic “Autumn”
How to draw an autumn landscape step by step: an easy but beautiful gouache drawing
Making the next wonderful picture will be very easy. You don’t necessarily have to have a diploma from a higher art school or attend specialized courses.
The language of our lesson is simple and will be understandable to everyone. He will describe to you all the nuances of working with materials, setting light and shade, and processing volume and perspective.
Don’t be intimidated by complex phrases, but rather get down to business quickly:
- The sketch is done with an HB pencil, it should be a light sketch, do not press too hard on the tool. Draw a horizontal line just below the center, which divides the sheet into two parts. Next, we outline the mass of trees in the distance. Then we sketch a meadow with birch trees and note the clouds in the sky.
- If your gouache has dried out, fill the bottles with water and place them in this position overnight.
The next day, drain the liquid and you will be left with fresh, wet material at the bottom. We paint the sky with a pale blue tint, with abrupt strokes, as well as its reflection in the river. The further from the center the darker the tone becomes, add blue paint to the mixture.
- We write out the long shot, the lighting will be on the left side. First, we cover the silhouettes with yellowish pigments, then we work on the halftones with a red palette. Water, like a mirror, reflects everything, so we depict a vertical smeared reflection on it.
- We outline cumulus clouds in empty spaces with whitewash, and decorate them with a pinkish-lilac color. So, we will clearly show the shadow and volume. Now we move to the foreground, make the first layer of yellow crown, mixing in a little light green.
- We use a greenish tone to express the nearby lawn and several accents on the forest background. For additional texture, add dark contrasting shadows in some places. To do this, mix ocher with blue paint and mix the desired range.
- Use whitewash and a thin brush to highlight the ripples on the river. We paint strokes of different lengths in chaotic places. We draw the ornament on the birch trunks in black. Using a purple tint we go over the background, showing the shadow.
- We place accent spots in the crowns and in the reflection on the water surface. Draw blades of grass on the field. Finally, we release a flock of migratory birds in the corner of the image.
We leave our autograph at the bottom of the masterpiece so that everyone understands who worked hard and created an incredible landscape.
Games
Educational games in a group facilitate the process of memorizing information. The following types of entertainment are suitable for children aged 4-5 years:
- What leaf is this? Print an image of leaves from rowan, oak, birch, maple, etc. Offer to quickly determine whether the leaves belong to shrubs or trees. The names need to be learned or spoken in advance.
- We collect the harvest. You will need toys of fruits, vegetables, baskets, mushrooms, etc. Place items on the floor. Line up the kids. Turn on the music and tell us what crops are harvested in the fall. Divide the students into 2 teams. On command, preschoolers must collect as much crops as possible into baskets. The winner is determined by counting the loot.
- Find differences. Children learn to compare and identify discrepancies. Attention, vigilance, and reaction speed develop.
- Come up with a name. Offer to look at a beautiful picture with an autumn forest, a house in the rain, a woman with a girl on a walk, etc. Give the task: come up with a title for the drawing and a short story based on the plot. The game develops speech, fantasy, and imagination.
- Let's create the composition “Autumn for Children” together. To do this, you will need illustrations depicting autumn trees, leaves, clouds, rain, etc., glue, and scissors. Prepare materials and distribute to children. Let them cut it out and paste it onto a blank album sheet. Each group will have their own vision of nature after summer.
On a note! To remember the signs of the autumn season, months and their sequence, use poems and riddles.
