Middle group. Junior preschool age. Children 4 - 5 years old
Summary of an open lesson on modeling for teachers “Umbrellas for the Katya doll” in the middle group Summary of the lesson “Umbrellas for the Katya doll”
Integration of educational areas:
“Artistic and aesthetic development”
,
“Cognitive development”
,
“Speech development”
. Types of activities: gaming, productive, communicative, motor. Goal: creating a colored umbrella figure in...
Modeling on a CD using the plasticineography technique for children 4–5 years old “Forest Beauty”
Teacher of the highest qualification category Kurnina Lyubov Vladimirovna MBDOU kindergarten No. 54 “Teremok”
Kovrov, Vladimir region.
Dear colleagues, I present to your attention a photo report on the sculpting “Forest Beauty”
, made by children aged 4–5 years using the technique...
Summary of an integrated lesson in modeling in the middle group “Visiting a fairy tale”
MKOU Panovskaya Secondary School
Abstract
integrated modeling class
in the middle group
"Visiting a fairy tale"
Educator: Petushkova T.V.
Target:
systematize children's knowledge about the fairy-tale mouse present in various fairy tales. Cultivate a caring and friendly attitude towards others, a desire to help them in difficult life situations, and develop communication skills.
Tasks:
- Social and communicative development:
- to form in children a sense of cohesion, unity, and a positive emotional mood within the team;
- learn to express your point of view, listen to peers and maintain a conversation;
- cultivate independence, perseverance, accuracy;
- develop attention and imagination.
2. Cognitive development:
— to form in children initial ideas about the mouse as a positive fairy-tale hero, to broaden the children’s horizons;
— exercise children in counting within 5;
- learn to answer the question “how much?”;
- learn to divide a whole part into 4 equal parts;
- consolidate the ability to sculpt a mouse in a constructive way, using round and oval shapes, observing the location and relationship of body parts;
- consolidate familiar sculpting techniques: rolling, unrolling, flattening, connecting parts using the technique of smearing.
3. Speech development:
— expand and activate children’s vocabulary: in half, identical, equal.
4. Artistic and aesthetic development:
- arouse desire and interest in sculpting a mouse, joy from perceiving the result of the overall work.
5. Physical development:
— contribute to the preservation and strengthening of children’s physical and mental health through physical education;
- promote the development of a careful attitude towards one’s health;
- develop fine motor skills.
Planned results:
- form ideas about the mouse as a positive hero in all fairy tales;
- name the fairy tales in which there is a mouse;
- sympathize with fairy-tale characters who find themselves in a difficult situation.
- feel the need to help them;
- make a mouse yourself to help fairy-tale characters.
Organization of an environment for continuous educational activities:
- garden decoration, tabletop theater "Turnip", plasticine (gray), stacks and boards according to the number of children, apple seed (for decorating eyes), knitting thread - tail), laptop, projector, screen, pointer.
Preliminary work:
- reading fairy tales: “Geese and swans”, “Teremok”, “The Ryaba Hen”, “The Tale of a Stupid Mouse”, “The Tale of a Smart Mouse”;
- looking at illustrations.
Progress of the lesson.
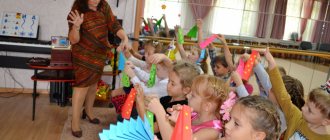
The teacher enters the hall with the children.
V.: Guys, we have guests today. Say hello to them. Now we will join hands and stand in a circle. Do you feel how the warmth ran through our palms? Everyone is in a good mood. Let's smile at each other.
(Crying is heard) Do you hear? What are these sounds?
D: Someone is crying.
V.: Let's come closer and see what happened.
They see the tabletop theater of the fairy tale “Turnip”. There are all the heroes of the fairy tale except the mouse.
Q: Why do you think fairy-tale heroes cry? What happened to them?
D.: They can’t pull out the turnip because there is no mouse.
Q: Do you think we can help?
D.: Yes. Let's blind the mouse.
V.: I knew that you are kind and sympathetic guys. You will always come to the aid of those who need it.
V.: Before we get started, let's look at a photo of a fairytale mouse. (I show it on the screen). What body parts does a mouse have?
D.: Torso, head, paws, tail, ears.
Q: What is the largest part of the body called?
D.: Torso.
V.: Correct. Here we will start sculpting the mouse from the body. Now let's go to our places. Let's sit correctly. We don’t slouch, our feet are together under the table, our back is pressed against the back of the chair. You have plasticine, a thread and 2 apple seeds on your plates. Why do we need seeds and thread?
D: Make eyes and tail.
V.: That's right, well done, you guessed it. How many pieces of plasticine are on the plate?
D: Five.
V.: That's right, five. Are the pieces all the same size?
D.: No.
Q: What will we sculpt from the largest piece of plasticine?
D.: Torso.
Q: What does the torso look like? (Egg) What should you roll first? (ball) And then? (roll into a thick stick) What can we make from a smaller piece?
D.: Head.
Q: How will we roll plasticine? (show) Let’s pull the mouse’s nose a little. What will we make from two small pieces?
D.: ears.
Q: How will we sculpt? (roll the balls and flatten them). We will need to divide the last piece into 4 equal (identical parts). To do this, divide a piece of plasticine in half with a stack, into two identical (equal parts), and then divide each of the two parts in half again. From these pieces you will mold the mouse's paws. Before we start work, let’s all stand near the chairs and do some physical education:
A mouse came out one day (walking in place)
See what time it is (turns left and right, fingers in front of eyes)
One, two, three, four (clap hands above head)
The mouse pulled the weights (hands up and squatting with hands down)
Suddenly there was a terrible ringing (clapping in front of you)
The mouse ran away (running in place).
We quietly sit down comfortably, with our back straight and pressed against the back of the chair. Let's warm up our fingers: fingers clenched into fists, unbend one finger at a time from the fist, starting with the thumb.
One, two, three, four, five, the fingers went out for a walk (we squeeze and unclench our fingers).
One, two, three, four, five hid in the house again (we bend our fingers starting with the little finger).
Quietly we get to work.
Background music is playing. Children sculpt.
V.: Guys, we’re finishing up work. Now we will choose the most beautiful mouse together.
I listen to the children.
V.: I also really liked the mouse (child’s name). We will send her to help the heroes of the fairy tale “Turnip”.
A mouse for a cat, a cat for a bug, a bug for a granddaughter, a granddaughter for a grandmother, a grandmother for a grandfather, a grandfather for a turnip - they pull and pull and pull out the turnip. Thank you very much for your help. We will send the rest of the mice to other fairy tales. We will send Sonya’s mouse to a fairy tale (on the screen is an illustration for the fairy tale “Geese and Swans”) - the children say the name and remember who the mouse helped in this fairy tale.
We will send Sasha’s mouse to a fairy tale (on the screen is an illustration for the fairy tale “Ryaba Hen”) - the children say the name and remember who the mouse helped in this fairy tale.
Let's send Yulina's mouse to a fairy tale (on the screen there is an illustration for the fairy tale "Teremok") - the children say the name.
Q: Guys, did you like the lesson?
D.: Yes.
V.: I also really liked the way you worked. Thank you for your kindness and responsiveness.
PERSPECTIVE PLANS IN THE MIDDLE GROUP LEPKA
Perspective plan for modeling and appliqué in the middle group.
Modeling 1
"Cheburashka"
Improve your ability to sculpt from plasticine. Teach children to pinch off small pieces of plasticine, flatten balls, and roll small peas. Nurture thinking.
Complex classes in the middle group Page. 45
Plasticine, board.
Application 2
"Beautiful flags"
Teach children to work with scissors: hold them correctly, squeeze and unclench the rings, cut a strip along the narrow side into equal pieces - flags. Reinforce techniques for careful gluing and the ability to alternate images by color. Develop a sense of rhythm and a sense of color. Evoke a positive emotional response to the images created.
Komarova T. S. “Art activities in kindergarten: Middle group” Pp. 29
Modeling 3
"Apples and Peaches"
Strengthen children's skills in sculpting round objects of different sizes. Learn to convey impressions of the environment in sculpting. Strengthen children's knowledge about fruits. Cultivate a positive attitude towards the results of your activities, a friendly attitude towards the works created by peers.
Komarova T. S. “Art activities in kindergarten: Middle group” Pp. 27
Plasticine, board, stack.
Application 4
"Vegetables on a plate"
Teach children to arrange objects in a pattern. Continue to introduce children to use scissors, cut vegetables from a square or rectangle, smoothly cut corners, turning the part. Cultivate accuracy in work.
Complex classes in the middle group Page. 66
Colored paper in red, orange, green, sheets of white paper in the shape of a plate, glue, scissors.
October
Modeling 1
"Cucumber and beets"
Introduce children to the techniques of sculpting oval-shaped objects. Learn to convey the features of each object. Strengthen the ability to roll clay with straight hand movements when sculpting oval-shaped objects and circular ones - when sculpting round-shaped objects. Learn to pull with your fingers, round the ends, smooth the surface.
Komarova T. S. “Art activities in kindergarten: Middle group” Pp. thirty
Cucumber, beetroot. Clay (plasticine, modeling boards.
Application 2
"Flower Bed"
Teach children to make a flower from 2-3 paper forms, beautifully combining them in color, shape and size. Show techniques for decorating a flower: cut the “shore” (edge) with a fringe, turning the paper circle in your hand: glue the smaller shape onto the larger one, applying glue to the middle of the base flower. Arouse interest in the design of a collective flower bed or clearing. Foster independence and accuracy.
Lykova I. A. Visual activities in kindergarten. page 24
Modeling 3
"Cockerel cockerel, golden comb"
Teach children to create an expressive image of a cockerel from plasticine and natural materials; show options for combining artistic materials: a body with a head made of plasticine, a tail and wings made of natural material and vice versa. Develop the ability to shape a composition. Arouse interest in experimentation in artistic creativity.
Lykova I. A. Visual activities in kindergarten. Page 32
Application 4
“The train is rushing “Knock-knock-knock”
Teach children to hold scissors and cut in a straight line: cut a paper rectangle into narrow strips. Arouse interest in creating a “railroad” from cut-up strips. Introduce safety rules when working with scissors. Develop coordination in the work of eyes and hands. Cultivate accuracy and interest in mastering the instrument.
Lykova I. A. Visual activities in kindergarten. Page 22
November
Modeling 1
By design
Teach children to determine the content of their work and use familiar techniques in modeling. Develop the ability to select the most interesting works from those created. Develop children's imagination and creativity.
T. S. Komarova “Classes in visual arts” p. 32
Clay, boards for modeling.
Application 2
"Teddy bear"
Teach children to assemble a familiar toy from parts, gluing them in the specified sequence; transmit paw movement.
G. S. Shvaiko “Classes in visual arts in kindergarten, middle grade.” page 24 Blanks for a bear.
Modeling 3
"Modeling vegetables"
Introduce children to the technique of pressing the middle of a ball and smoothing the surface of a sculpted object with your fingers.
Complex classes in the middle group Page. 65
Plasticine.
Application 4
"Decorate the napkin"
Teach children to make a pattern on a square, filling in the middle and corners with elements. Learn to cut a strip in half after folding it; hold scissors correctly and use them correctly. Develop a sense of composition. Strengthen the ability to carefully glue parts.
T. S. Komarova “Classes in visual arts” p. 34
Square sheet 16x16 cm. Strips of different colors 6x3 cm, scissors, glue, napkins, oilcloth, brush.
Modeling 4
“Make whatever toy animal you want.”
Teach children to independently determine the content of their work. Strengthen the ability to sculpt using different sculpting techniques. Foster independence. Develop imagination.
T. S. Komarova “Classes in visual arts” p. 57
Clay (plasticine, modeling board, stack.
December
Application 1
"Bullfinch"
To consolidate children's knowledge about migratory and wintering birds. Develop the ability to examine and examine objects. Continue to develop the ability to arrange parts on a sheet in a certain order. Strengthen your neat gluing skills.
Modeling 2
"Girl in Winter Clothes"
To evoke in children a desire to convey the image of a girl in a sculpted image. Learn to identify parts of the human figure in clothing (head, fur coat of the arms that widens downward), and convey them in compliance with proportions.
T. S. Komarova “Classes in visual arts” p. 51
Doll. Clay (plasticine, modeling boards
Application 3
"Beads for the Christmas tree"
Learn to cut corners of rectangles and squares to obtain oval and round beads; Alternating beads of different shapes; stick carefully, evenly, in the middle of the sheet. To consolidate children's knowledge about round and oval shapes. Continue to teach children safety precautions when working with scissors, instill a festive mood and a desire to decorate the Christmas tree.
T. S. Komarova “Lessons in visual arts” p. 53 Beads, paper rectangles and squares of different colors, thread, glue, brush, napkin, scissors.
January
Application 1
“Beautiful pyramids were brought to the store.”
Exercise children in cutting out rounded shapes from squares (rectangles) by smoothly rounding the corners. Reinforce scissor handling techniques. Learn to select colors and develop color perception. Exercise children in arranging figures by size in decreasing order.
T. S. Komarova Visual activities in kindergarten. Page 56
Paper squares of different colors and sizes, 1\2 album. sheets, scissors, glue.
Modeling 2
"Snowy Baba"
Continue to teach children to create expressive sculpted images. Learn to plan your work: conceive an image, divide the material into the required number of parts of different sizes, sculpt sequentially, starting with large parts. Show techniques for decorating a sculpted figurine with additional materials. Develop an eye, a sense of shape and proportions.
I. A. Lykova Visual activities in kindergarten. page 76
Application 3
"Snowman"
Teach children to carefully cut out parts, assemble them together according to a pattern, and glue them evenly. Use scissors according to instructions.
Complex classes middle group p. 178
Colored and white paper, glue, scissors, napkins.
Modeling 4
“Come and visit.” (Sparrows on the feeder).
Teach children to convey a simple pose in sculpting: tilting the head and body down. Reinforce sculpting techniques. Show the possibility of obtaining a more expressive color by mixing two original colors. Develop a sense of form and composition ability.
T. S. Komarova Visual activities in kindergarten. Page 65
Plasticine, modeling board, stack.
February
Application 1
"Flying Planes"
Teach children to correctly compose images from parts, find the place of one or another part in the overall work, and carefully stick it on. Consolidate knowledge of the shape (rectangle, learn smoothly, cut off its corners. Cause joy.
T. S. Komarova Visual activities in kindergarten. Page 64
Paper rectangles for the body, tail and wings, scissors, glue, brush, napkin.
Modeling 2
"Funny Helicopters"
Teach children to sculpt air transport (helicopter). Pay attention to the methods of attaching parts (smearing, using toothpicks or straws). Clarify your understanding of the structure and method of movement of a helicopter. Create a desire to please dads with your crafts.
I. A. Lykova Visual activities in kindergarten. page 96
Application 3
Decorative applique on a square
Teach children to make a pattern on a square, rhythmically placing geometric shapes in the corners, in the middle, along the edges. Learn to transform shapes by cutting them (a square into 2 triangles, a rectangle into 2 squares). Reinforce cutting techniques. Foster independence.
T. S. Komarova Visual activities in kindergarten. Page 69
White paper 18x18cm, strips of colored paper, scissors, glue, brush, napkin.
Modeling 4
"Flowers-hearts"
Teach children to sculpt relief paintings as gifts for loved ones - mothers and grandmothers. Show options for depicting flowers with elements - hearts. Learn to sculpt hearts in different ways: model with your fingers; cut with a mold or stack. Arouse interest in framing stucco paintings. P-r – develop a sense of form and rhythm. Cultivate aesthetic taste.
I. A. Lykova Visual activities in kindergarten. page 104
March
Application 1
"Owlet"
Teach children to make an object from parts, carefully cut out parts of the applique, from a circle - a body, two semicircles - wings, a small triangle - a beak, two small circles - eyes, two triangles - ears, two triangles - paws.
Complex classes Page 247
Colored paper, glue, scissors.
Modeling 2
"Make what you like"
To develop children’s ability to evaluate their impressions and determine their attitude to what they saw. Strengthen the desire to create interesting images in sculpting, using previously learned techniques.
T. S. Komarova Visual activities in kindergarten. Page 75
Clay, modeling board, stack.
Application 3
"Icicles on the roof."
Arouse interest in depicting icicles using different applicative techniques and creating the composition “Icicles on the roof of a house.” Continue to learn how to cut with scissors and independently adjust the length of the cuts. Show how to cut out icicles from paper folded like an accordion. Develop a sense of shape, color, rhythm.
I. A. Lykova Visual activities in kindergarten. page 116
Modeling 4
"Little Goat"
Teach children to sculpt a four-legged animal (oval body, head, legs). Strengthen sculpting techniques: rolling between palms, attaching parts to the sculpted body of an animal, smoothing places of fastening, pinching, etc. Develop sensorimotor experience.
T. S. Komarova Visual activities in kindergarten. Page 73
Clay, modeling board, stack.
April
Application 1
"Vitamin basket"
Teach children to arrange ready-made forms in the “Vitamin Basket” composition;
develop the ability to use glue, develop fine motor skills; to cultivate in children the need to consume healthy foods, a sense of empathy, and a desire to help.
“Basket for vitamin products”, blanks of vegetables and fruits made of colored paper, glue, napkins, individual oilcloths.
Modeling 2
"Rocket"
Develop interest in artistic creativity, consolidate concepts: outer space, weightlessness, gravity, planets, stars, satellites, meteor shower, comets, Martians, etc. Develop children's powers of observation, memory, and interest in the world around them. Teach children to show imagination and creative imagination. Continue work on developing verbal communication skills.
Plasticine, a board, napkins, a Kinder Surprise container.
Application 3
"Eternal flame"
Reinforce appliqué techniques in the trimming technique, consolidate knowledge of safety precautions with scissors. Develop fine motor skills, develop tactile sensations, develop imagination. Templates of the Eternal Flame, squares of corrugated colored paper (different colors, brush, pencil, napkin, oilcloth, scissors, glue.
Modeling 4
Modeling a ladybug from dough
Introduce children to work with dough, it is elastic. Convey the characteristic features of their structure. Develop thinking and attention. Complex classes p. 253
Salty dough black, red, green.
May
Application 1
"Spring Flower"
Teach children to cut using the technique of smoothly rounding the corners of a square, cut the circle in half along the fold; make up of parts - circles, semicircles and a narrow stripe - images of unblown and blossoming flowers; reinforce neat gluing techniques.
G. S. Shvaiko “Classes in visual arts in kindergarten, middle grade.” page 129
Material prepared by the teacher.
Modeling 2
"Modeling by design"
Continue to develop independence, imagination, creativity. Strengthen sculpting techniques and the ability to use materials carefully.
T. S. Komarova Visual activities in kindergarten. Page 67
Plasticine, modeling board, stack.
Application 3
Little Red Riding Hood"
Teach children to convey the image of a red riding hood in appliques. Continue to learn how to depict a person (the shape of a dress, head, arms, legs, characteristic details (a cap, observing the relationships in size. Strengthen the ability to carefully cut and paste.
T. S. Komarova Visual activities in kindergarten. Page 83
Colored paper, scissors, glue, brush, napkin, oilcloth.
Modeling 4
“How we played an outdoor game”
Continue to teach children to create images of outdoor play in modeling. Develop imagination and creativity. Reinforce sculpting techniques.
T. S. Komarova Visual activities in kindergarten. Page 86
Plasticine, modeling board, stack.
G. S. Shvaiko “Classes in visual arts in kindergarten, middle grade.” pp. 69-71
Application 5
Final “Magic Garden”
Teach children to create a collective composition, independently determining the content of the image (magic trees, flowers). Learn to cut straight with scissors; rounding the corners of a square, rectangle. Develop perception.
T. S. Komarova Visual activities in kindergarten. Page 85
Colored paper, gold and silver, large sheet, scissors, glue, brush, napkins, oilcloth.
Consultation for educators “Basic modeling techniques in middle preschool age”
Tatiana Alekseycheva
Consultation for educators “Basic modeling techniques in middle preschool age”
Topic: “ Basic modeling techniques ”
.
Goals:
1. Contribute to increasing the level of competence of teachers in: -knowledge of methods of teaching modeling to preschoolers ;
-knowledge of modeling techniques for different age groups of preschools ;
-practical knowledge of all modeling techniques ;
2. Arouse interest in the problem of using both basic and non-traditional modeling techniques in preschool age .
3. Promote team unity.
Time: 02/10/2018
Venue: music hall.
Materials: tables for teachers ; plasticine, boards, stacks, cardboard, napkin; patterns for making crafts.
Contents of the game: Participants sit at tables. The presenter and creative group are located in front of the participants.
1. Theoretical questions: The presenter reads out the questions, the participants answer, and receive a chip. At the end of the theoretical block they are exchanged for prizes.
2. Speeches: Speech by teachers. Demonstration of techniques , additional materials, diagrams, crafts (younger, middle , older age )
3.Practical part:
All participants make a bas-relief of the sun.
Summing up the seminar.
«Basic modeling techniques in middle preschool age»
(report)
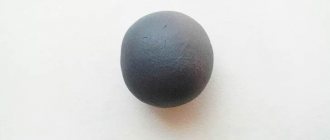
In the middle group, children sculpt simple objects consisting of several parts.
They must learn to convey proportions between parts of objects, firmly attach and lubricate them.
At this age , techniques such as :
- pinching (ears, beak, scallops)
;
- pressing (bowls, cups)
;
- pulling parts from a whole piece (beak plus tail)
;
- connecting parts, pressing and smearing them (head to body)
;
- decoration using stacks and moldings;
The basic elements that serve as the basis for modeling at this age are :
1. ball.
2. cone.
3. ovoid.
4. cylinder.
Modeling in middle age is built on the basis .
The ball is best rolled in your palms .
Cone - first roll up a ball, then using a second board or just using your hand on a modeling board roll up a roller , pressing on one side (return movements)
.
Ovoid - children are initially explained that the gadfly is like an egg.
(first we make a ball, then we press on one side or the other, sharpening the ends on the board or in our hands)
The cylinder is a ball, then a thick roller, dulling the edges by pressing on the board.
1. First, the ball and ovoid are inserted. Because, for example, with the help of these elements you can sculpt a child in a blanket or a teddy bear.
2. The second stage is to introduce the cone. You can invite children to make crafts from just cones (Christmas tree, fox, mouse)
. If you combine a cone and a ball, you can sculpt a girl in a long dress.
3. The cylinder can be used to sculpt the lower torso or legs (with trimming)
.
In order for the work to be durable and original, you can use various materials, both to strengthen the structure and to decorate crafts.
For example:
— For making tree trunks, bodies, insects (dragonfly, butterfly)
you can use: wire, rods, toothpicks, matches.
This will make the structure more durable . To do this, prepare rollers, a ball, a cone and simply string it onto the base .
— Such a detail as a pen cap can be useful in order to depict a smile on a person’s face.
— A pencil may be useful for rolling out plasticine instead of a rolling pin (without points)
. The tip can be used to make dots and dents of varying depths: eyes, nose, buttons.
- A bottle, a jump rope, a board - used for rolling out plasticine.
— To decorate your work, you can use various materials: feathers, grains, cereals, beads...
— In sculpting, the technique of mixing colors is used . To get the layered structure of a tree trunk, you need to mix brown and orange.
To get a snake with rings on its body, you need to mix green and yellow. First, roll out a thick roller of one color, then wrap it with a thin rope of a different color and roll out a long roller.
There is no need to be afraid to choose a difficult topic for modeling , thinking that children will not be able to cope. Do not forget that everything complex is made from elementary things and parts.