A colorful geometric paper applique is the most affordable way to instill in your child a lot of useful skills.
Working with scissors, glue and paper, children learn to be neat and persevering, and gain joy from the process of creative activity.
Using simple geometric shapes makes it easy for even young children to create impressive pictures.
Preparation
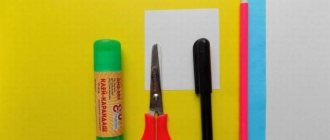
The first step is to prepare for the development process:
- When organizing a workplace, everything unnecessary is removed from the table.
- You can cover the surface with oilcloth to protect it from glue.
- All elements are cut out in the required quantity.
- It is recommended to use stationery scissors with blunt tips - they are comfortable for the child and he will not be able to cut himself with them.
- A background base is selected from colored paper or thick cardboard.
- For younger children, it will be more convenient to use pencil glue rather than PVA.
- To make the activity more interesting, you should choose beautiful and bright colors.
Before creating an application, you need to tell your child about geometric shapes - show the blanks, name their shapes. It is important to become familiar with the sequence.
Your child will be interested in creative activities together, and teamwork will strengthen relationships. Over time, the baby himself will learn to assemble compositions from different elements.
Pyramid - development. Pyramid development for gluing. Paper scans
Rectangle, square, triangle, trapezoid and others are geometric figures from the section of exact science. A pyramid is a polyhedron. The base of this figure is a polygon, and the side faces are triangles with a common vertex, or trapezoids. To fully represent and study any geometric object, mock-ups are made. They use a wide variety of materials from which the pyramid is made. The surface of a polyhedral figure, unfolded on a plane, is called its development. The method of converting flat objects into three-dimensional polyhedra and certain knowledge of geometry will help you create a layout. It is not easy to make developments from paper or cardboard. You will need the ability to make drawings to specified dimensions.
For the little ones
Toddlers are just beginning to learn about crafts and shapes. Initially, you should randomly distribute the shapes on the sheet so that the child learns to work with glue.
Children aged 1-2 years are characterized by energy and restlessness, so you should start the lesson in a playful way.
You can tell a story about a circus bear who lost his juggling balls. The child will get acquainted with different colors, the circle shape and learn how to handle glue.
For the applique you will need three circles of different diameters made of colored paper. You can print the bear using a template or use a sticker. The bear is glued to the background sheet, and the child’s task is to find balls of a certain color. The found circle is covered with glue.
It is important to teach your child to hold the glue at a 90 degree angle. The part is located in an arbitrary location.
When the baby learns to handle glue, you can complicate the task a little and try to make an applique along the contours. To do this, geometric shapes are sketched on a sheet or cardboard, and parts corresponding to the drawing are cut out of colored paper.
The baby must find and glue the parts along the contours of the picture.
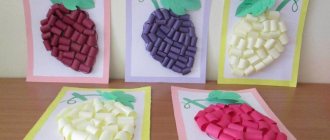
Vase with candies
The word “vase” in this task is conditional. The child can fill a jar, plate, tray or glass with colorful shapes. It is these objects (their outlines on paper, cardboard) that will act as the basis. The step-by-step process of making a craft looks like this:
- You need to prepare a base with the outline of a basic object applied to it - vases, jars, plates.
- Cut out circles of different diameters from multi-colored paper or foil that will symbolize lollipops.
- Kids must fill the outline of the base object with candies in any order, without going beyond its boundaries.
- You can complement the applique with painted flowers, candies of other sizes, and the sun.
House
Photos of applications for the little ones clearly show how you can assemble a picture from simple shapes. To make a house you will need a template or sketch, glue, scissors, colored paper and cardboard.
From colored paper, cut out a large square and a triangle for the house, a small square for the window, and use a rectangle for the door.
All parts are sequentially treated with glue and placed on the base.
Space
1st grade boys often dream of becoming astronauts. They will be happy to make an application on a space theme:
- The outline of the rocket is applied to the base.
- For planets and rocket portholes, several circles are cut out (from 7 to 10).
- For stars, smaller circles are made (10-15).
- The triangle is needed for the nose of the rocket.
- Another triangle, cut in two, plays the role of the rocket's tail.
- From a large rectangle, many strips are made and pasted to resemble the fire released by the rocket.
The missing elements of the application can be completed.
Typewriter
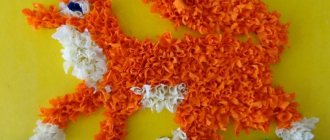
When working with a child, it is important to take into account his interests; for example, a boy will be much more interested in assembling a craft in the form of a car. The application will be appreciated by children aged 3-5 years, and for the work you will need colored paper, glue, a simple pencil, scissors and a model of the machine.
Stages of work:
- Shapes are cut out - rectangles for the body, circles for the wheels. You can complement the picture with smoke from ovals, and a route from a black elongated rectangle. Details are added or removed based on the child’s characteristics; if the baby is diligent and easily involved in the task, then you can freely supplement the composition. Don’t forget about the brightness of color, it is what makes the creative process even more interesting.
- Each element is smeared with glue in turn and glued to the background. The road and body come first, and then the wheels and smoke.
For greater expressiveness, you can draw trees, the sun and clouds with colored pencils. Blue color is ideal for a base. In a more complex version, the child himself cuts out the parts along the marked lines.
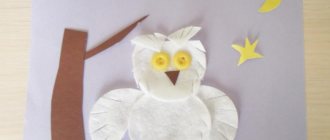
Chick
Kids think abstractly; for them, such a trifle as the color or shape of a character does not matter if his image conveys child-like emotions. But how can you make an applique just like this so that your baby feels a kindred spirit? Here's a great example of this!
Meet Tsypa! Him:
- Body - square;
- Eye – 2 circles (black and white, and a little more white);
- Beak - triangle;
- The paws are also triangular;
- The wing is a semicircle;
- Tuft - crescent.
Now, trust the little one, let him choose what color will be! Explain what each figure means and why the bird needs it. Isn't that interesting? So, finding the right stencils for applications is already a game. All that remains is to glue everything together!
For children from 3 years old
At the age of three, children can already assemble a picture of 6 parts in the correct sequence. You can choose animals for applique that are familiar to the child - for example, a hen with chicks.
For production you will need:
- Green cardboard.
- Yellow circles - 3 pcs.
- White circles of different diameters - 2 pcs.
- Triangles – 1 white, 2 yellow, 3 red, 6 brown.
- Colored markers.
- Glue.
The first step is to prepare a sample, and the children follow the picture and lay out their applique. It is advisable to focus on the baby’s characteristics; for some it is easier to create from a sample, while others prefer to repeat the actions step by step.
Eyes are added to the pasted chickens. The picture can also be supplemented with green grass made from stripes, a bright round sun, and daisies made from white triangles.
For the little ones there is a large selection of colorful applications for creativity, with self-adhesive figures. The kits are sold in bookstores or delivered via courier.
Ready-made sets help develop fine motor skills.
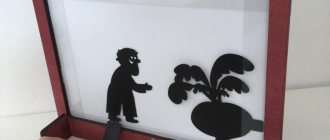
Bouquet
These are not just flowers, but a structure that will stand. In this case we will make all parts of the plant. The flowers, leaves and stems themselves. Children in the middle group will master this simple applique very quickly.
We fold the green leaf in half so that the colored part is on the outside. Edge to edge. We secure them
It is very important not to bend it too much, just run your hand lightly in the middle.
Now you can make cuts from the middle to the edges of the sheet, not reaching the edge by approximately 1.5-2 cm.
We roll the sheet into a tube and fasten its corners at the bottom one to the other. Produces a stable structure
We slightly spread the “petals” of the bouquet at the top.
It will not be difficult to cut out flowers of different colors. They will be nicely decorated with centers that can be made round, heart-shaped, and even triangular or square.
We attach the flowers to the edges of the stems at the top. The bouquet is ready, you can give it as a gift!
School age children
Junior grades are able to independently separate details according to a model, and can assemble a complete picture, focusing on their imagination. Initially, you should show the children what the finished craft will look like.
To work you will need brushes, colored paper, glue, scissors, cardboard, a ruler and a simple pencil.
A base is prepared, geometric shapes in a specific theme are sketched on it. All details are copied from the base, cut out and glued according to the template.
Development of a quadrangular pyramid
First, let's imagine what the geometric figure looks like, the model of which we will make. The base of the selected pyramid is a quadrangle. The side ribs are triangles. For work we use the same materials and devices as in the previous version. We draw the drawing on paper with a pencil. In the center of the sheet we draw a quadrilateral with the selected parameters.
We divide each side of the base in half. We draw a perpendicular, which will be the height of the triangular face. Using a compass solution equal to the length of the side face of the pyramid, we make notches on the perpendiculars, placing its leg at the top of the base. We connect both corners of one side of the base to the resulting point on the perpendicular. As a result, we get a square in the center of the drawing, on the edges of which triangles are drawn. To fix the model on the side faces, add auxiliary valves. For reliable fastening, a strip of centimeter width is enough. The pyramid is ready for assembly.
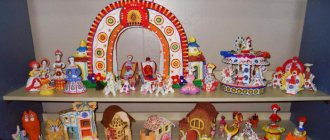
Photo of geometric applique
Learning complex geometric shapes using simple ones: the benefits of activities for children
Geometric shapes, or composite shapes, are easier to learn through simple shapes. You need to cut out several squares, circles and triangles and fold them.
Examples of composing complex figures:
- Trapezoid: square + 2 triangles.
- Rectangle: 2 or more squares.
- Rhombus: 2 equal triangles.
- Parallelogram: 2 squares + 2 equal triangles.
The child must be fully involved in the learning process, otherwise the learning will be useless. Game-based learning is the best way to attract the student's attention and make the process interesting. By making discoveries on their own, the baby will want to continue learning
Complete the figure according to the sample
Descriptive geometry is aimed at developing spatial thinking. The child learns to imagine complex three-dimensional figures by breaking them down into simple and flat ones. The tasks involve not only choosing the correct answers, but also explaining your choice and why other answers are incorrect.
Drawing will help reinforce the lesson.
What should be done:
- Show the child the figures, talk about them, give examples of things of the corresponding shape that are in the room.
- Print forms on which the half-drawn figures are shown with a dotted line (an example of the form is given above).
- Task: continue the dotted line, say which image is a circle, a square, a rectangle.
- Discuss the results.
Instead of dotted lines, there may be regular, but interrupted ones. This is a simplified version of the exercise. To complicate the task, you need to print a form on which part of the figure is painted over, but does not follow the contours. This will confuse the baby.
In addition to finishing the drawing, it becomes necessary to paint over the remaining part of the figure.
Tracing a figure by points
The connecting the dots exercise develops the imagination, allowing you to imagine which dots need to be connected to form a given figure. This skill develops the ability to complete tasks according to a model, which will be useful in school. The child must draw with a pencil so that he can correct mistakes.
How to do the exercise:
- Print out the assignment forms.
- On each form there is a sample drawing on the left, and on the right there are many dots from which you need to make the same drawing.
- The child should notice that the dots are different: there are dots with crosses, black dots and white dots. Identical points cannot be connected.
- There are more dots on the right than necessary - some will remain outside the picture.
Work organization
Crafts from geometric shapes are a way of harmonious development of children of different age groups.
When preparing an application lesson, the following factors should be taken into account:
- children's age;
- level of development of thought processes;
- the degree of mastery by the child of the skills necessary to create an application from geometric shapes.
It is better to start getting acquainted with geometric applications with simple versions of crafts.
Each age group has its own peculiarities of organizing work on crafts:
- At the stage of familiarization with geometric appliqué, children learn new activities based on already established skills. Based on the game, kids learn the basic geometric elements, lay them out on the plane of the sheet and glue them.
At this stage, an adult plays an important role, as he prepares the necessary set of figures and helps the child master the correct technique for using glue.
During individual lessons with a 3-4 year old child, teachers begin to develop skills in working with scissors (cut out simple shapes: rectangle, square, triangle). After completing the creative process, children of primary preschool age can help in cleaning the workplace.
- At the age of 4-5 years, children begin to participate in preparing figures for appliqué, working independently with scissors. At the same time, they repeat their actions after the parent or teacher, who prepares a sample picture and then repeats it together with the child.
At the end of the work, the child independently evaluates the correctness and accuracy of his craft. Important! Children's creativity should not be criticized by an adult. He should gently point out shortcomings and advise how to avoid them in the future.
- By the age of 5-6, children have sufficiently mastered the skills of working with scissors and can independently (using a ready-made contour or template) cut out geometric details. Older preschoolers independently choose color combinations for a particular craft.
An important innovation in the organization of creative activity is the absence of a model. The child, with the help of an adult, analyzes the object, breaking it down into simple shapes, and selects the appropriate shapes to work with.
- Creating a geometric appliqué for younger schoolchildren is aimed at developing creative thinking , analytical abilities and imagination. Therefore, the adult assistant only suggests a topic for work and several examples of its implementation, giving the child the opportunity to independently choose the necessary materials and forms for its implementation.
In all age groups, proper organization of the workspace plays an important role.
For the convenience of children, the following scheme should be used:
- In the center of the working surface are ready-made forms or sheets of colored paper.
- There is a background in front of the child.
- On the left there is a mat for working with glue, and on the right there are napkins for hands and pressing parts to the base.
- Glue brushes and scissors are placed in a special stand in the upper right corner of the table.
- Liquid glue is placed in a shallow container on a tray in the center of the work surface.
Important! Proper preparation and organization of work on the application will make this activity both an exciting game, and the development of creative abilities, and a means of understanding the world around us.
Organization of the process
Geometric applique does not require serious artistic skills from adults to organize the process of children's creativity. The main thing is to provide the kids with all the necessary materials and tools, to organize a safe and convenient space for work.
- For the little ones.
In order for children aged 2–4 years to successfully make an applique, they need to prepare a drawing with clear contours and cut out the appropriate number of parts. At the same time, they may need a personal example from a senior, showing on the same blank what, where and how to stick.
- For children 4–5 years old.
At this age, children can already arrange geometric shapes on a sheet of paper without ready-made contours, looking at a sample. You can have them cut out parts with straight lines, such as triangles, themselves from lined sheets of colored paper. In this case, you should make sure that the scissors are safe - with rounded ends.
- For older preschoolers.
At 6–7 years old, children are able to trace simple patterns and cut out appliqué details themselves. At this age, it is useful to provide them with an independent choice of the color scheme of the craft: for example, when depicting flowers, geometric patterns, butterflies. This helps them learn how to combine colors and develops their creativity.
To ensure that the work lasts, use high-quality, not too thin colored paper and make sure that the glue stick has not dried out.
Tools and materials
Crafts from geometric shapes are created using a set of simple materials and tools, which are supplemented with new elements as the child grows up.
Paper
The main material for creating flat crafts is paper. It is used for backgrounds and for cutting out geometric elements. For the base, you can choose colored cardboard or thick paper. Small parts are cut from medium-weight double-sided paper. Bright applications are made from colored sheets for the office.
Glue
The adhesive composition is selected according to the age of the child. For 2-year-old children, a paste made from potato starch or wheat flour is suitable for work. This glue does not cause allergies and will not cause harm if swallowed, so it can be spread onto small parts with your fingers.
To make 1 liter of paste, 5 tablespoons of dry substance are diluted with a small amount of water to form a homogeneous paste. Then it is diluted with the remaining liquid. The solution is boiled over low heat until the mass thickens and filtered through a sieve.
Glue for applications is selected according to the age of the child
It is convenient for children 3-4 years old to work with stationery glue in the form of a pencil. When choosing it, special attention should be paid to the quality of the product. It should be applied in an even layer, not leave lumps on the paper and not have a strong odor.
PVA and brushes for applying it are used by children from the senior group of kindergarten. Working with liquid glue requires sufficient development of fine motor skills, attention and accuracy. Brushes for applying adhesive to paper are selected with medium hardness. Their size depends on the size of the working part.
Scissors
The main requirement for scissors used by children is safety. For a child, buy scissors with round ends. Before starting children's creativity, an adult must check the quality of the mechanism's functioning, since scissors with undeveloped levers can be dangerous for a child.
The blade length of children's scissors is approximately 10-12 cm. When cutting out large parts, you can use longer models.
Important! Before teaching children how to use scissors, it is necessary to introduce them to safety precautions, which include the following:
- Do not swing or play with them while working.
- They should be passed rings forward, holding them by the folded blades.
- After use, the tools are put away.
- Store scissors in boxes or high stands with the rings facing up.