Notes on sculpting “Amanita”
Abstract "Plasticine Crow"
Educator: Radaikina O.A.
Topic: Poisonous mushrooms. "Fly agaric".
Tasks:
— Teach children to sculpt fly agarics from four parts (hat, leg, “skirt”, clearing).
— Show a rational way of making specks (decoration) for a cap: rolling out the flagellum and cutting it into small pieces in stacks.
-To clarify the idea of the structure of the fly agaric to more accurately convey the shape and proportions of the parts.
-Cultivate interest in learning about nature and reflecting impressions in different types of artistic activities.
Develop:
curiosity, creative taste, desire to sculpt.
Materials:
modeling boards, stacks, plasticine, napkins, images of fly agarics in nature, modeling diagram.
I. Part. Introductory.
Educator:
-
“This mushroom was decorated with pine forest.
Everyone knows: he is a mo-ho-mor!
Although handsome, wonderful,
It is not edible. Dangerous."
Look guys, this is a fly agaric mushroom (show pictures or photographs). Let's look at it, what parts does the fly agaric consist of? What geometric shape does the hat resemble? Specks? And the leg? (children's answers). Look and tell me what color is his hat? What about the spots? Tell me why it was called fly-mor? (children's answers) Because he kills flies.
Today I suggest you make fly agarics. First, let's make a clearing for our mushrooms, and then the fly agaric mushroom itself.
II. Part. Main. Teacher's demonstration.
Take a piece of white plasticine in your right hand and make a fly agaric leg. Roll out the cylinder, then make a “skirt” for the fly agaric leg. Roll out the column, flatten it into a ribbon, pinch the frill and wrap it around the leg.
We take a piece of red plasticine and we will sculpt a hat - we roll it into a ball, flatten it and bend it to make a bowl. We decorate the hat with white dots. First, roll out a flagellum from white plasticine. We cut it in a stack into many, many small pieces, and attach them to the red cap.
Now let's connect the cap and the leg; the mushroom itself and the clearing.
Questions for consolidation: - Guys, what will we sculpt first? What then? How to make a fly agaric “cup-hat”? And when we make the hat, what then? (children's detailed answers)
Independent activities:
Children make fly agaric mushrooms according to their imagination, or, if necessary, based on diagrams. If help is needed, the teacher prompts and helps.
III. Part. Final.
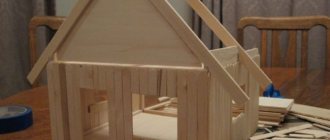
Design of the exhibition “Dangerous Meadow” with fly agaric mushrooms. We decorate with twigs to fence the clearing or put up warning signs. We praise the children, invite them to admire their work, reinforce new knowledge, and talk about why they shouldn’t collect fly agaric mushrooms. We ask for help in cleaning the workplace, we switch the children’s attention from one type of activity to another.
Features of preparation and organization of classes
In the middle group, the child’s visual activity (especially when he attends kindergarten regularly) continues to develop. Fine motor skills become more perfect, which naturally affects the quality of sculpting. In addition, the baby is already gaining experience in understanding the world around him, and his imagination is developing. Due to this, ideas about objects and phenomena become more realistic and detailed.
So, if in the second younger group children during modeling classes create primitive images of mushrooms (just a column with a cap in the form of a ball or cake - no special attention is paid to color, shape, characteristic features), then in middle preschool age the image of a mushroom is already being worked out in more detail.
In early preschool age, children create primitive images of mushrooms, without paying special attention to their color, shape, and characteristic features; in the middle group, children already understand that mushrooms differ in shape and color
The teacher explains to the children that each fungus has characteristic features and is not like the others. For example, a boletus will have a thick light leg and a brown cap, a fly agaric will have a thinner, long white leg and a cone-shaped bright red cap with white specks, chanterelles will be red with a concave cap that smoothly turns into a leg, etc. When explaining Reliance on clarity is necessary - appropriate thematic pictures, or even better, dummies of specific mushrooms.
When explaining the characteristic features of different mushrooms, clarity is necessary; the ideal option is dummies
In the middle group, the teacher encourages children to determine for themselves the colors of plasticine they need to sculpt a particular mushroom. This develops independent thinking and observation skills in children. Also, the guys can independently separate from a large piece the required amount of material to make a certain part.
Mushroom sculpting techniques
According to the image of a particular mushroom, the teacher teaches children appropriate sculpting techniques. Most of the crafts will be created in a constructive way: the components of the mushroom are formed separately (mushroom, leg, skirt, specks of the fly agaric), which are then combined into a single composition (using the method of pressing down, smoothing).
Most mushrooms are best made in a constructive way
However, some types of mushrooms are more convenient to sculpt in a sculptural way - from a single piece of plasticine. For example, these are chanterelles. Their cap seems to be a continuation of the stem, its edges look up (and not down, like many mushrooms).
When sculpting individual mushrooms (for example, russula), it is good to combine the two indicated methods: the mushroom is formed from a single piece of plasticine (like a chanterelle), and then a flat pink or lilac cap is attached on top.
Russulas can be sculpted using a combined method, combining constructive and sculptural
In general, the children continue to practice sculpting techniques familiar to them from the second junior group: rolling out plasticine with straight and circular movements, flattening the ball with their palms to form a cake. However, now the emphasis is on finger sculpting to refine the shape: pressing in the cap to give it a concave shape, pulling back on the tip to give the cap a cone-like appearance. The stem of the mushroom no longer has just the shape of a column (cylinder), but tapers slightly at the top; dark plasticine is added to it below (by smearing) to imitate earth.
Children of the fifth year of life can already sculpt not just one mushroom, but create a beautiful composition, for example, from two mushrooms of different sizes, deviating from one another.
The mushrooms are arranged in pairs, deviating from each other in different ways
The craft can also be supplemented with details: grass, leaves, a bug, a caterpillar, berries. By the way, the kids can now draw the pattern on the leaf themselves in stacks.
The mushroom composition can be supplemented with grass, insects, berries
To make modeling more fun, the teacher should offer the children additional materials. For example, a mushroom cap can be a chestnut, half a walnut shell. The leg can be made from an acorn (it is coated with plasticine or left untouched). It is good to mark the white dots on the fly agaric cap with rice cereal.
In addition to the main material (plasticine), children can be offered additional material to indicate the main parts of the mushroom and as decoration.
Step-by-step modeling “Boletus in the grass”
- The first stage is sculpting the legs. From white or beige plasticine you need to roll a thick sausage and give it a slightly pointed shape on one side.
The leg of the boletus has the appearance of a thick, slightly pointed sausage at the top.
- To create a hat from brown plasticine, you need to roll a large ball. Using a stack, it should be divided into two unequal parts.
A large brown ball needs to be cut into two unequal parts
- Most of it needs to be slightly straightened with your fingers and a depression pressed inside.
You need to trim the hat with your fingers and make a recess inside
- To make the fungus more realistic, a ball is rolled out of beige plasticine (from which the leg was sculpted) and a flat cake is formed, equal in diameter to the cap. This part needs to be glued to the cap, and then the leg must be attached.
A flat cake is formed from beige plasticine and molded to the bottom of the cap, all that remains is to attach the stem
- A small boletus is molded in the same way.
A small boletus is molded similarly to a large one
- You need to make a stand for the mushroom. A piece of green plasticine is flattened into a flat cake - this is the base on which the boletus mushrooms are placed. Grass is forming around. To do this, take a mixture of yellow and green plasticine and roll out the sausage. Then it is flattened and cut with a stack. The mushrooms are wrapped in grass (the blades of grass are bent in any shape).
Boletus mushrooms are placed on a green cake stand and wrapped in yellow-green grass
Step-by-step modeling of “Fox-sisters”
- From orange plasticine you need to roll a sausage, noticeably expanding towards the top.
The base of the mushroom will be shaped like a cone
- The wide part should be flattened and a funnel should be formed with your fingers. To make the fungus look more realistic, you need to apply notches-plates in stacks.
Notches will make the fungus more realistic
- Since chanterelles grow in families, it is advisable to make 3-4 mushrooms of different sizes. They need to be stuck on a green plasticine base, made from plasticine (two shades of green) and blades of grass. You can place a leaf on the hat, also fashioned or cut out of colored paper.
For chanterelles you need to make a stand and decorate the composition with grass and leaves
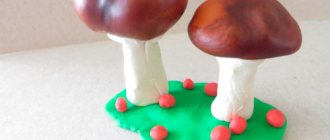
Step-by-step modeling “Handsome Fly Agaric”
- From white plasticine you need to roll out a sausage for the leg, slightly expanding it downwards. Additionally, a thin sausage is rolled out for the “skirt”.
The sausages will become the basis for the leg and skirt of the fly agaric
- The thin sausage should be flattened and stuck to the leg. The stack indicates notches.
You need to make stacked notches on the skirt
- A cap is formed from a red ball, pointed upward (the plasticine is pulled out to the sides with your fingers). Additionally, you need to make a white cake, the size corresponding to the hat.
The red hat needs to be given a cone shape with a recess inside
- A white cake is molded to the bottom of the cap; the stacks represent the plates.
The inside of the cap will be white with notches-plates.
- The outer side of the hat must be decorated with white spots.
White spots are a distinctive feature of the fly agaric
- All that remains is to connect the stem and cap - and the poisonous mushroom is ready. Like other mushrooms, it can be placed on a green stand representing grass.
The composition will be completed by a grass stand
Video: modeling a fly agaric from plasticine (master class)
Video: boletus mushrooms made of plasticine
Video: russula mushrooms made of plasticine (combined modeling method)
Motivating start to class
In the middle group, it is very important to motivate children to be creative and to attract their attention to the topic of mushrooms. The teacher creates a certain game situation, for example, you can use the following options:
- Queen Autumn appears (a doll in a matching costume). It turns out that she was walking through the forest and noticed that there were very few mushrooms there. There is a long winter ahead, and the forest animals will have to starve. Queen Autumn asks the kids to take care of the animals and make a lot of different mushrooms.
Queen Autumn asks the guys to take care of the animals - to make mushrooms so that they can store them for the winter
- A hedgehog comes to the group. It's his mom's birthday today. The animal wants to give her a basket of mushrooms, but does not have time to collect them.
One of the motivation options is that a hedgehog comes to the guys from the forest and asks them to make mushrooms for his mother’s birthday.
- The mushroom Borovik appears and invites the children to a fairy-tale forest clearing. To get there, you need to close your eyes and say the magic words. A squirrel is crying in the forest because she cannot find mushrooms for her cubs.
Mushroom Borovik invites children to a fairy-tale forest clearing
- During a lesson on the topic “Amanita,” the teacher tells the kids that for people this mushroom is inedible and poisonous, but for animals, on the contrary, it is useful. Children are invited to make fly agarics for moose and deer so that they do not get sick.
You can start a lesson on sculpting mushrooms by reading a nursery rhyme with the corresponding content:
- - Legs, legs, where have you been? - We went to the forest to pick mushrooms. - What were you little hands working on? - We were collecting mushrooms. - And you, little eyes, helped? - We searched and looked - We looked at all the stumps, Here is Vanyushka with the fungus, With the boletus!
There are many options for physical education and finger exercises on the topic of mushrooms. Such dynamic pauses will only increase interest in creativity.
Table: physical education
| Text | Movements |
| In the clearing, a mighty oak tree stretches its branches straight towards the cloud. | Stand on your toes, stretching - arms up |
| He generously hung acorns on branches in the middle of the forest. | Tilts left and right with arms raised |
| And mushrooms grow below, there are so many of them here today! | Turns left and right, hands on waist |
| Don’t be lazy and don’t be shy, lean over for mushrooms! | Forward bends |
| One - fungus and two - fungus, put them in the box. | Stand up, clasp your hands in front of you, simulating a box, take a deep breath |
Table: finger game “I’ll pick mushrooms”
| Text | Movements |
| I’m taking the basket to the forest, I’ll pick mushrooms there. My friend is surprised: “How many mushrooms are there around here!” | Children show surprise, spread their arms to the sides |
| Boletus, butterfly, boletus, honey fungus, fingers Boletus, chanterelle, milk mushroom - Let them not play hide and seek! Saffron milk caps, little waves I'll find them at the edge of the forest. I'm returning home, taking all the mushrooms with me. But I won’t carry the fly agaric. Let him stay in the forest! | Alternately bend the fingers on both hands, starting with the little finger of the right hand |
Implementation of an individual approach when sculpting mushrooms
Since the image of a mushroom in modeling can be embodied with varying degrees of complexity, this topic is very suitable for implementing an individual approach in class. Thus, children who have well-developed fine motor skills can work on the craft in more detail, marking the “skirt” of the mushroom and drawing notches-plates in a stack.
The same applies to the number of elements of the composition. As part of the theme “Mushrooms in the Meadow,” some will make just two mushrooms, while others will make a whole large family.
When sculpting mushrooms, you can successfully use an individual approach
Composition options based on theme
In the visual arts program for the middle group, mushroom sculpting is offered to children in October (after all, these are the same gifts of autumn as vegetables and fruits). The topic can be defined more specifically, for example, “Handsome Fly Agaric” or “Boletus”, focusing on the characteristics of a particular mushroom.
You can suggest a topic such as “Mushrooms for a hedgehog” (squirrels, forest animals). The teacher plays out a specific image of an animal in the motivational part of the lesson.
In addition, the children can sculpt mushrooms in the clearing. This can be individual (3-4 mushrooms on the grass) or a collective composition. In the second case, the teacher prepares a large base: it can be a sheet of A3 cardboard, painted green, artificial grass, moss, etc.
The clearing (the basis for collective modeling) is prepared by the teacher using cardboard, paper, artificial grass and other materials
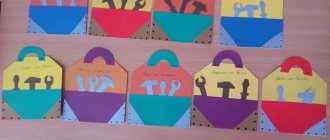
Another version of the theme is “Basket with mushrooms.” Again, it can be played out as individual and collective work. The children can make small baskets where they will place their mushrooms (several pieces), or the teacher prepares a basket in advance (for example, from cardboard strips), and the children put their mushrooms there.
Each child builds a basket in the most convenient way
During the lesson you can also sculpt mushrooms and berries (fruits of the forest) at the same time. For example, on the cap of a large mushroom or next to it there may be a raspberry or a sprig of currant made of plasticine.